Quickstart Divisimate 2
Choose your DAW:
In this quickstart we will go through the steps to send the individual notes from 4-note chords to four different instruments in Ableton Live
Divisimate 2 can be used either in standalone mode or as a plugin. If you want to use standalone mode keep reading. If you want to use Divisimate 2 as a plugin, scroll to Divisimate 2 Plugin Setup.
Divisimate 2 Standalone Setup
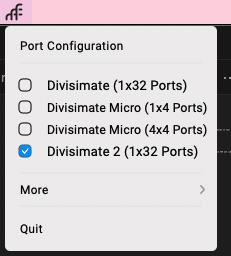
- Open Divisimate and make sure that the correct port configuration for the software is selected in the sytem tray (win) / menu bar (mac).
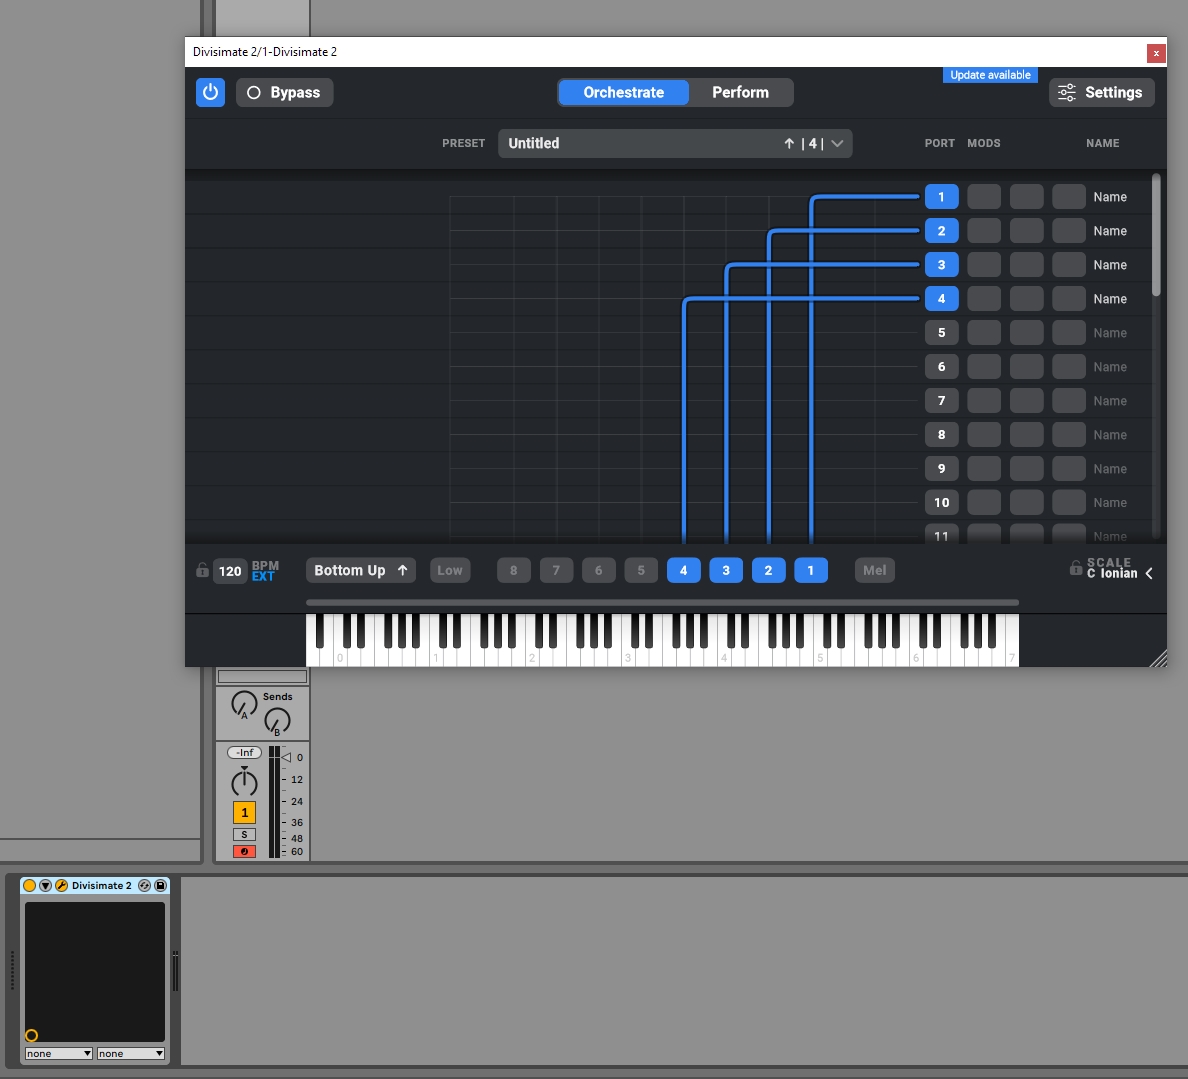
- Manually activate 4 voices in the lower part of the GUI above the keyboard by clicking on ‘4’ and connect the 4 voices to the first 4 Out-Ports on the right by clicking in the matrix.

Alternatively you can load the factory preset “4vc – 4 parts” on the perform page.
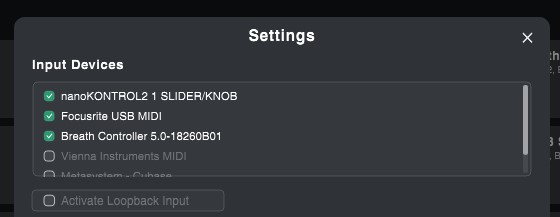
- Make sure that your MIDI input device is activated in the settings.
Now open a new session in Ableton Live and continue with the > Track Setup.
Divisimate 2 Plugin Setup
- Open a new session in Ableton Live and delete all default tracks, leave one MIDI track.
- Load the VST3 instrument plugin Divisimate 2 into this track.
- Make sure that the correct port configuration for the software is selected in the Nextmidi Hub in the sytem tray (win) / menu bar (mac)”.
- Manually activate 4 voices in the lower part of the GUI above the keyboard by clicking on ‘4’ and connect the 4 voices to the first 4 Out-Ports on the right by clicking in the matrix.
- On the Divisimate 2 track choose your MIDI controller as input.
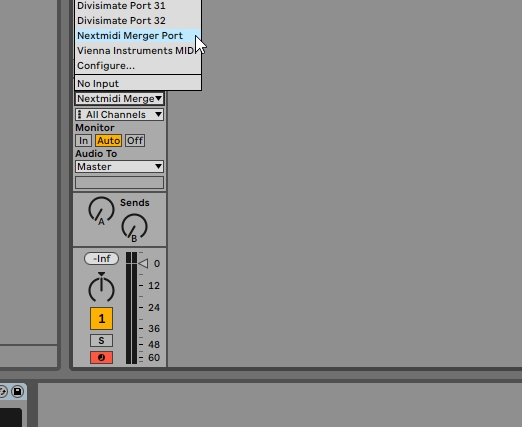
If you use multiple controllers, activate the > Nextmidi Merger Port in the Nextmidi Hub, choose the controllers that should be merged and select the Nextmidi Merger Port as your input for the Divisimate 2 track. Don’t leave it to All Ins since this will create a feedback loop!
Track Setup
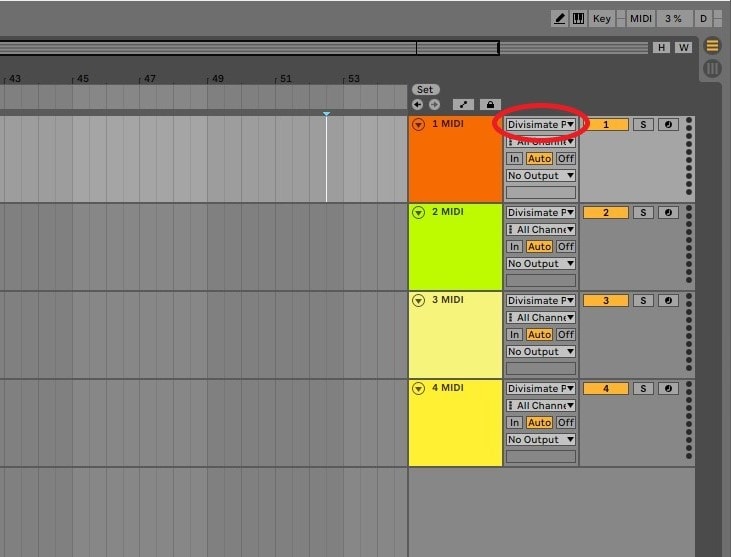
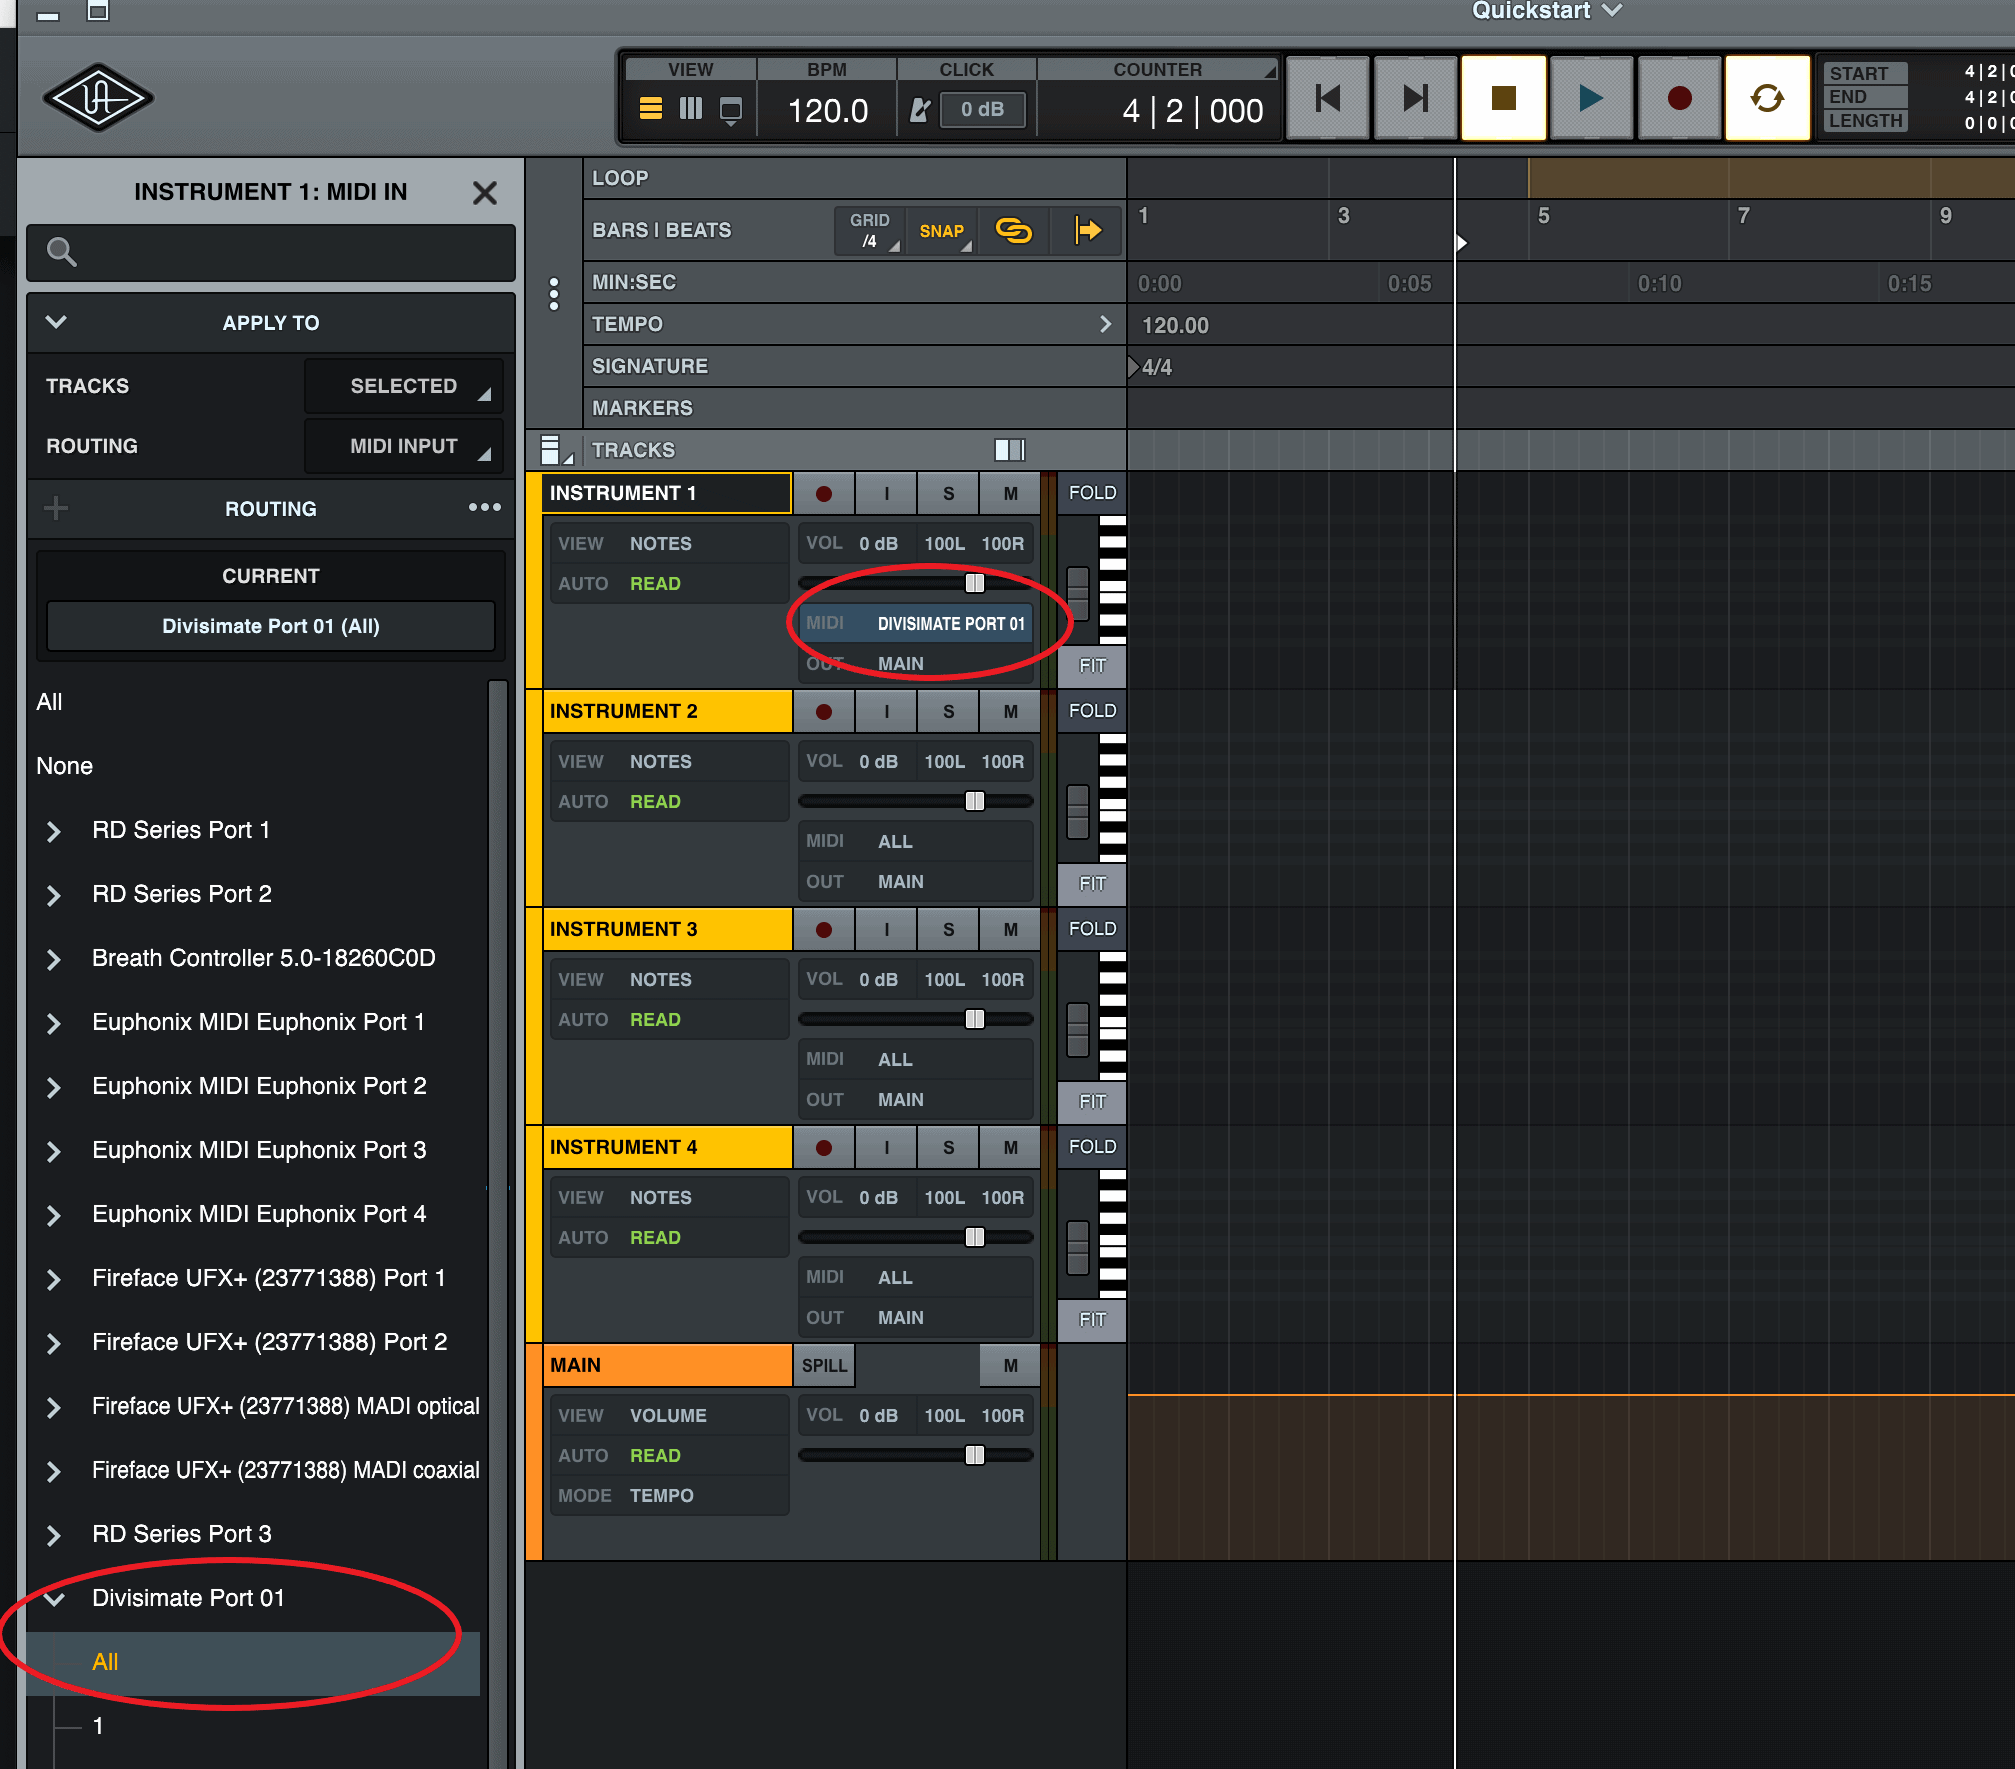
- Create four new 4 MIDI-Tracks.
- Preferably switch to the Arrangement View by clicking the icon in the upper right corner or by pressing TAB
- Set the first track’s midi-input from All Ins to Divismate Port 01, the following track’s midi input to Divisimate Port 02 and so on. To play the 4-voice-preset you built in Divisimate, you need to connect at least Port 01-04.
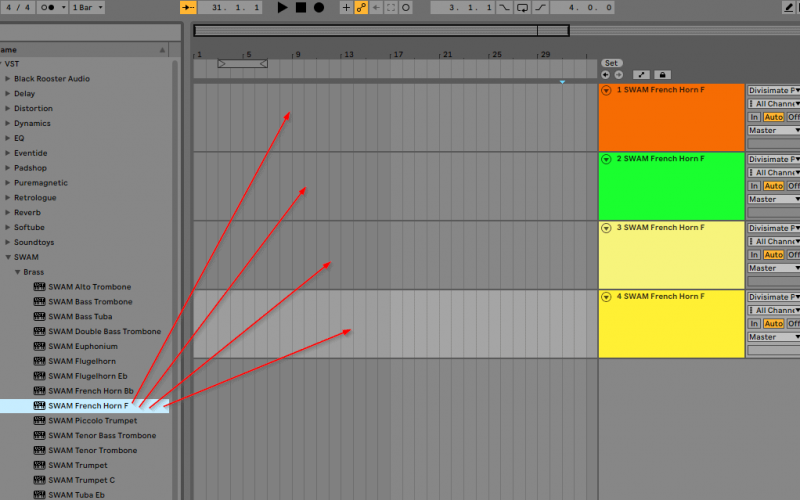
- Add instruments to all the tracks. In order to do this, simply drag an instrument to each of the four tracks.
- Select all tracks then record-enable them by Ctrl/Cmd-clicking the arm buttons.
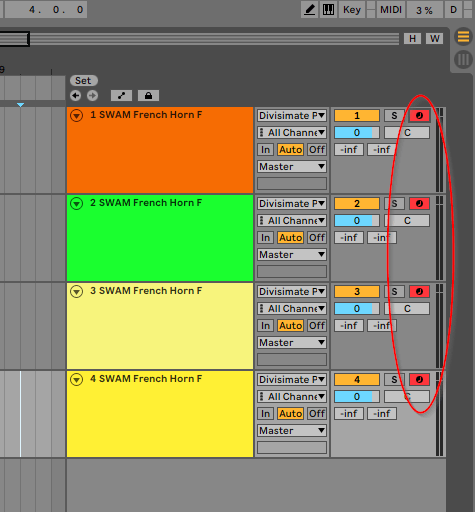
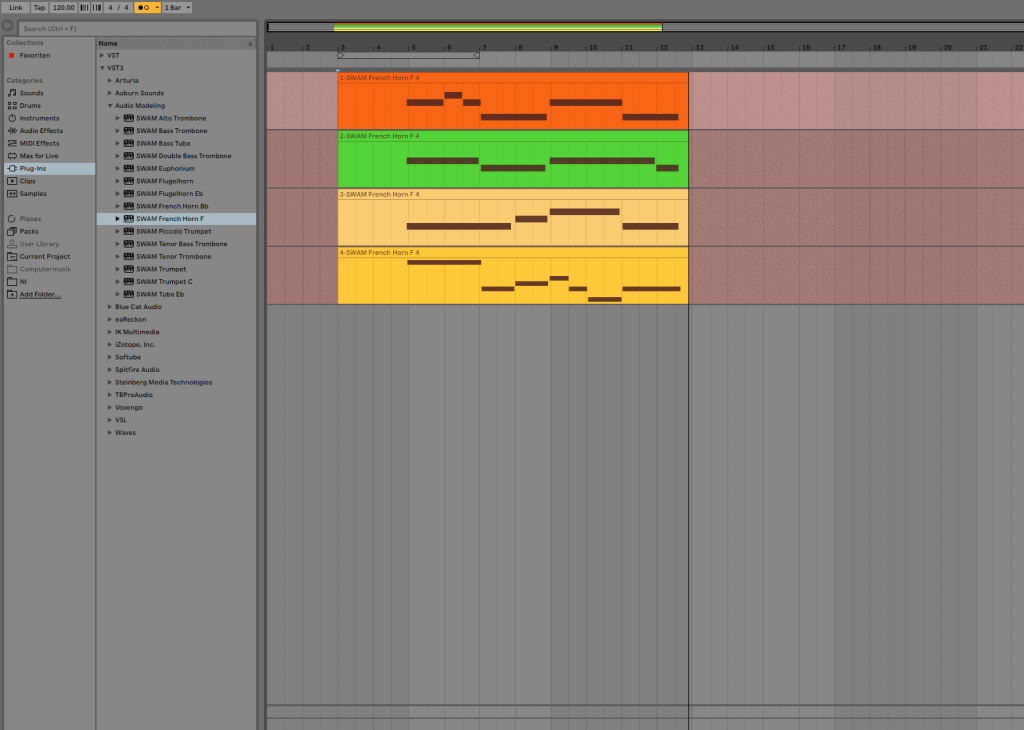
- Now you can play the four instruments with Divisimate and record the result in Ableton Live!
Important Settings
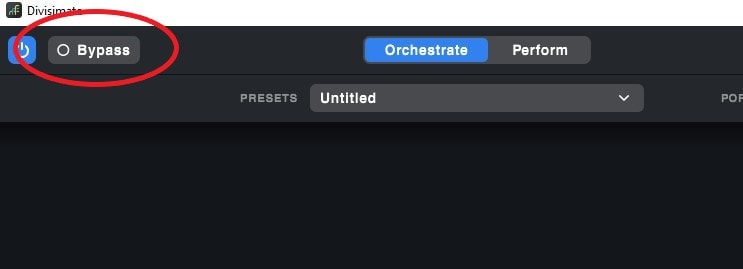
If you want to go back to working the traditional way track-by-track, simply press ‘Bypass’ or the shortcut b in Divisimate. Divisimate will then send all midi events and CCs directly through to all ports without any delay or latency. This way you can just record enable any track.
Careful: If you have instruments using the option “All MIDI In”, you should use the power button (or the ESC key) to turn Divisimate off when you record those instruments to avoid note duplicates.
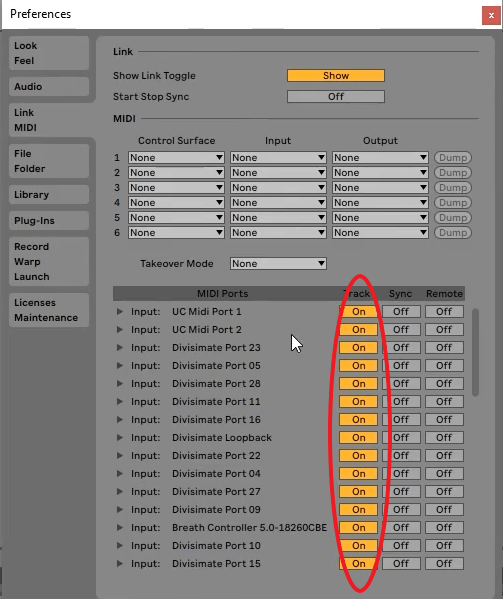
If the Divisimate Ports are not displayed in the input selection menu of your tracks make sure that the ports are enabled for tracks in the preferences.
Additional Ressources
Creating a Loopback Track in Ableton Live
Skip to 9:09 to learn how to set up a loopback track in Ableton.
Note: On Mac the use of the Loopback Track adds some additional latency in Ableton Live based on the buffer size.
In this tutorial we will go through the steps to send the individual notes 4-note chords to four different instruments in Bitwig.
Bitwig has a limit of 512 maximum MIDI input streams, where each channel and the “All Channels” option are counted. That puts the maximum number of input ports usable in Bitwig at 30, which is just shy of the 32 ports of Divisimate. This means to address 32 parts in Bitwig, we need to use Divisimate in Logic Mode. The use of multitimbral ports is unfortunately not possible until Bitwig rectifies this limitation. We also do not recommend using the plugin version of Divisimate in Bitwig.
Setup Divisimate
- Open Divisimate and make sure that the correct port configuration for the software is selected in the sytem tray (win) / menu bar (mac).
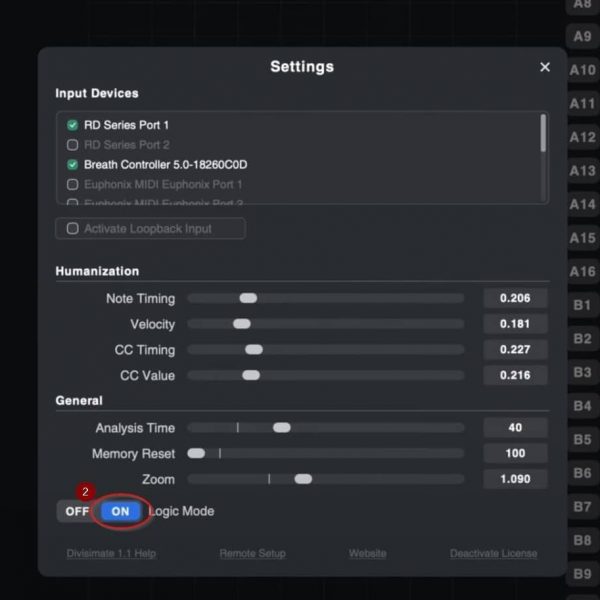
- Go to Settings and activate Logic Mode
- Manually activate 4 voices in the lower part of the GUI above the keyboard by clicking on ‘4’ and connect the 4 voices to the first 4 Out-Ports on the right by clicking in the matrix.
Alternatively you can load the factory preset “4vc – 4 parts” on the perform page.
- Make sure that your MIDI input device is activated in the settings.
Setup Bitwig
- Open a new project in Bitwig.
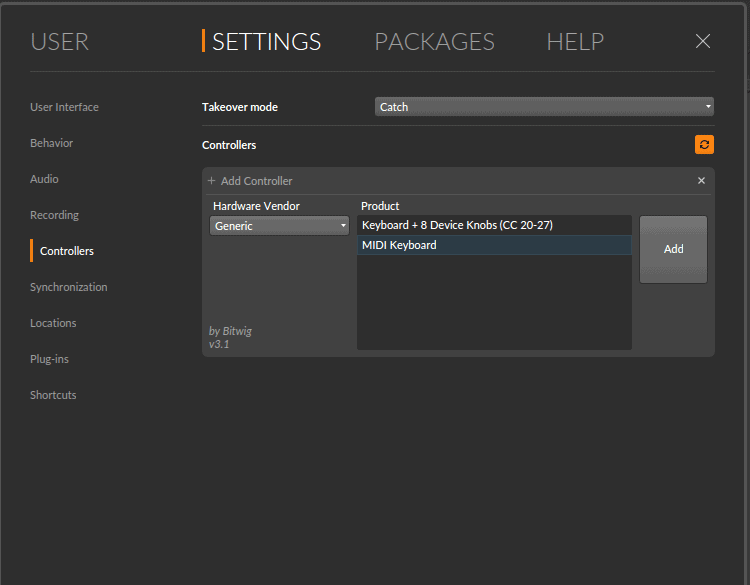
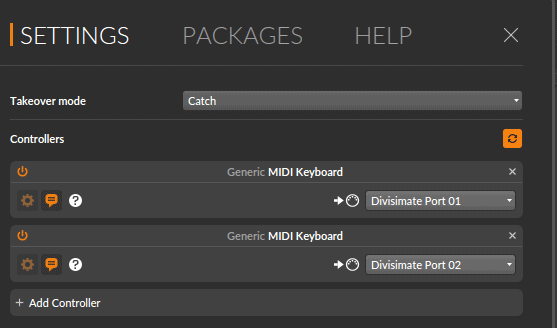
- Go to “Settings” -> “Controllers” and click on “+ Add Controller”.
Then choose “MIDI Keyboard” and click on “Add”.
- On this newly added Controller choose “Divisimate Port 01” as input device.
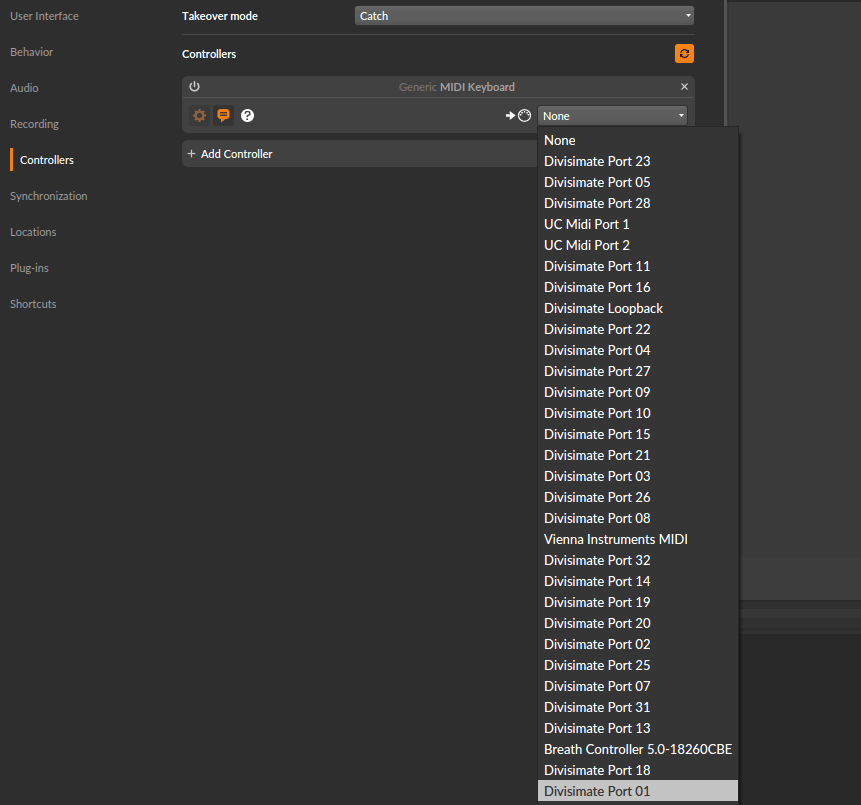
- Repeat this process, add another controller this time choose “Divisimate Port 02”.
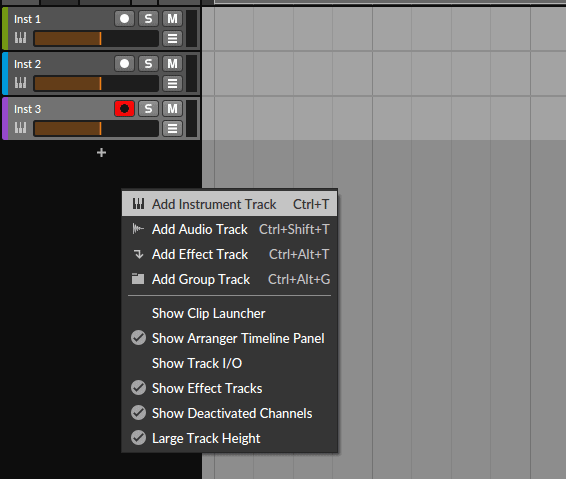
- Go back to your project in the “Arrange” view and add four new instrument tracks. Load the instruments of your choice on these tracks.
- Select the first instrument track and in the input menu above the fader in the lower left choose “Divisimate Port 01 – Channel 1”.
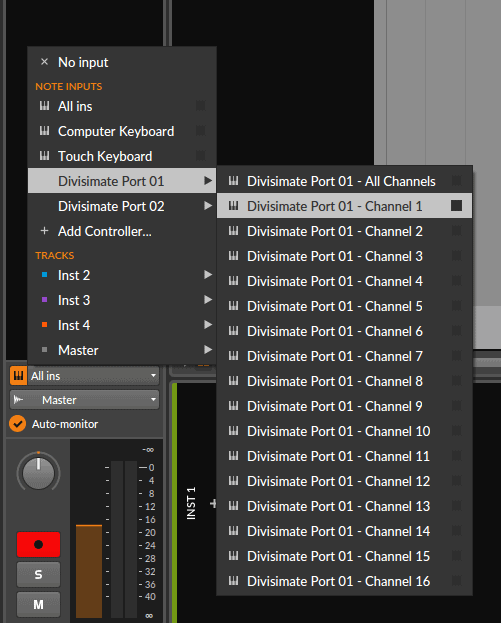
Repeat this process and have each track receive from acscending channel of Divisimate Port 01.
After this the second track should have “Divisimate Port 01 – Channel 2”, the third one “Divisimate Port 01 – Channel 3” and the fourth “Divisimate Port 01 – Channel 4.
- Now just record enable all four tracks and then you’re done!
You can play those four tracks together as an ensemble through Divisimate. The same method can be used to build larger templates using all the 32 Divisimate ports. The ports A-1 to A-16 represent the channels 1-16 of Divisimate Port 01 while the Ports B-1 to B-16 represent channel 1-16 of Divisimate Port 02.
Have fun orchestrating and composing!
Important Settings
If you want to go back to working the traditional way track-by-track, simply press ‘Bypass’ or the shortcut b in Divisimate. Divisimate will then send all midi events and CCs directly through to all ports/channels without any delay or latency. This way you can just record enable any track alone and play them as if Divisimate was not there.
Careful: If you have instruments using the option “All MIDI In”, you should use the power button (or the ESC key) to turn Divisimate off when you record those instruments to avoid note duplicates.
In this quickstart we will go through the steps to send the individual notes from 4-note chords to four different instruments in Cakewalk by Bandlab with the standalone version of Divisimate 2.
Setup Divisimate
- Open Divisimate and make sure that the correct port configuration for the software is selected in the sytem tray (win) / menu bar (mac).
- Manually activate 4 voices in the lower part of the GUI above the keyboard by clicking on ‘4’ and connect the 4 voices to the first 4 Out-Ports on the right by clicking in the matrix.
Alternatively you can load the factory preset “4vc – 4 parts” on the perform page.
- Make sure that your MIDI input device is activated in the settings.
Setup Cakewalk
- Open a new project in Cakewalk.
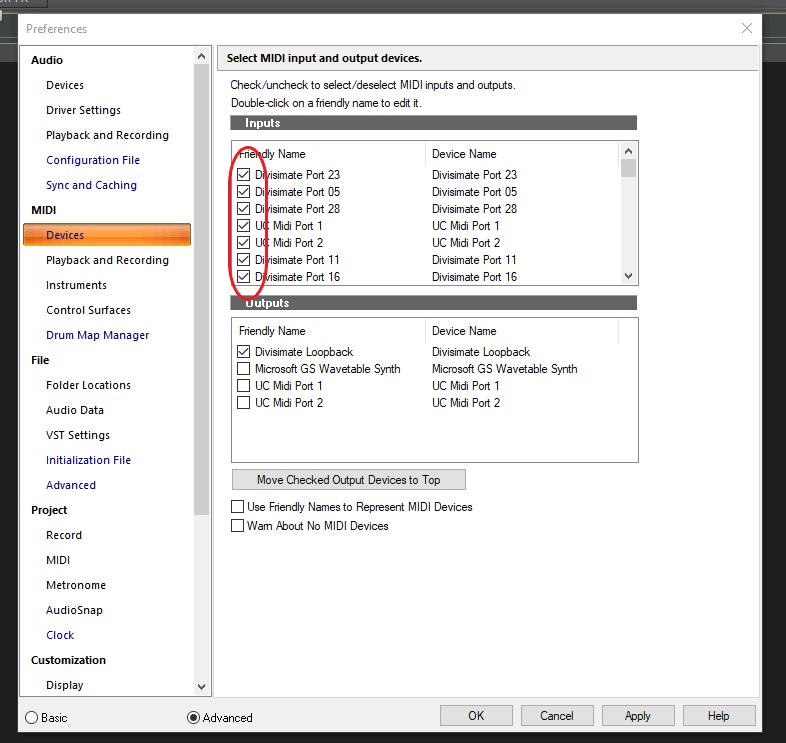
- Go to the Preferences/MIDI/Devices and make sure that all Divisimate Ports are activated. Unfortunately Cakewalk does not sort MIDI ports by name, so they may appear out of order in the list of inputs.
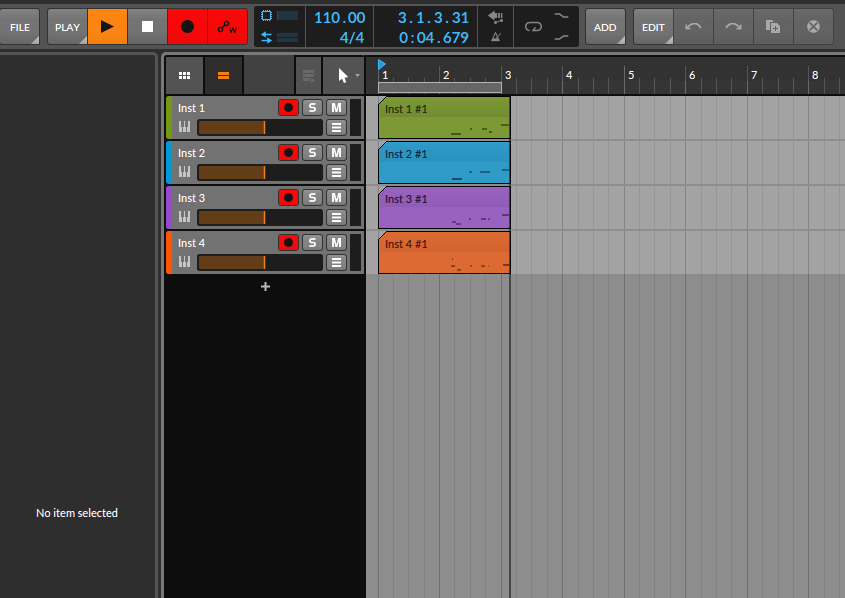
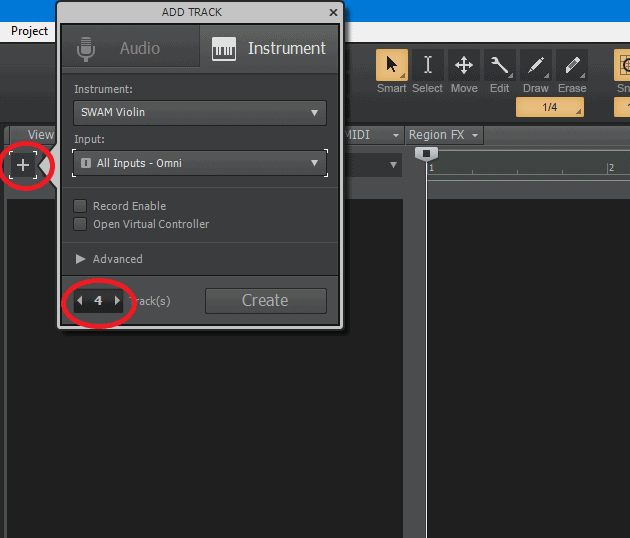
- Create 4 instrument tracks with the instrument of your choice.
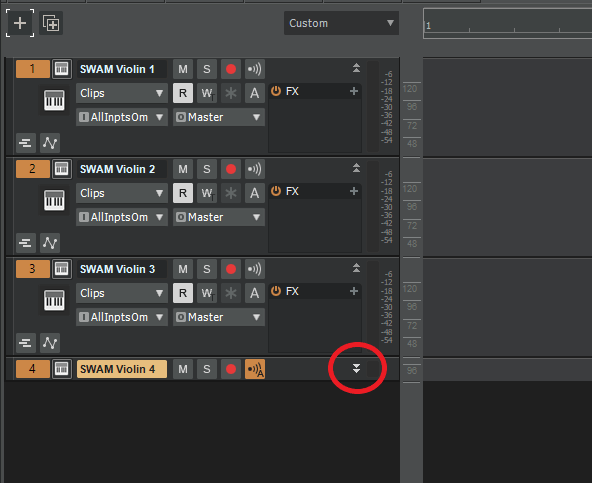
- Extend the view of the tracks by clicking on the “Restor Strip Size Arrow” to see all input/output options.
- Click on the input menu for the first track and select “Divisimate Port 01” and “MIDI Omni” to receive all channels of that port on that track. Repeate the same for the other three tracks and Divisimate Port 02, 03 and 04
- Record-enable and activate input echo on all four tracks to record and hear them together.
- And done! Now you can play those four tracks together as an ensemble through Divisimate. The same method can be used to build larger templates using all the 32 Divisimate ports. Have fun orchestrating and composing!

Important Settings
If you want to go back to working the traditional way track-by-track, simply press ‘Bypass’ or the shortcut b in Divisimate. Divisimate will then send all midi events and CCs directly through to all ports without any delay or latency. This way you can just record enable any track alone and play them as if Divisimate was not there.
Careful: If you have instruments using the option “All MIDI In”, you should use the power button (or the ESC key) to turn Divisimate off when you record those instruments to avoid note duplicates.
In this tutorial we will go through the steps to send the individual notes of 4-note chords to four different instruments in Camelot Pro with the standalone version of Divisimate 2. We will also provide a quick way to set up all 32 Divisimate ports in Camelot Pro. In our example we will create a playable string quartet using the SWAM Solo Strings by Audio Modeling. You can download our example template by scrolling down to the chapter Demo Template.
Setup Divisimate
- Open Divisimate and make sure that the correct port configuration for the software is selected in the sytem tray (win) / menu bar (mac).
- Manually activate 4 voices in the lower part of the GUI above the keyboard by clicking on ‘4’ and connect the 4 voices to the first 4 Out-Ports on the right by clicking in the matrix.
Alternatively you can load the factory preset “4vc – 4 parts” on the perform page.
- Make sure that your MIDI input device is activated in the settings.
Setup Camelot Pro
- Create a new empty scene from scratch.
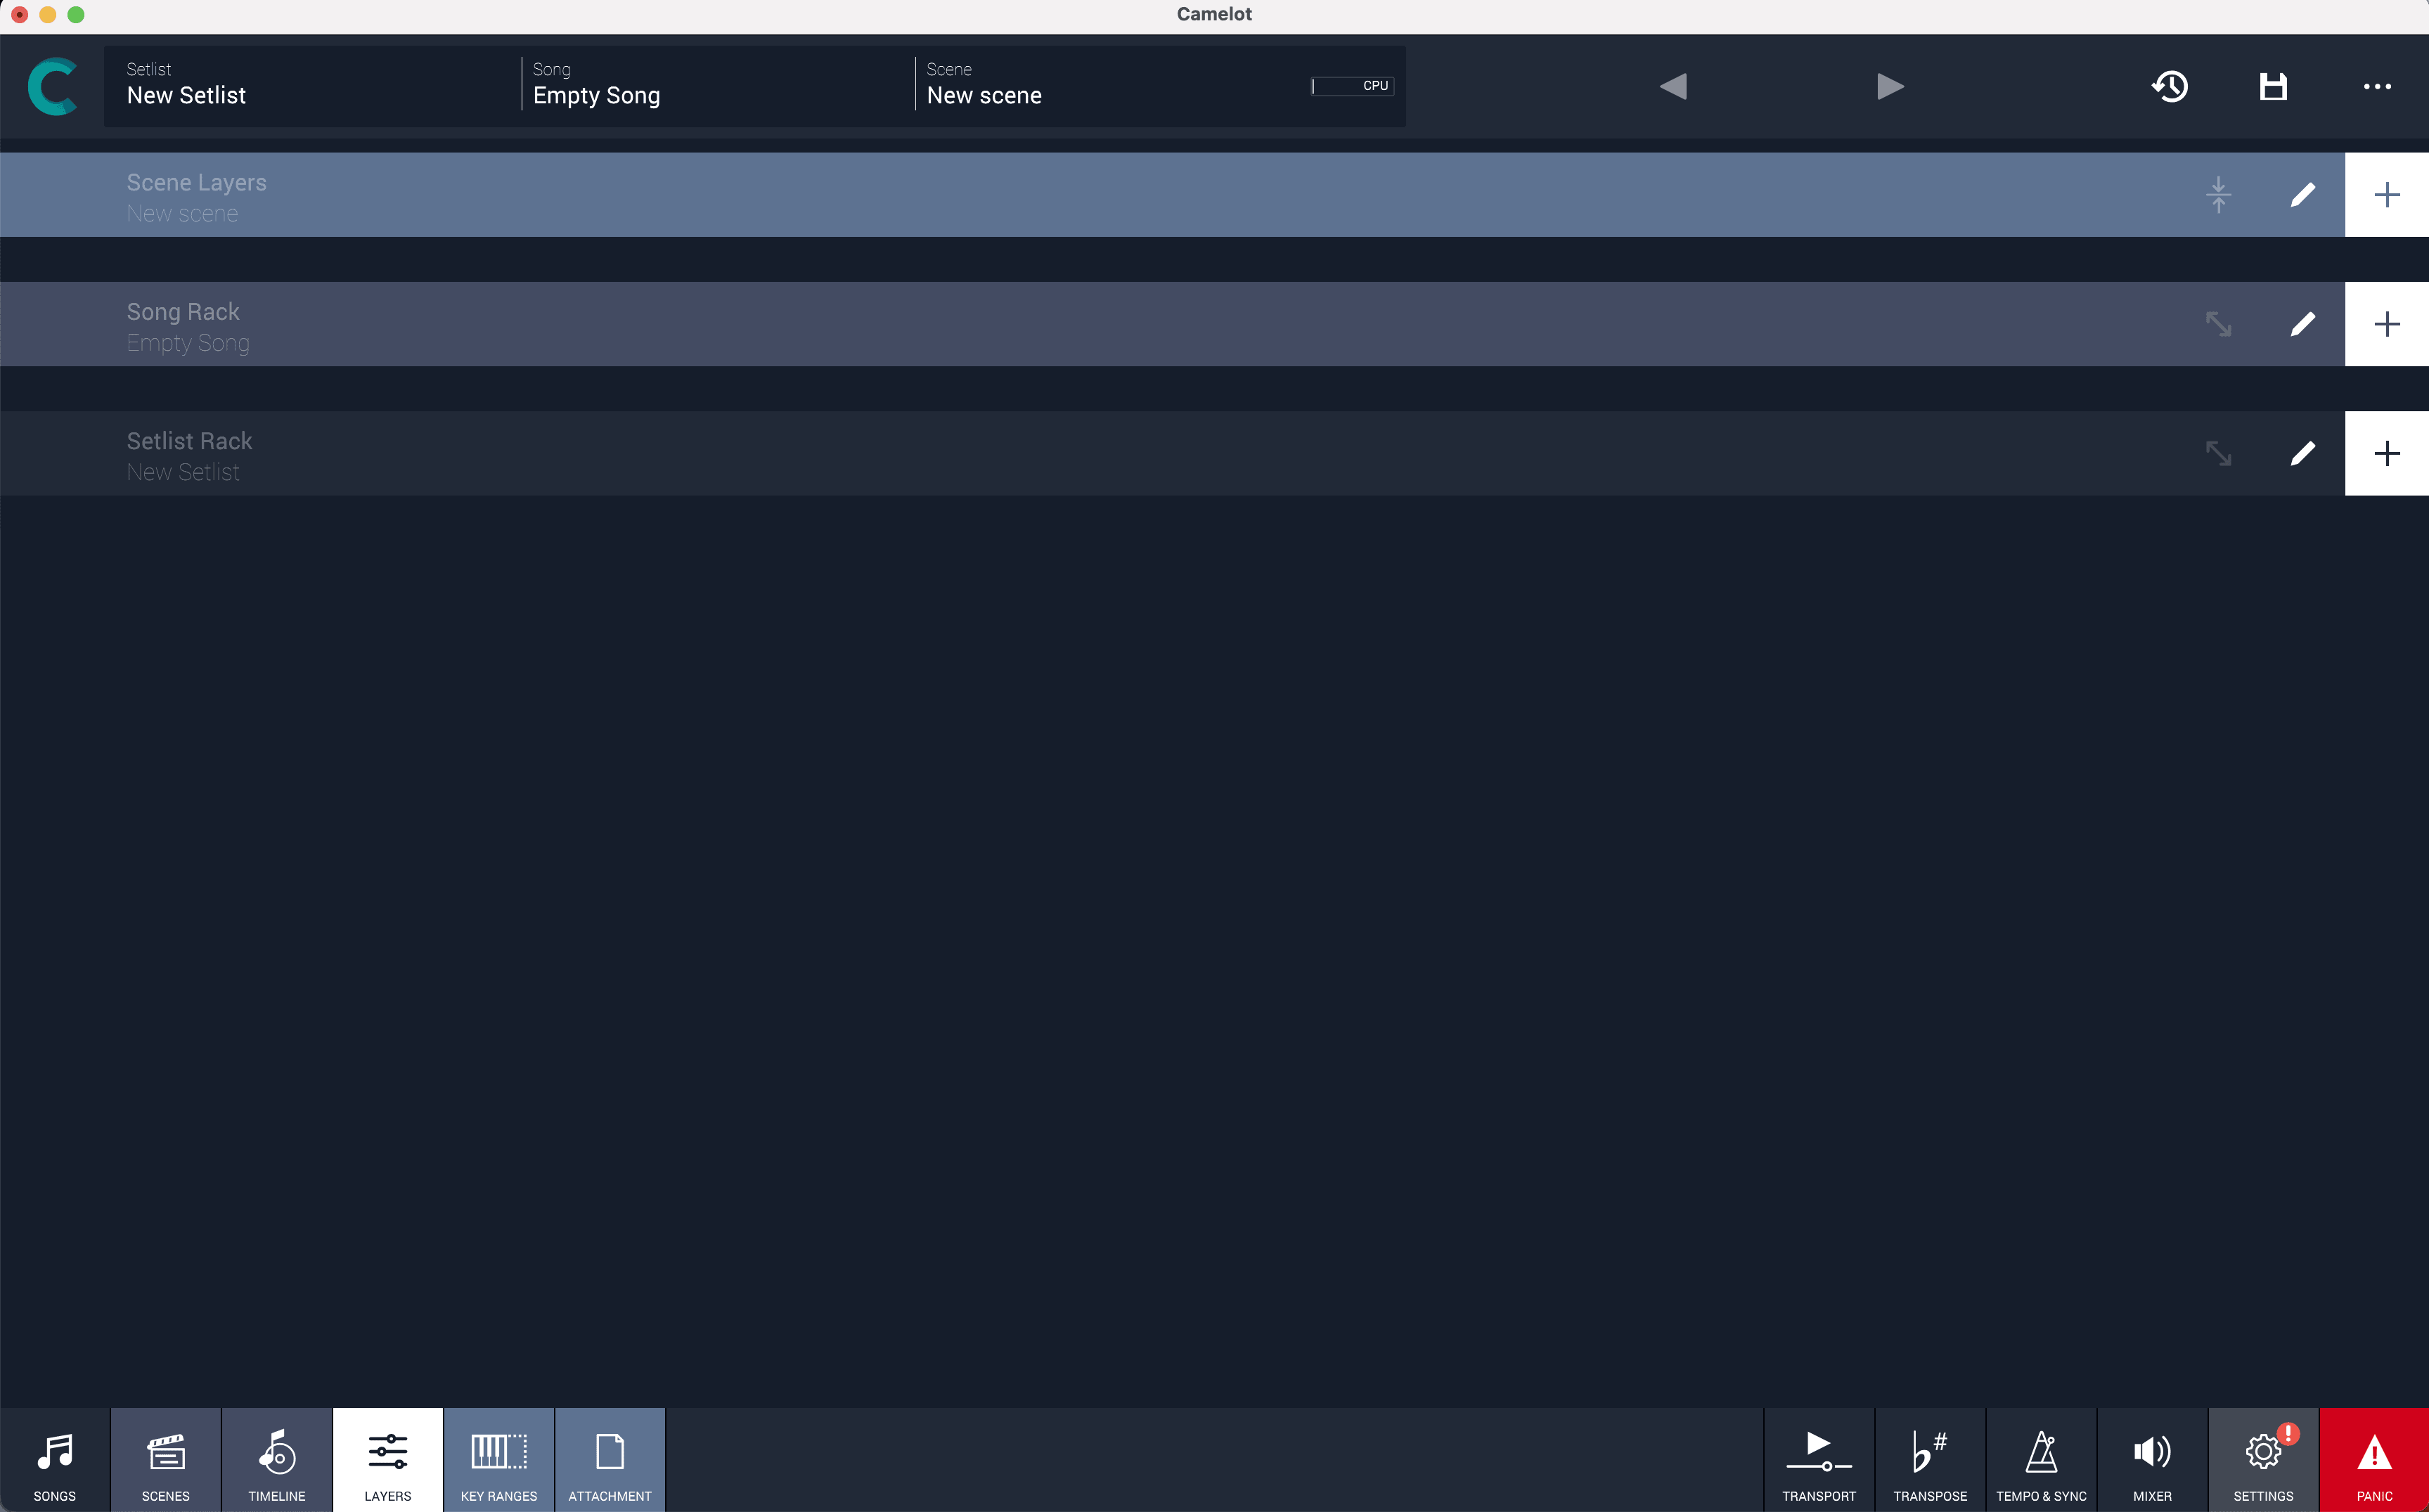
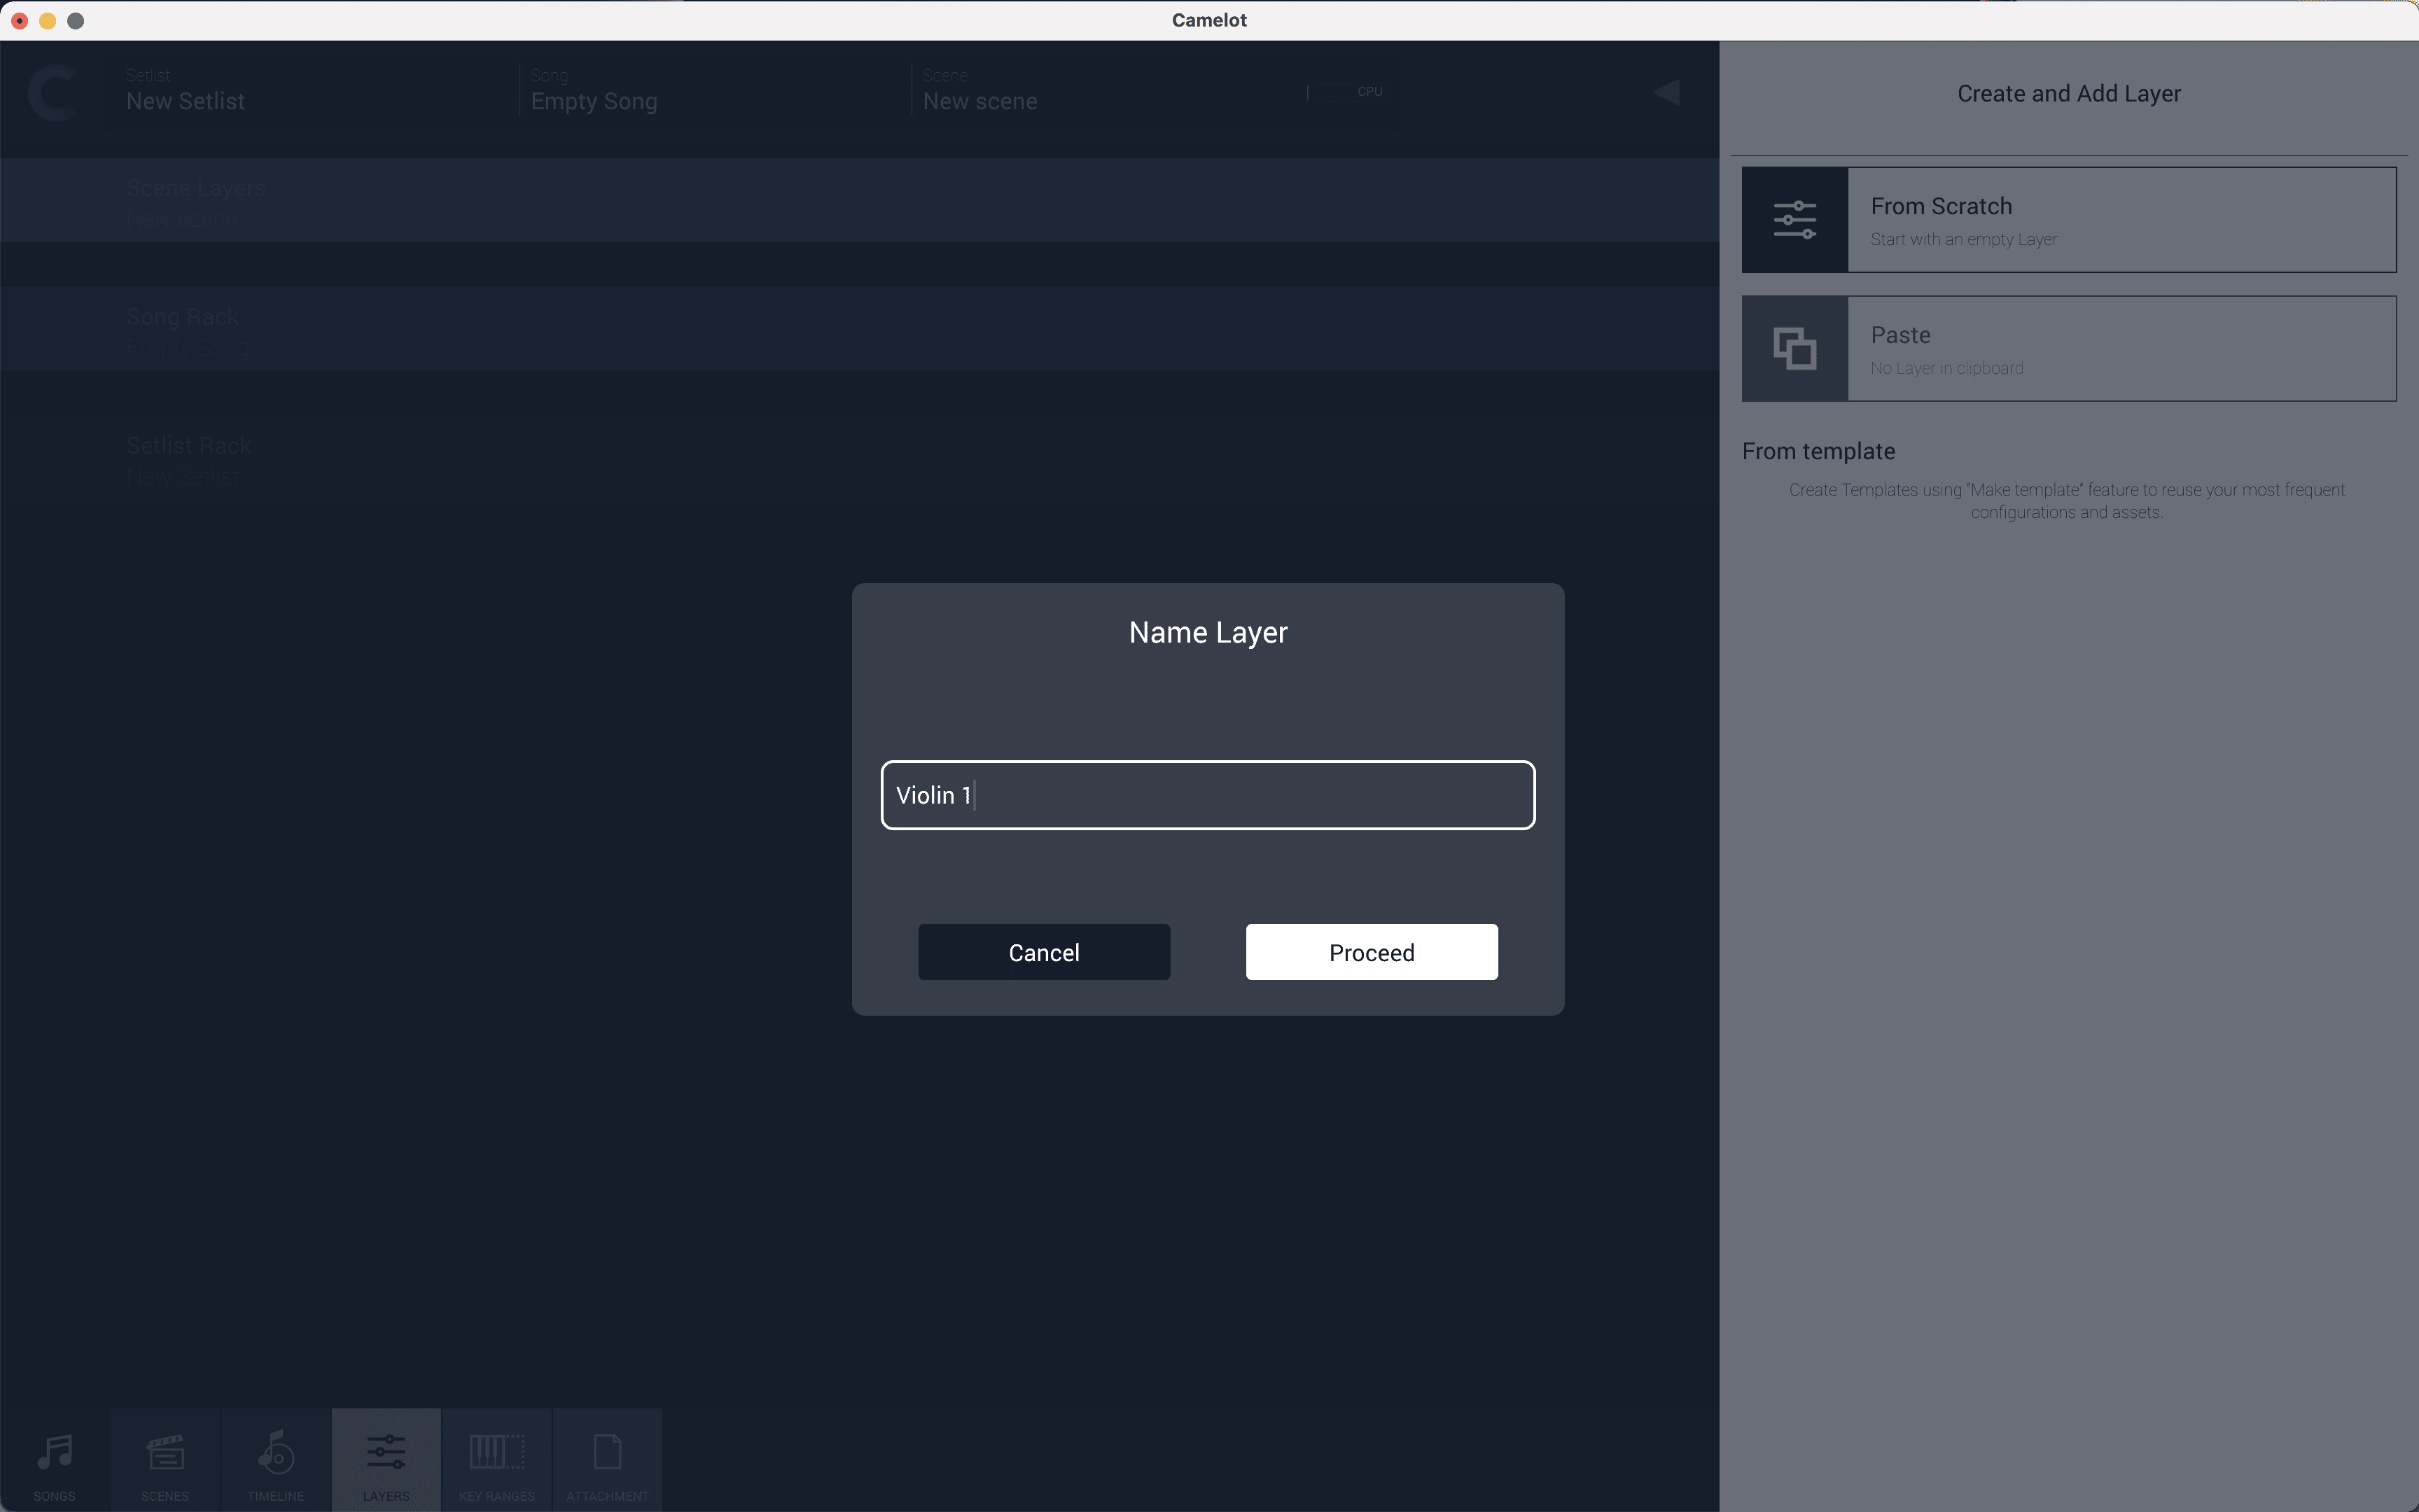
- Click on the plus icon on the top right to add a new layer. For our String Quartet, the name of the first Layer we will create is “Violin 1”.
- Add three more layers to have a total of four layers in your scene.
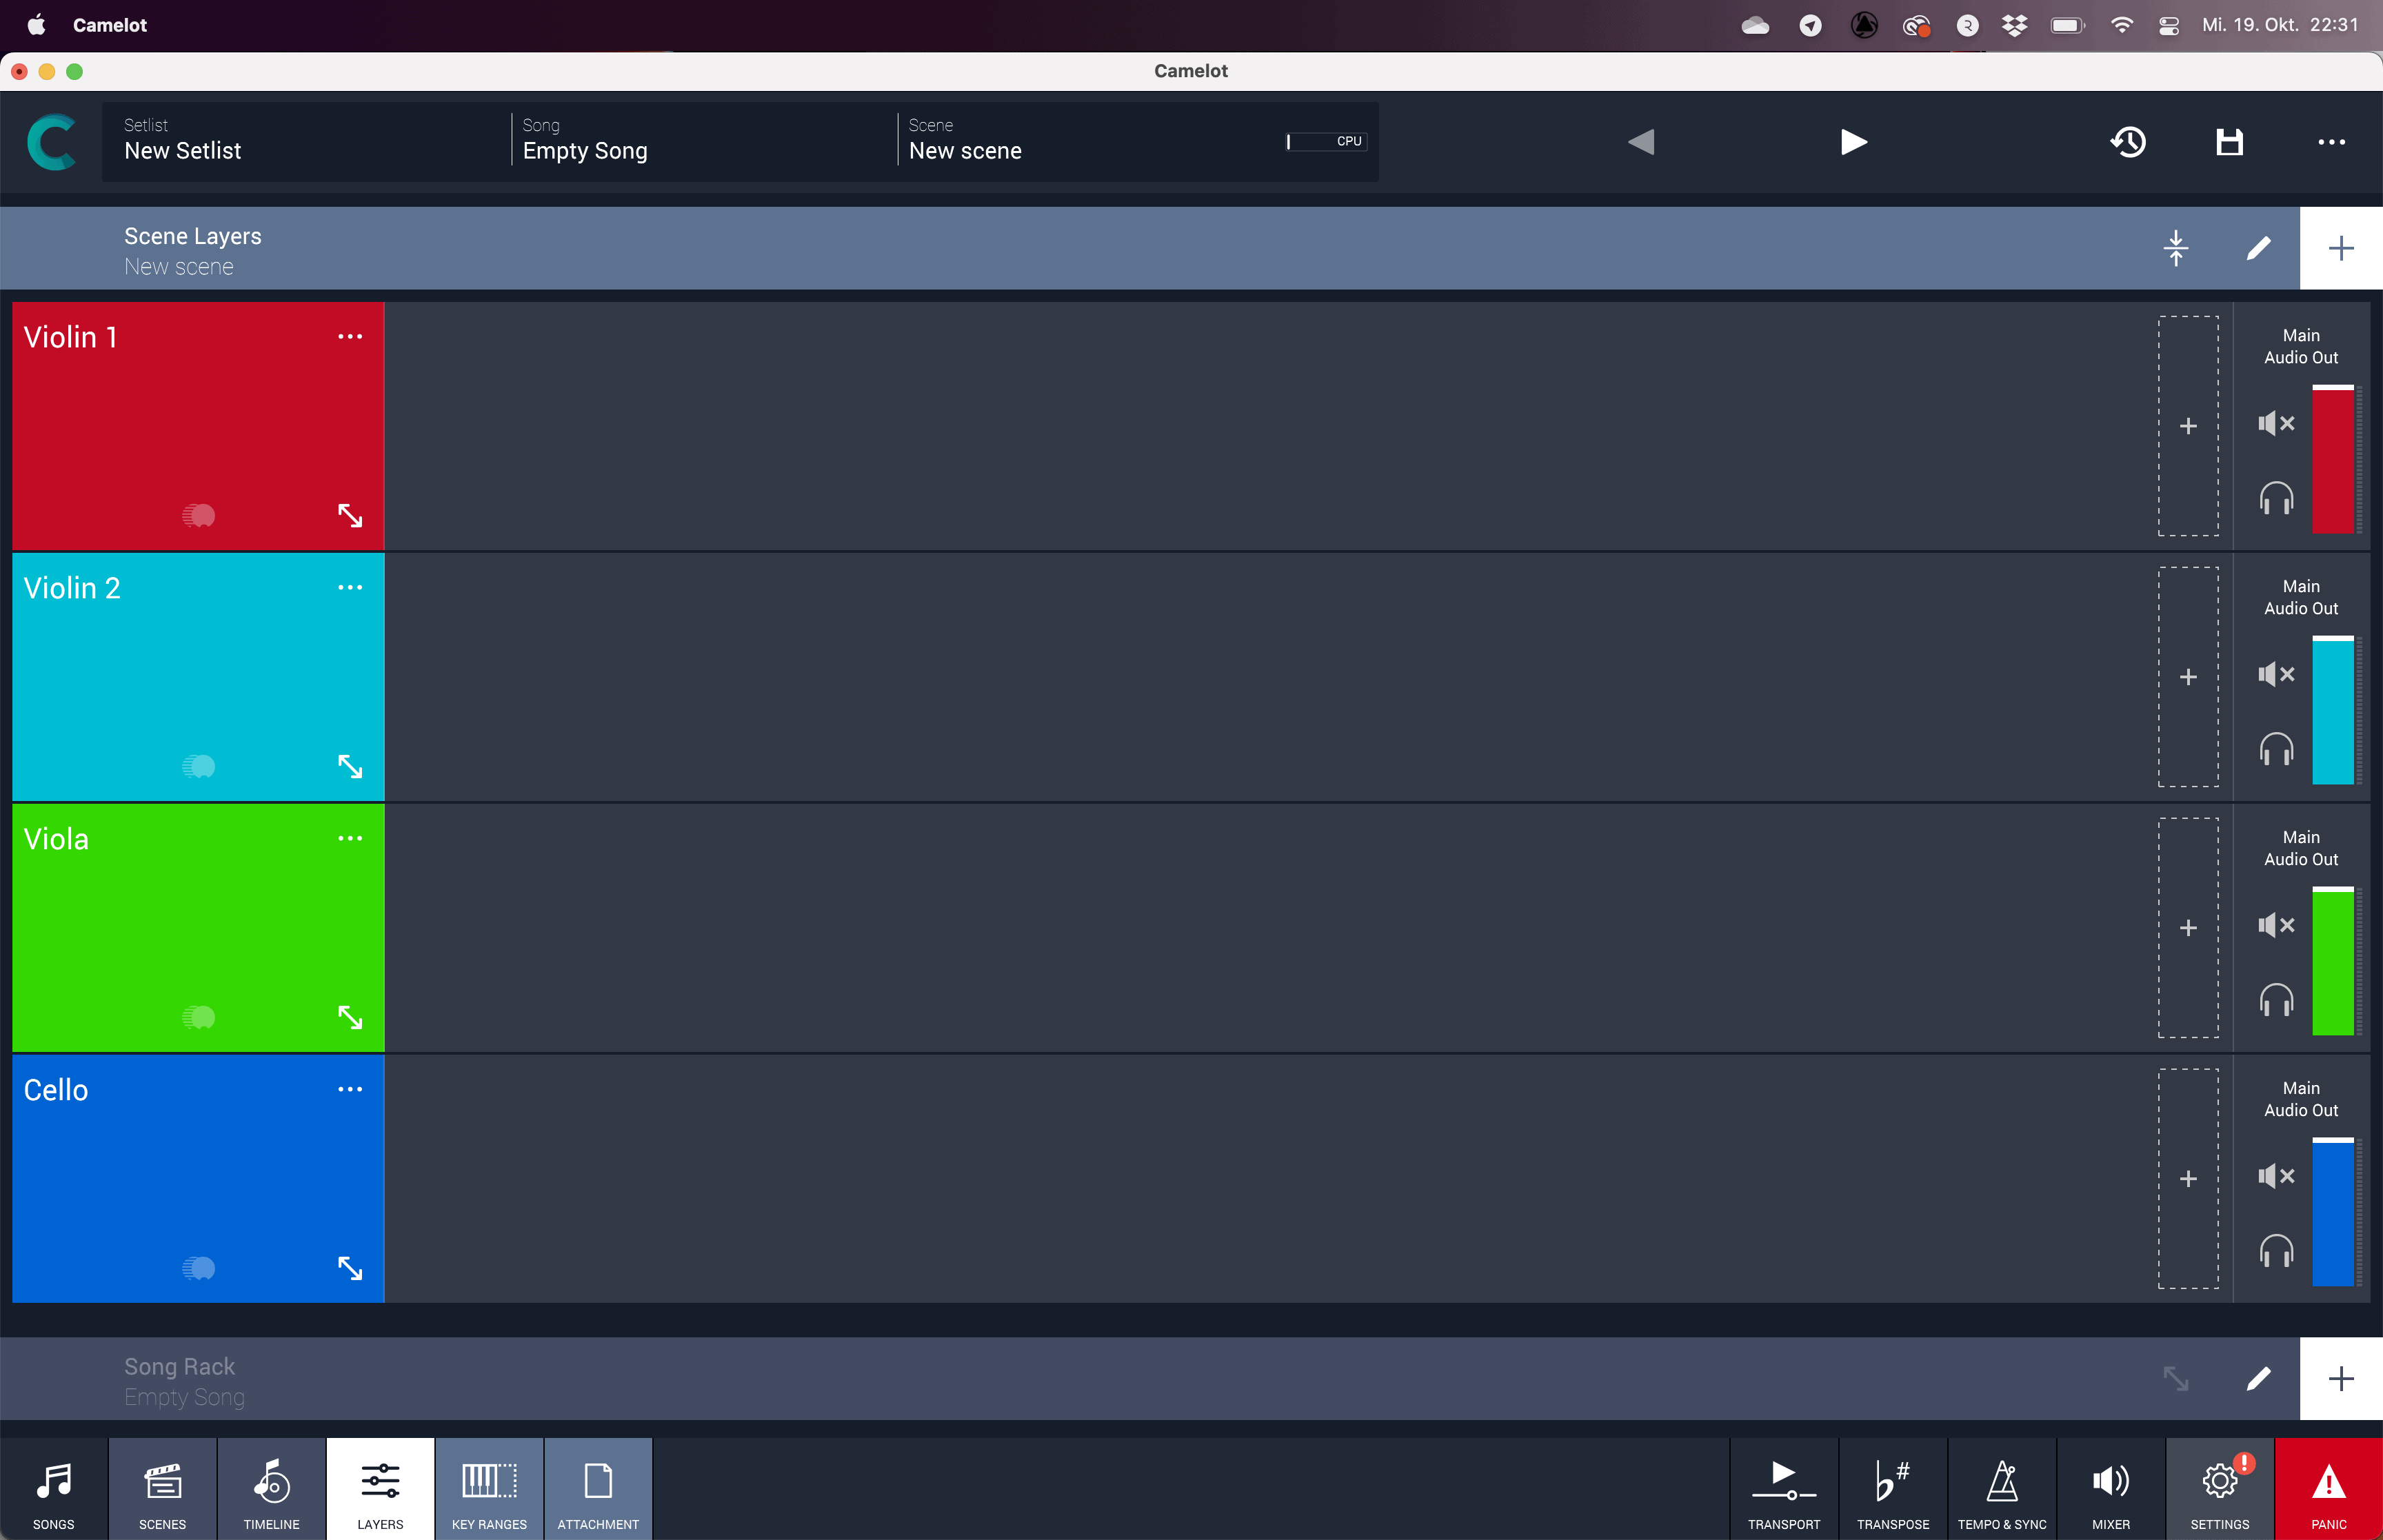
- Click on the layer area to access the input settings. Choose the MIDI Inputs tab. If you can not see any Divisimate Ports make sure that the “show all devices” option is activated.
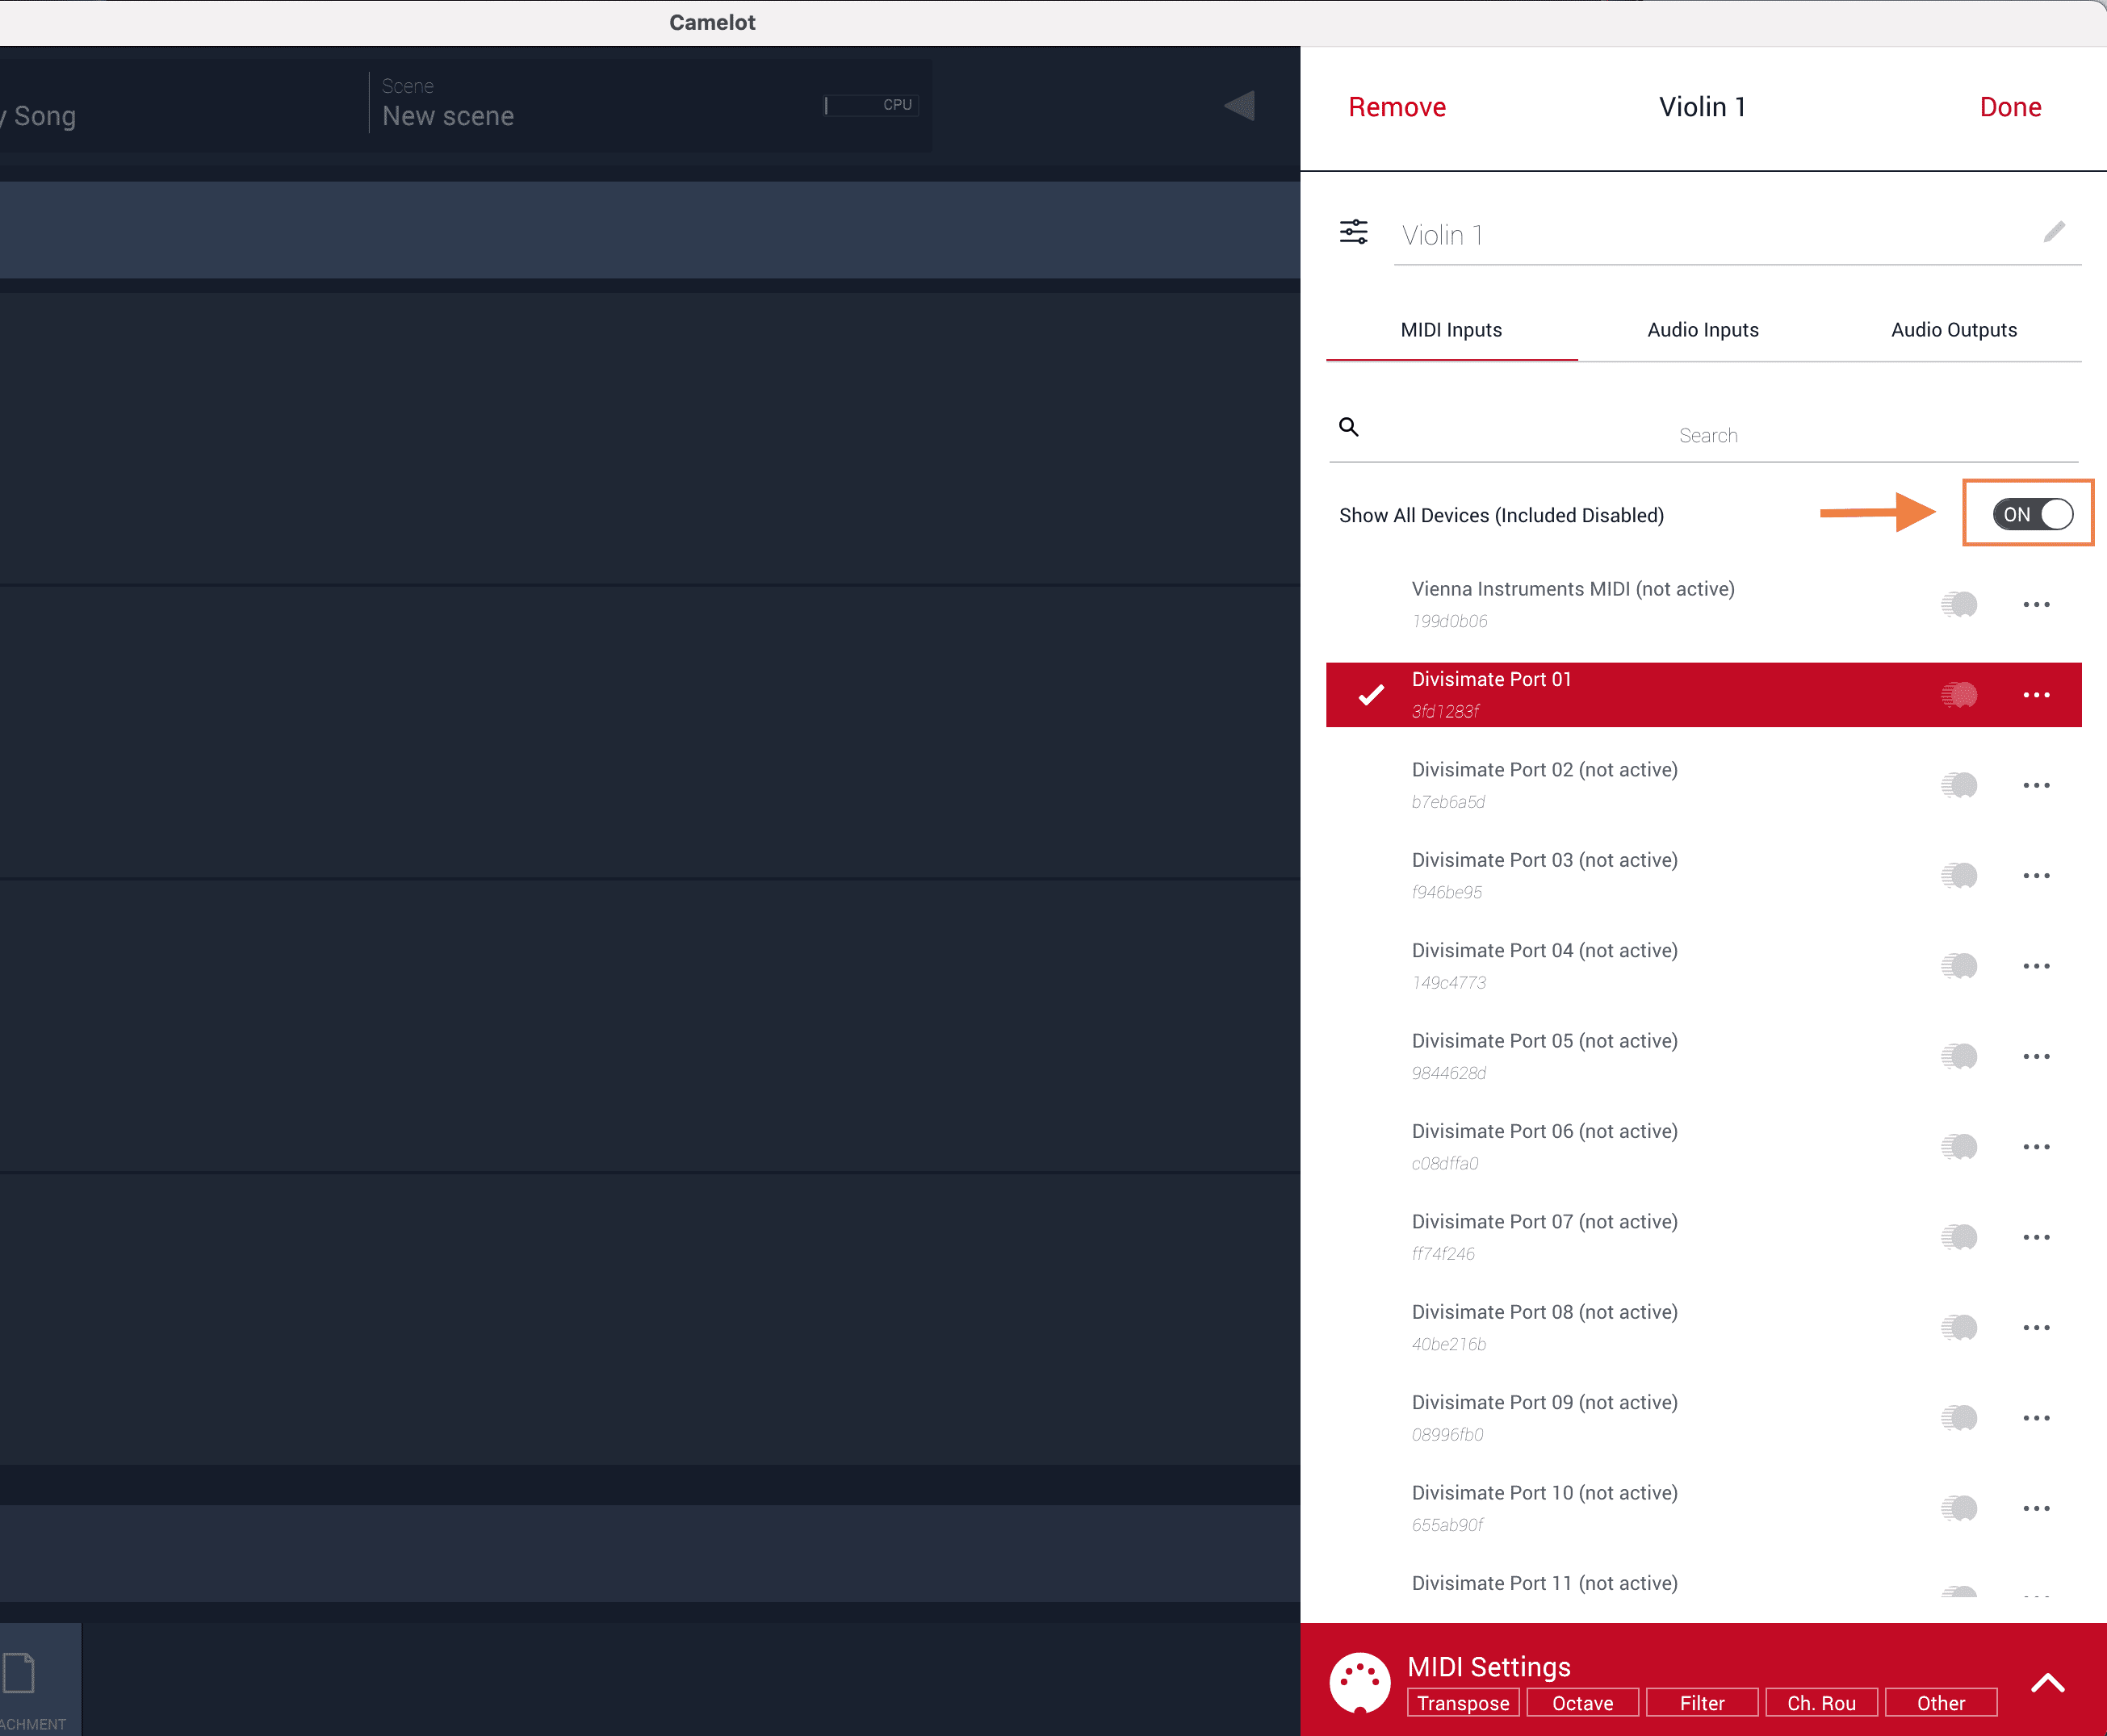
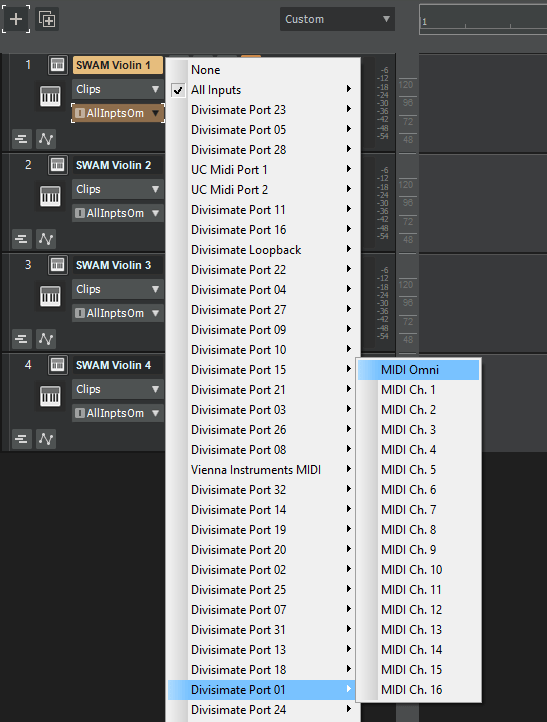
- From the list of available MIDI inputs choose “Divisimate Port 01” for your first layer, then repeat the process and choose Port 02, 03 and 04 for the subsequent layers. You now have four layers each receiving from a different Divisimate Port.

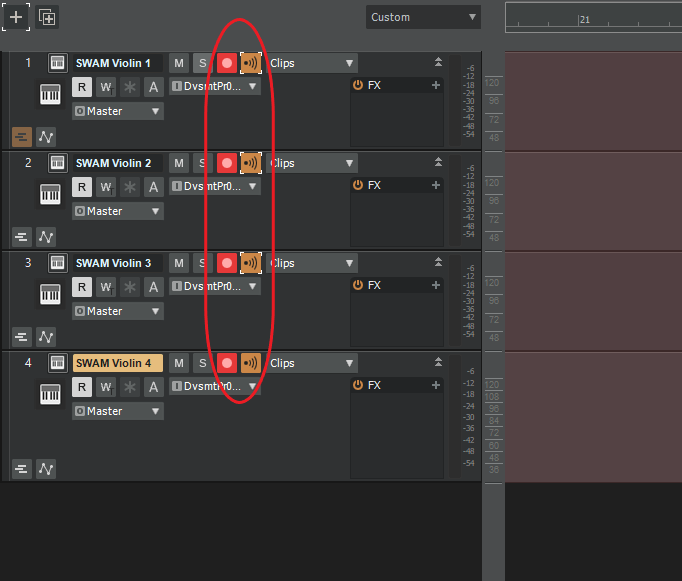
- Click the plus icon on the right of each layer to add the instruments of your choice to the different layers. In our case we will add 2 SWAM Violins, a SWAM Viola and a SWAM Cello to create a simple String Quartet.

- And that’s already it – you can now play a string quartet through Divisimate in Camelot Pro. Add some reverb, pan the instruments to your liking, and you have a one-of-a-kind playable ensemble at your hands. Have fun orchestrating and performing!

Demo Template
If you just want to get started right away, you can download the template for this SWAM String Quartet for Camelot Pro here to get started right away:
After you downloaded the file, just add a new Song in Camelot and use the “Import” Option to import the “SWAM_String_Quartet.cmsng” file into your setlist.
*The file is compressed in a .zip-Archive. Make sure you unzip the file in the finder or explorer before you try to open it. The Song uses the VST3 version of SWAM Solo Strings.
Important Settings
If you want to go back to playing all instruments together, simply press ‘Bypass’ or the shortcut b in Divisimate. Divisimate will then send all midi events and CCs directly through to all ports without any delay or latency.
Careful: If you have instruments using the option “All MIDI In”, you should use the power button (or the ESC key) to turn Divisimate off when you record those instruments to avoid note duplicates.
In this quickstart we will go through the steps to send the individual notes from 4-note chords to four different instruments in Cubase/Nuendo
Divisimate 2 can be used either in standalone mode or as a plugin. If you want to use standalone mode keep reading. If you want to use Divisimate 2 as a plugin, go to > Divisimate 2 Plugin Setup.
Divisimate 2 Standalone Setup
- Open Divisimate and make sure that the correct port configuration for the software is selected in the sytem tray (win) / menu bar (mac).
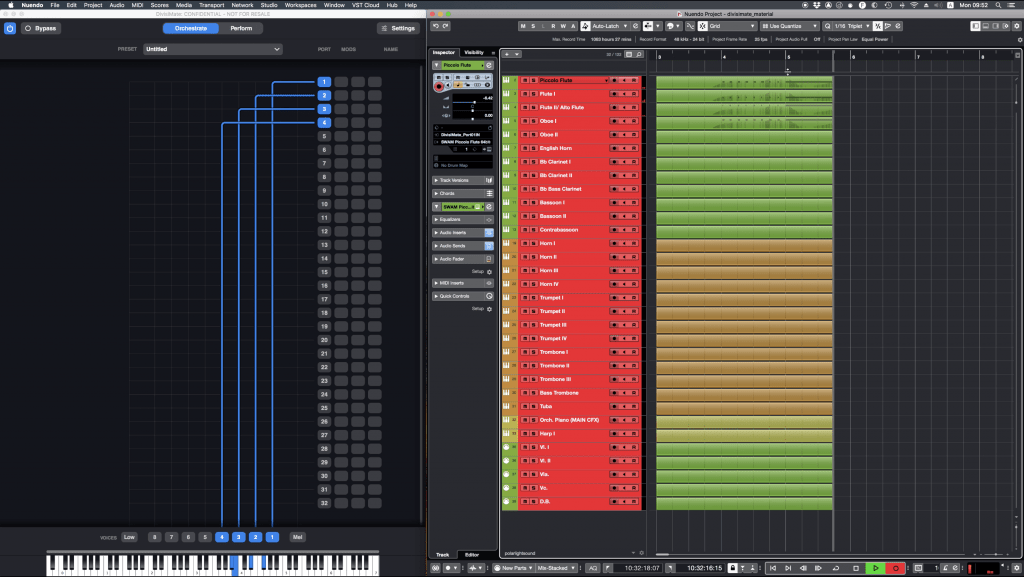
- Manually activate 4 voices in the lower part of the GUI above the keyboard by clicking on ‘4’ and connect the 4 voices to the first 4 Out-Ports on the right by clicking in the matrix.
Alternatively you can load the factory preset “4vc – 4 parts” on the perform page.
- Make sure that your MIDI input device is activated in the settings.
Now open a new session in Cubase or Nuendo and continue with the > Track Setup.
Divisimate 2 Plugin Setup
- Open a new session in Cubase or Nuendo
- Create a new Instrument Track and choose Divisimate 2 as the instrument
- Make sure that the correct port configuration for the software is selected in the sytem tray (win) / menu bar (mac).
- Manually activate 4 voices in the lower part of the GUI above the keyboard by clicking on ‘4’ and connect the 4 voices to the first 4 Out-Ports on the right by clicking in the matrix.
- Choose your MIDI controller as input. Don’t leave it to All MIDI Inputs otherwise you can create a feedback loop! If you want to use multiple input devices on your Divisimate 2 track, follow the tip under Additional Settings.
Track Setup
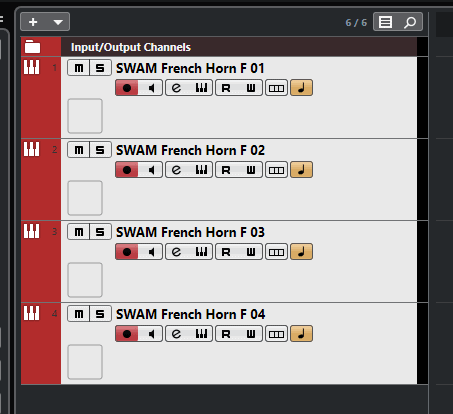
- Create four new instrument-tracks.
- Set the first track’s midi-input from All MIDI Inputs to Divismate Port 01, the following track’s midi input to Divisimate Port 02 and so on. To play the 4-voice-preset you built in Divisimate, you need to connect at least Port 01-04.
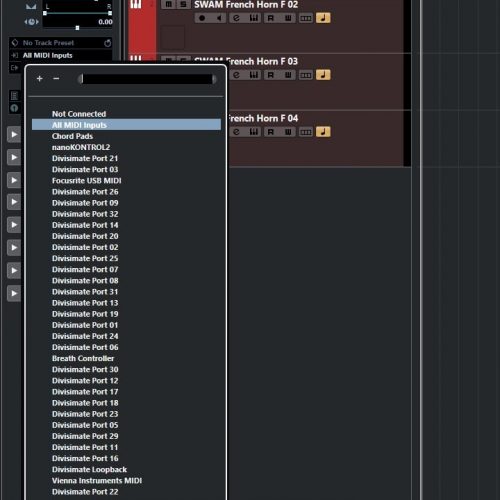
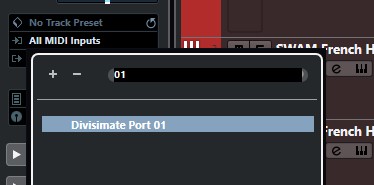
Note: There’s a search function in this menu, so you can quickly find the ports you’re looking for.
After entering the menu, type in the port number you are looking for and the list will get filtered.
- Now record-enable all the tracks you want to play. Per default you can do this by simply selecting the tracks. Click on the first one and shift-click on the last one or ctrl/cmd-click on the ones you like to play. Now Cubase/Nuendo should automatically record-enable the selected tracks.
- Now you can play the four instruments in Divisimate!
Important Settings
If you want to go back to working the traditional way track-by-track, simply press ‘Bypass’ or the shortcut b in Divisimate. Divisimate will then send all midi events and CCs directly through to all ports without any delay or latency. This way you can just record enable any track alone and play them as if Divisimate was not there.
To avoid duplicates on the “All MIDI Inputs” menu, go to Studio > Studio Setup > MIDI Port Setup.
Disable the checkbox In ‘All MIDI Inputs’ for all Divisimate Ports except for Divisimate Port 01. This is necessary, to prevent Cubase from receiving 32 duplicates of the incoming signal, when Divisimate is bypassed and forwarding MIDI-messages simultaneously to all MIDI ports.
If you’re on Windows also disable the checkbox In ‘All MIDI Inputs’ for all MIDI controllers you want to use in Divisimate.

Additional Ressources
Getting Started with Divisimate in Cubase Pro
Setting up Divisimate in Cubase Pro, setting up first orchestrations and recording a string quartet piece.
Working with the Divisimate Loopback Port in Cubase Pro
Using a loopback track to use a MIDI track in Cubase as input for Divisimate.
5 Workflow Tips for Cubase and Divisimate
5 Tips for working with Divisimate in Cubase Pro to build your workflow and really get the most out of them.
In this quickstart we will go through the steps to send the individual notes from 4-note chords to four different instruments in Digital Performer. Divisimate 2 can be used either in standalone mode or as a plugin. If you want to use standalone mode keep reading. If you want to use Divisimate 2 as a plugin, go to > Divisimate 2 Plugin Setup.
Divisimate 2 Standalone Setup
- Open Divisimate and make sure that the correct port configuration for the software is selected in the sytem tray (win) / menu bar (mac).
- Manually activate 4 voices in the lower part of the GUI above the keyboard by clicking on ‘4’ and connect the 4 voices to the first 4 Out-Ports on the right by clicking in the matrix.
Alternatively you can load the factory preset “4vc – 4 parts” on the perform page.
- Make sure that your MIDI input device is activated in the settings.
Now open a new session in Digital Performer and continue with the > Track Setup.
Divisimate 2 Plugin Setup
- Open a new session in Digital Performer.
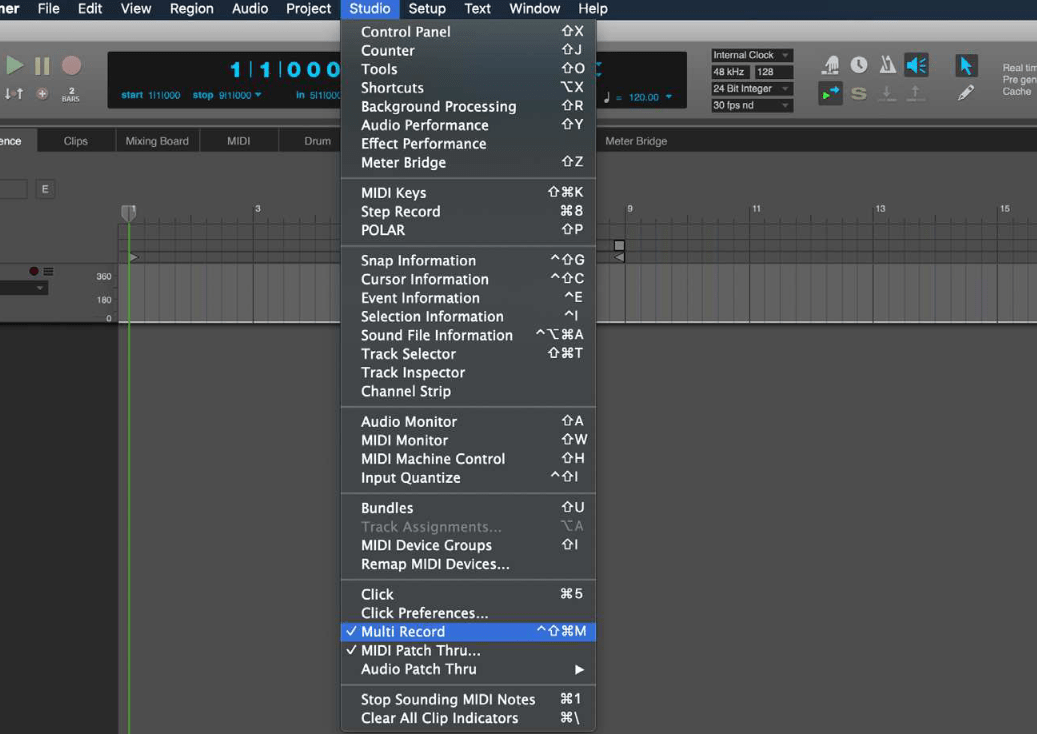
- Activate the “Multi Record” Option in the Studio Menu.
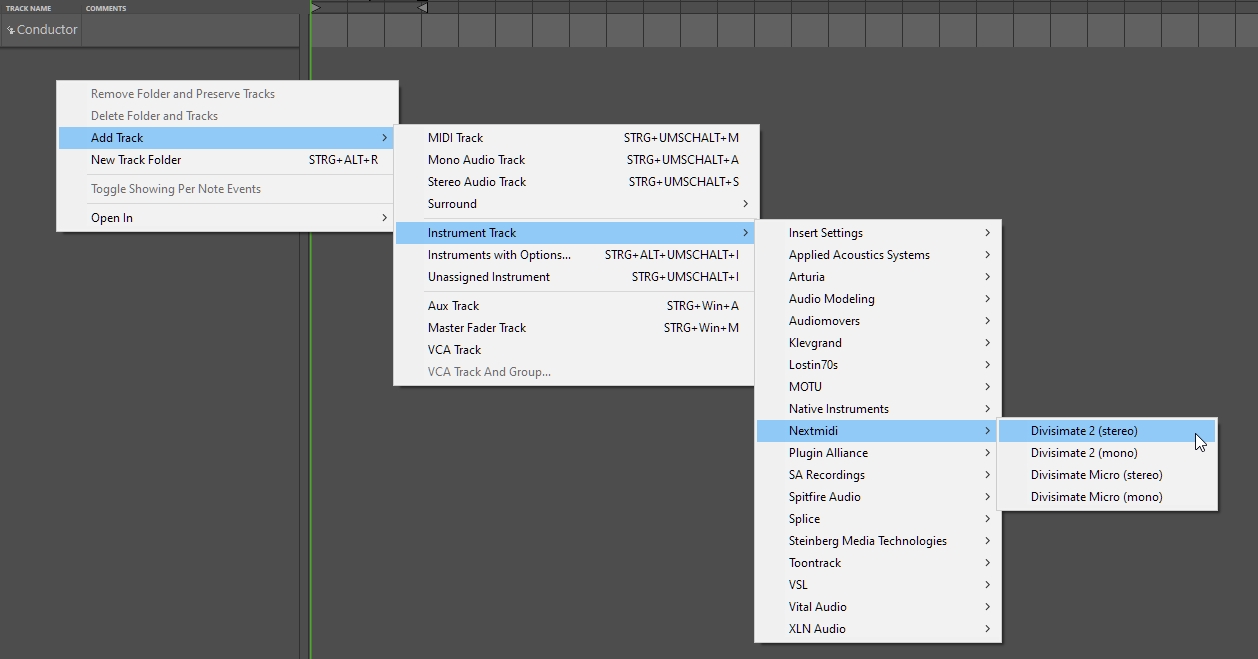
- Create a new instrument track with the Divisimate 2 plugin on it. Divisimate 2 will open.
- Manually activate 4 voices in the lower part of the GUI above the keyboard by clicking on ‘4’ and connect the 4 voices to the first 4 Out-Ports on the right by clicking in the matrix.
- Choose your MIDI controller as input.
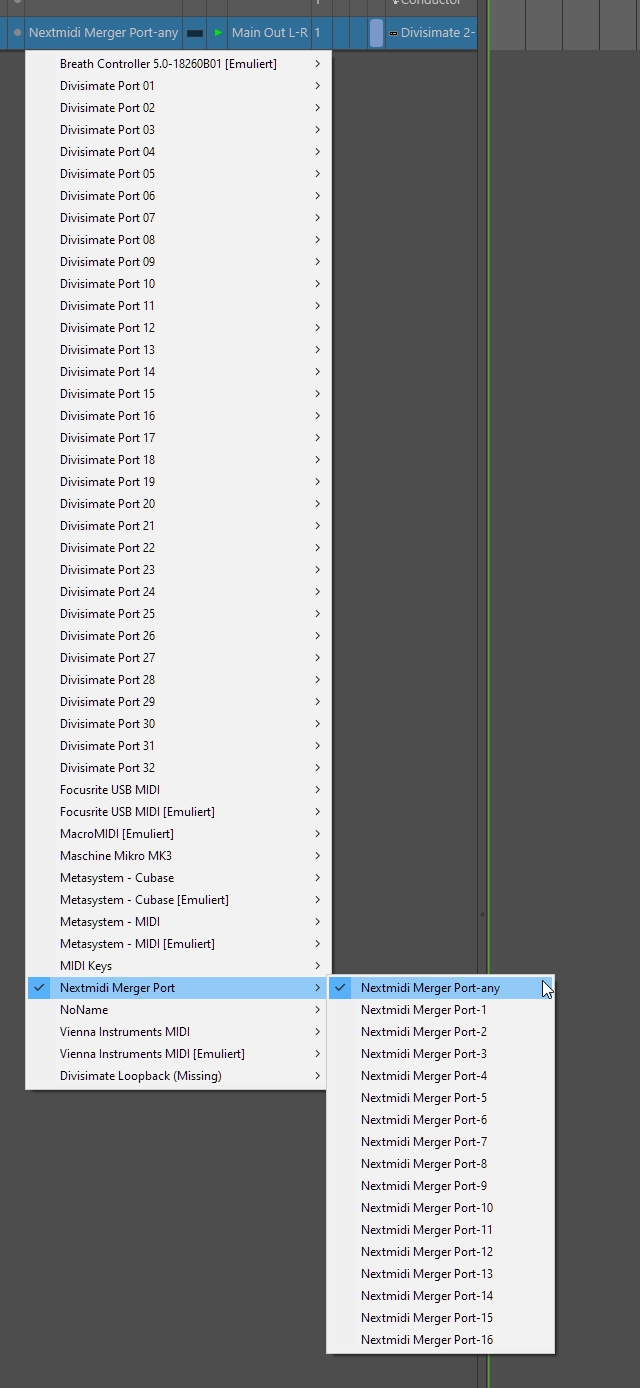
If you use multiple controllers, activate the > Nextmidi Merger Port in the Nextmidi Hub, choose the controllers that should be merged and select the Nextmidi Merger Port as your input for the Divisimate 2 track.
Track Setup
- Create a new session in Digital Performer.
- Activate the “Multi Record” Option in the Studio Menu.
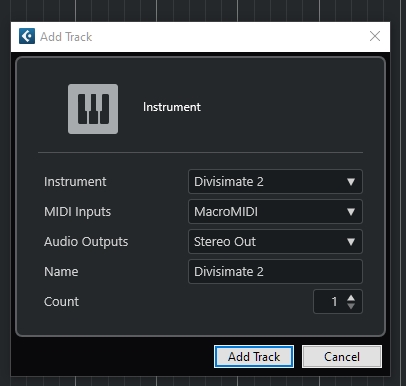
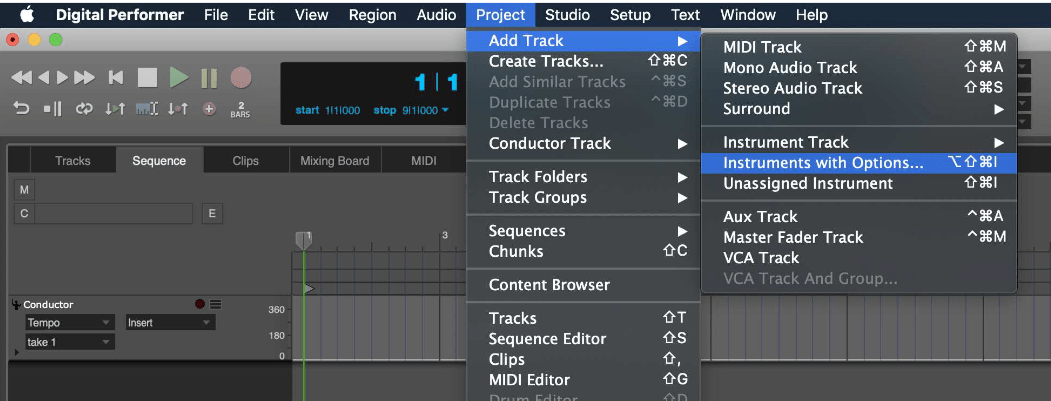
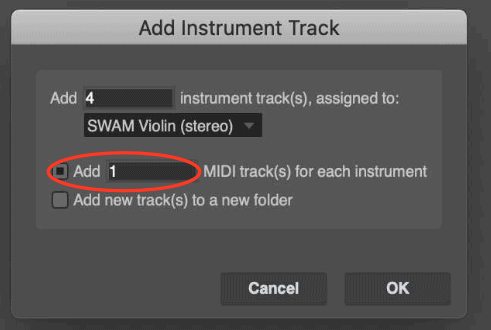
- Go to “Add Track” -> Instrument with Options to add four instrument tracks and specify a MIDI track for each instrument.
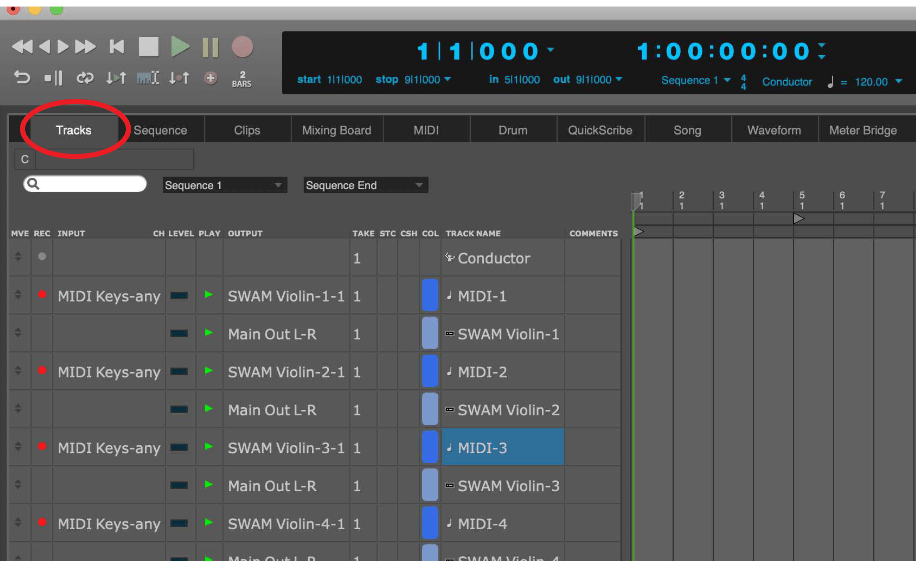
- Choose the “track view on the upper left to view the tracks you created
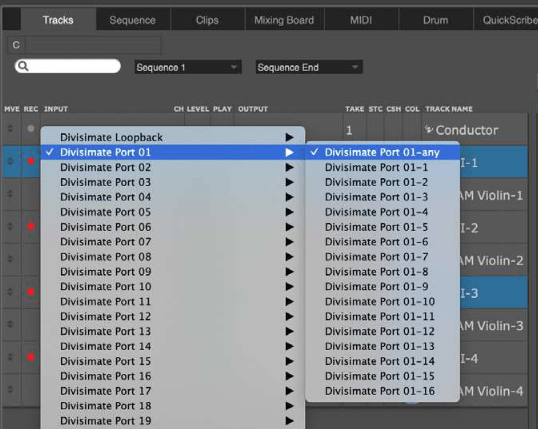
- Select Divisimate Port 01-any as Input for the first track, Divisimate Port 02 for the second one and so on until all tracks have a distinct Divisimate Port assigned between 1 and 4.
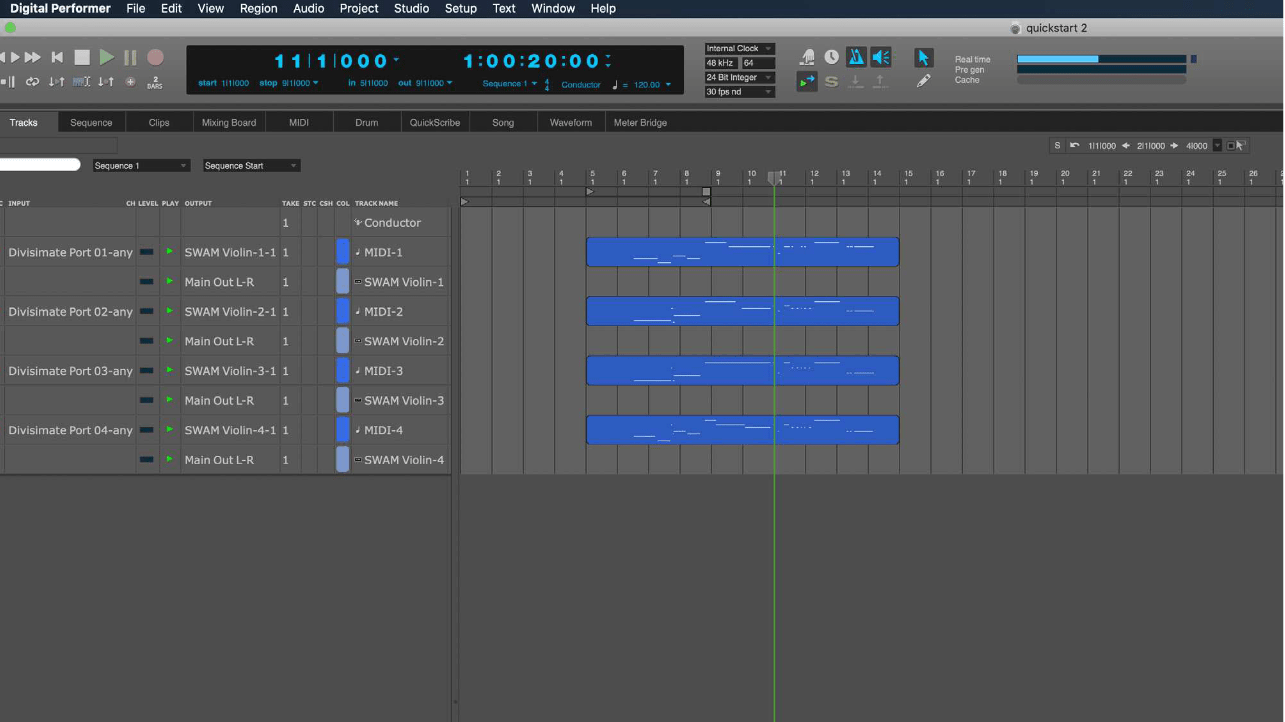
- Done! Now you can play the four instruments with Divisimate and record the result in Digital Performer.
Important Settings
If you want to go back to working the traditional way track-by-track, simply press ‘Bypass’ or the shortcut b in Divisimate. Divisimate will then send all midi events and CCs directly through to all ports without any delay or latency. This way you can just record enable any track alone and play them as if Divisimate was not there.
Careful: If you have instruments using the option “All MIDI In”, you should use the power button (or the ESC key) to turn Divisimate off when you record those instruments to avoid note duplicates.
For Logic Pro 10.6 or earlier!
The workflow with Divisimate has changed completely with the Logic 10.7 update. This document shows the workflow for the old versions of Logic
Unfortunately Logic Pro 10.6 and earlier has some limitations in the MIDI routing department. While recording MIDI on different tracks it can only distinguish between MIDI Channels, not between individual Input Devices. That means that a maximum of 16 individual parts can be recorded in Logic at a time. The Logic Mode simplifies this setup, but only one of the displayed ports (A/B) can be used at a time.
In this tutorial we will go through the steps to send the individual notes 4-note chords to four different instruments in Logic Pro 10.6 or earlier using the standalone version of Divisimate 2.
Setup Divisimate
- Open Divisimate and make sure that the correct port configuration for the software is selected in the menu bar.
- Go to Settings and activate Logic Mode
- Manually activate 4 voices in the lower part of the GUI above the keyboard by clicking on ‘4’ and connect the 4 voices to the first 4 Out-Ports on the right by clicking in the matrix.
Alternatively you can load the factory preset “4vc – 4 parts” on the perform page.
- Make sure that your MIDI input device is activated in the settings.
Setup Logic Pro 10.6 or earlier
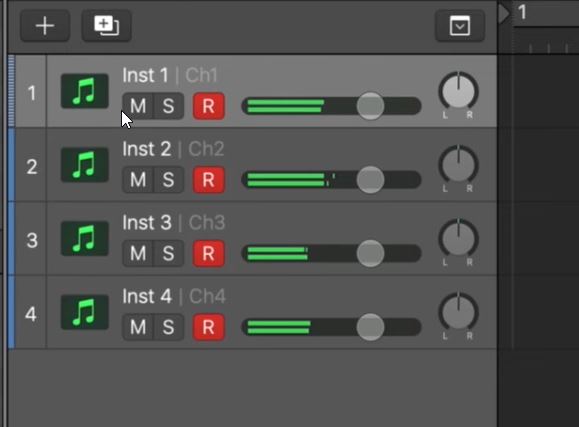
- Open a session in Logic Pro and create four instrument-tracks.
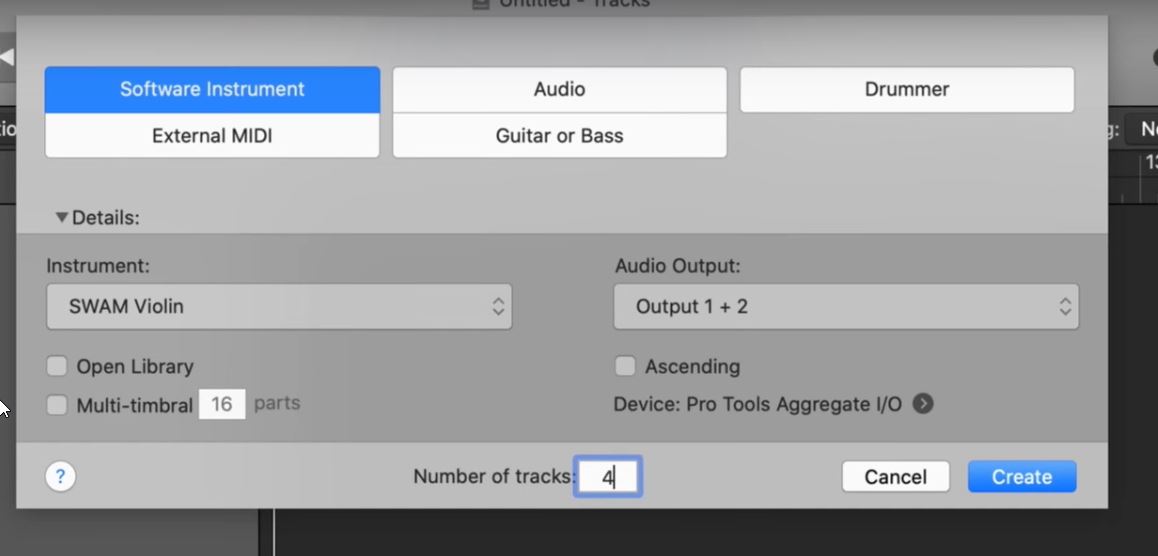
- Set the first track’s midi-channel from All to 1, the following track’s midi-channel to **2 and so on. To play the 4-voice-preset you built in Divisimate, you need to connect at least Channel 1-4.

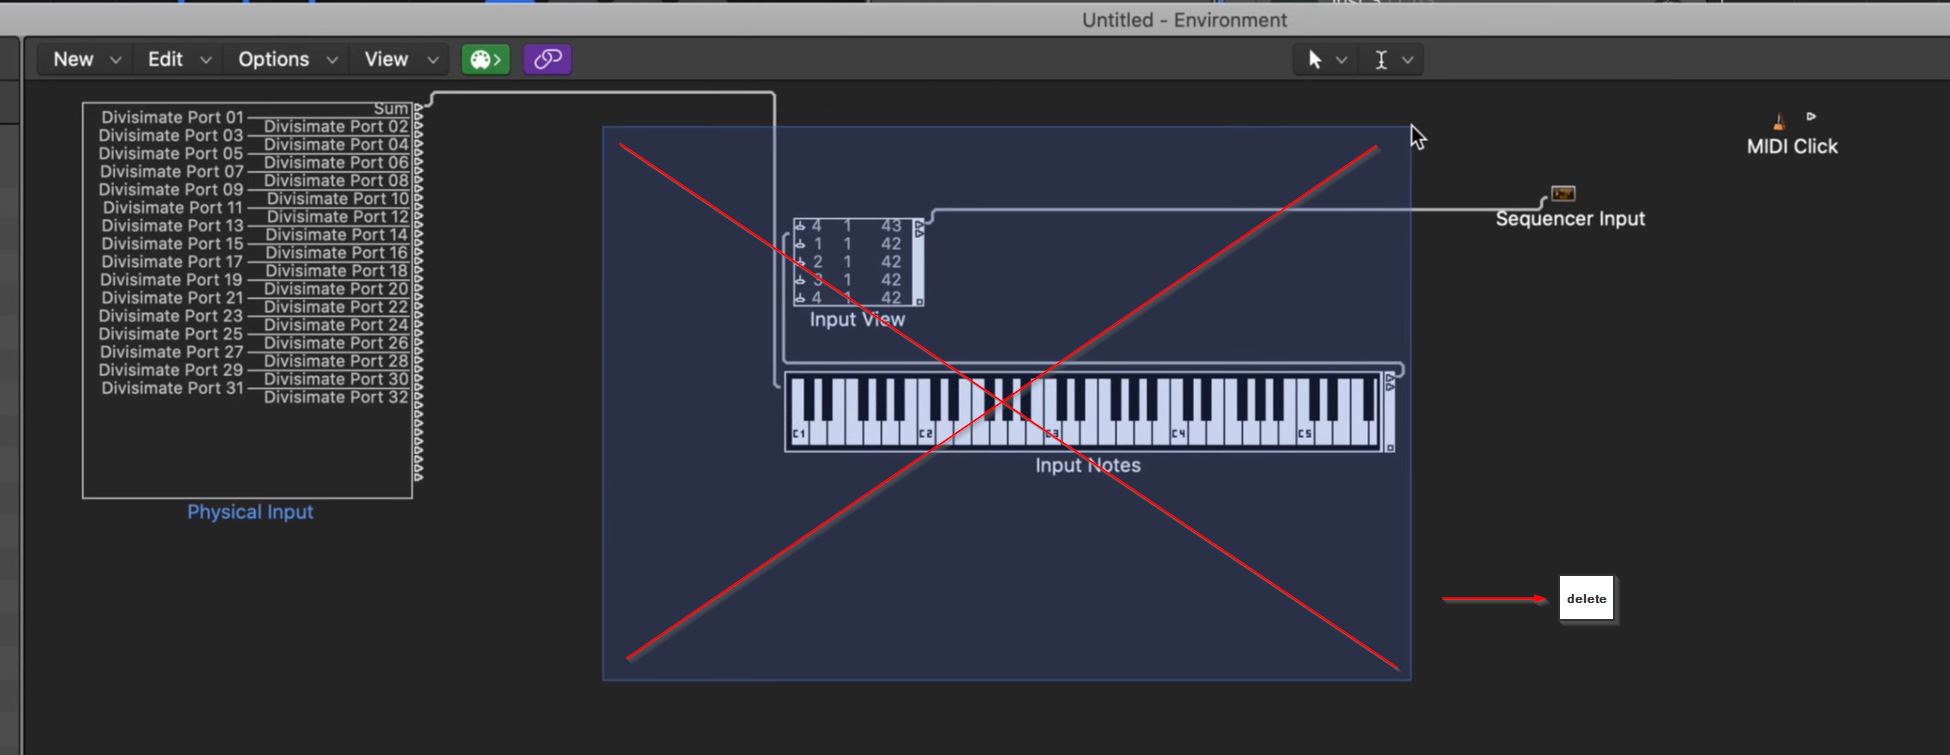
- Open the MIDI-Environment (Window > Open MIDI Environment) and go to the Layer Click & Ports.

Extend the Physical Input item by dragging at the edge in order to see all the inputs. Delete all items except Physical Input, Sequencer Input and MIDI Click by drawing a rectangle around it and hitting delete.
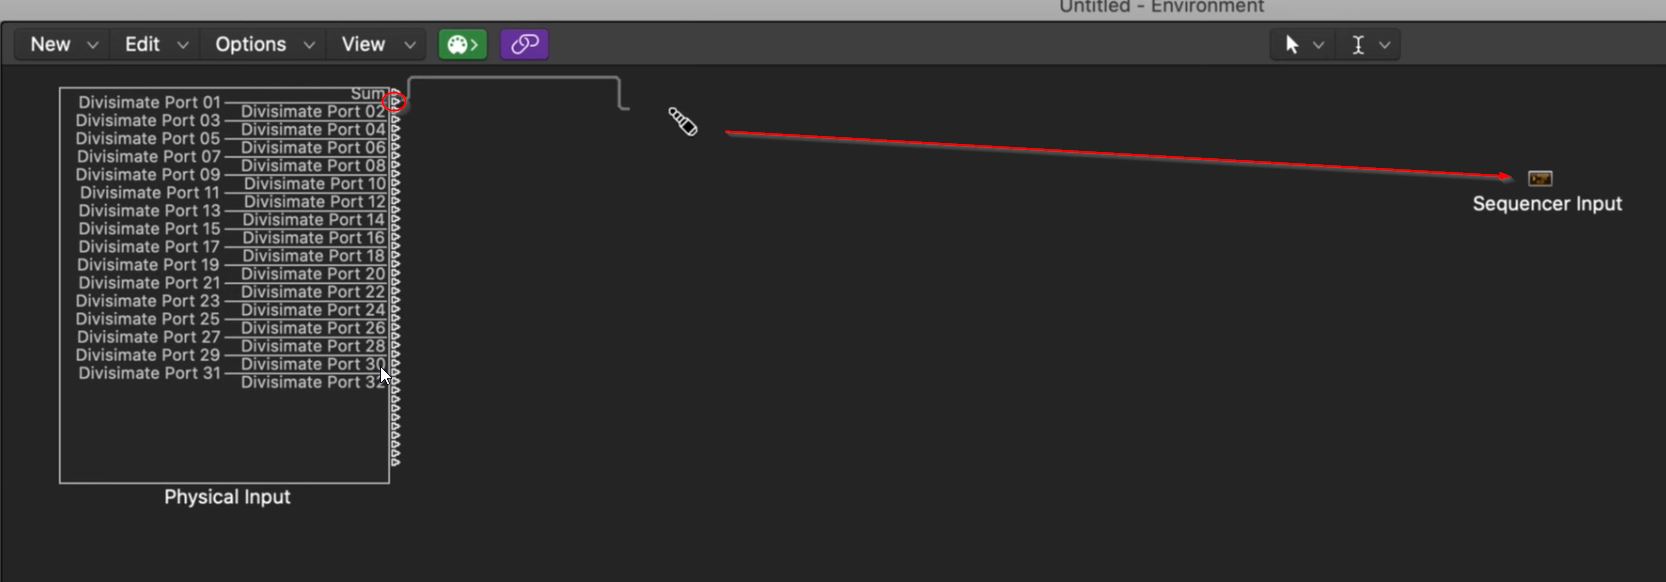
Connect Divisimate Port 01 to the Sequencer Input by clicking the tiny triangle corresponding to Divisimate Port 01 and dragging it to the Sequencer Input.
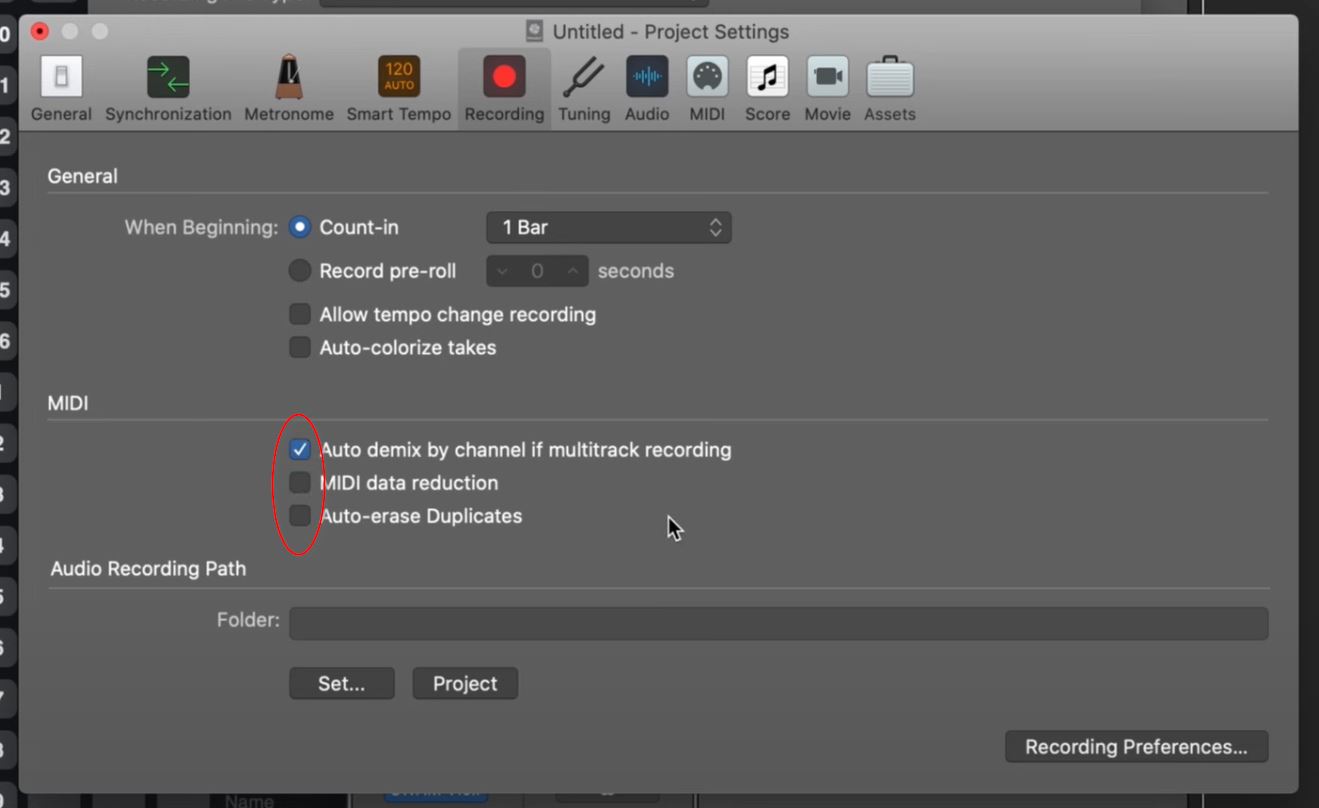
- Go to Logic Pro X > Preferences > Recording… and then to Recording Project Settings.
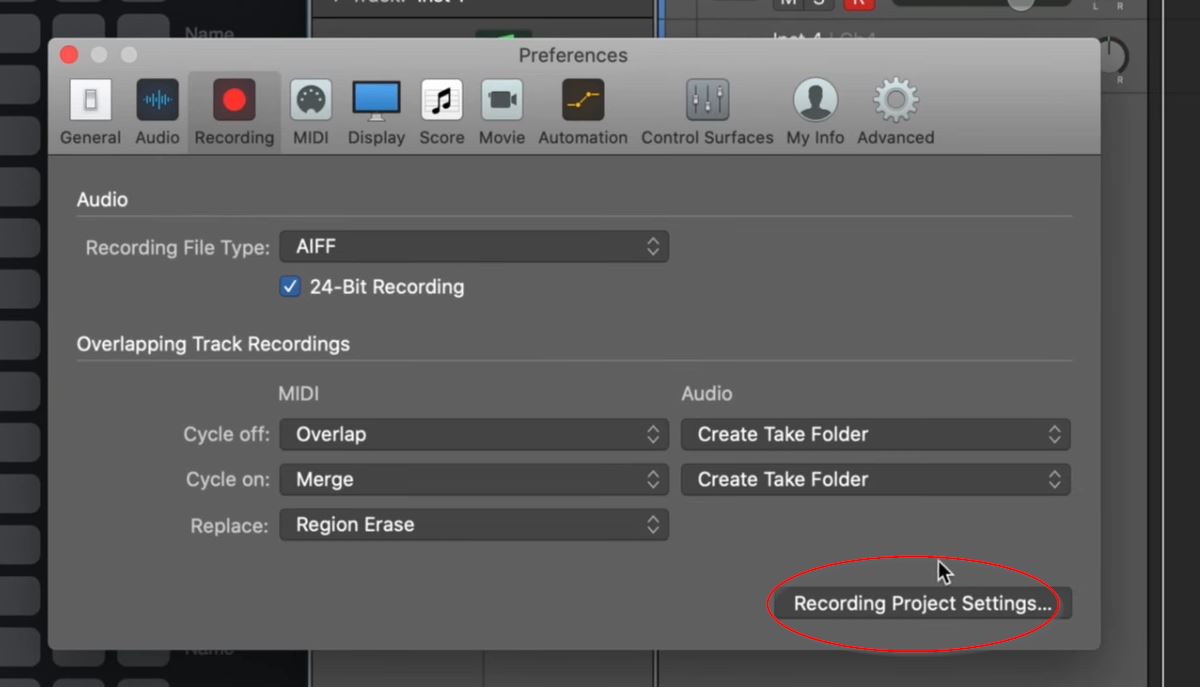
Activate Auto demix by channel if multitrack recording and deactivate MIDI data reduction and Auto-erase Duplicates.
- Now record-enable all the tracks you want to play and have fun orchestrating and composing!
Important Settings
If you want to go back to working the traditional way track-by-track, simply press ‘Bypass’ or the shortcut b in Divisimate. Divisimate will then send all midi events and CCs directly through to all ports/channels without any delay or latency. This way you can just record enable any track alone and play them as if Divisimate was not there.
If you can’t see Divisimate Ports in your environment, go to Logic Pro X > Preferences > MIDI and make sure they are activated as inputs. It may also be a good idea to deactivate your MIDI keyboard here, to avoid any duplicates.

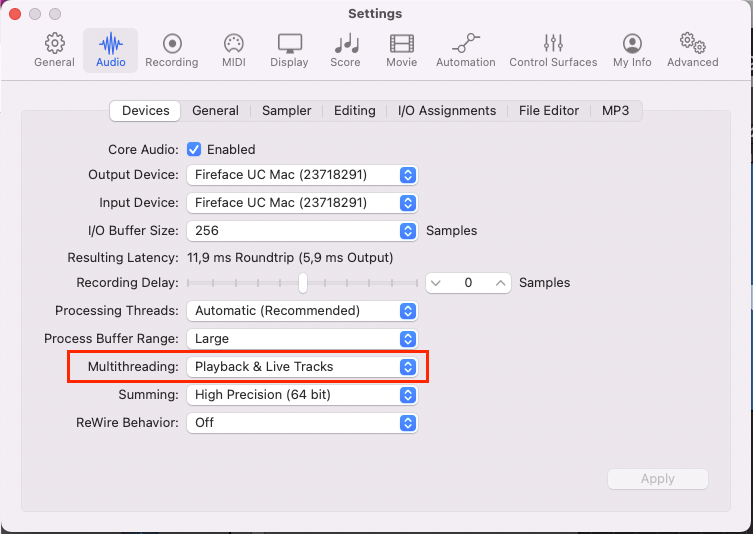
If you are having trouble with CPU spikes while playing multiple instruments, go to Preferences > Audio > Devices and make sure that under Multithreading the option Playback & Live tracks is enabled.
In this quickstart we will go through the steps to send the individual notes from 4-note chords to four different instruments in Logic Pro.
Divisimate 2 can be used either in standalone mode or as a plugin. If you want to use standalone mode keep reading. If you want to use Divisimate 2 as a plugin, go to > Divisimate 2 Plugin Setup.
Are you using Logic Pro 10.6 or older?
This quickstart document shows the process for Logic Pro 10.7 and upwards - older versions of Logic do not offer the possibility to select separate input ports for different tracks. With a workaround Divisimate can be used in Logic Pro 10.6 and older with a maximum of 16 tracks at once.
Divisimate 2 Standalone Setup
- Open Divisimate and make sure that the correct port configuration for the software is selected in the Nextmidi Hub, found in the menu bar.
- Manually activate 4 voices in the lower part of the GUI above the keyboard by clicking on ‘4’ and connect the 4 voices to the first 4 Out-Ports on the right by clicking in the matrix.
Alternatively you can load the factory preset “4vc – 4 parts” on the perform page.
- Make sure that your MIDI input device is activated in the settings.
Keep Logic Mode turned off!
Logic Mode is only required when using Logic 10.6 or older - if you are using Logic 10.7 or above, make sure to have Logic Mode turned off for this setup to work correctly.
Now open a new session in Logic and continue with the > Track Setup.
Divisimate 2 Plugin Setup
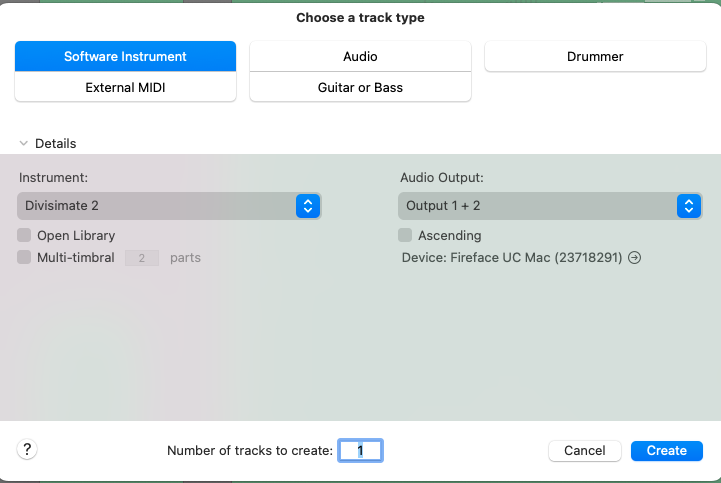
- Create a new Logic Project and add an instrument track with Divisimate 2.
- Make sure that the correct port configuration for the software is selected within the Nextmidi Hub in the menu bar.
- Manually activate 4 voices in the lower part of the GUI above the keyboard by clicking on ‘4’ and connect the 4 voices to the first 4 Out-Ports on the right by clicking in the matrix.
Alternatively you can load the factory preset “4vc – 4 parts” on the perform page.
- Make sure that either your MIDI Controller or the Nextmidi Merger Port are selected directly as an Input on your Divisimate track.

Track Setup
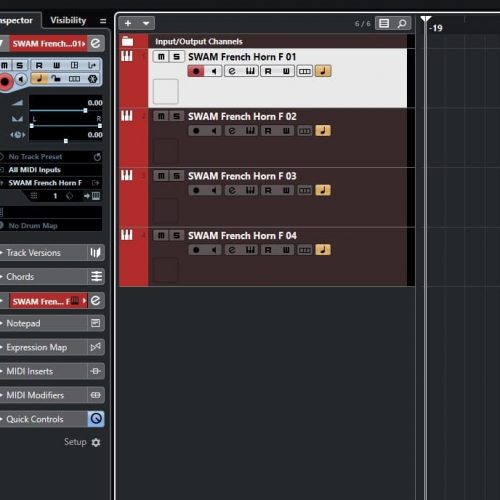
- Create four instrument-tracks in Logic Pro. If you are using the Divisimate 2 plugin, make sure that it is placed at the top of the session above the instruments.
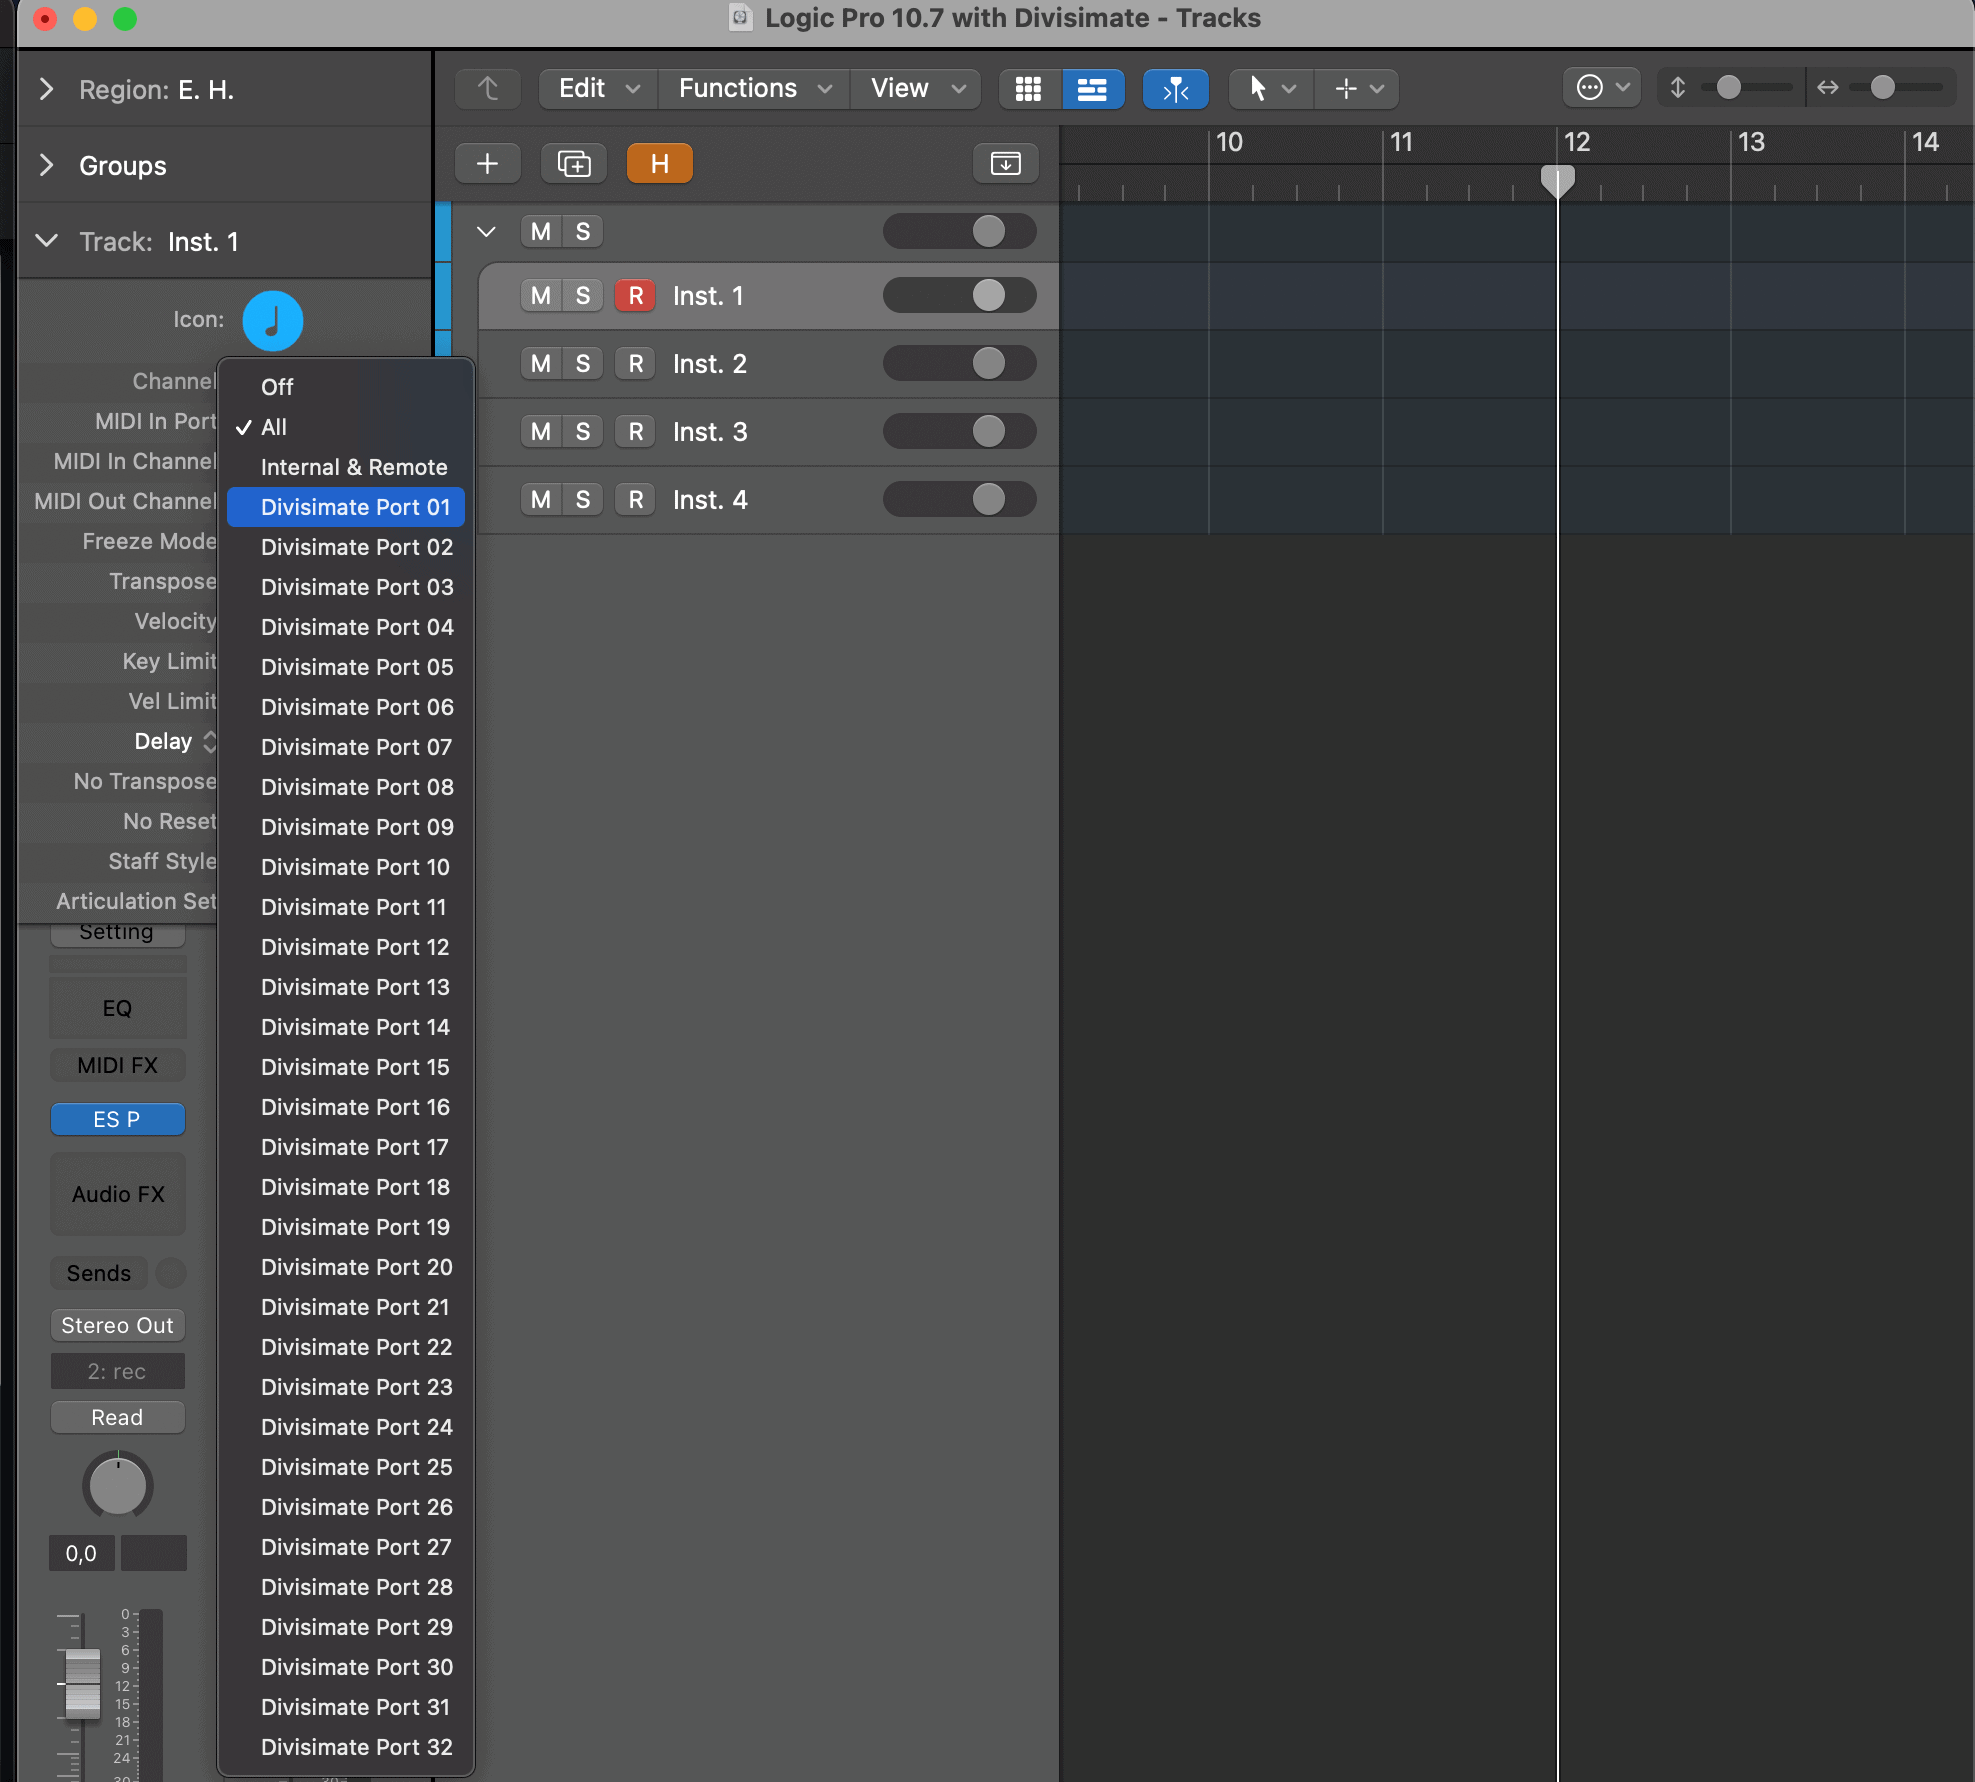
- Select the first track and go to the Track Inspector on the left (press ‘i’ if it is not visible). Click on the arrow next to “Track” to expand the track settings.
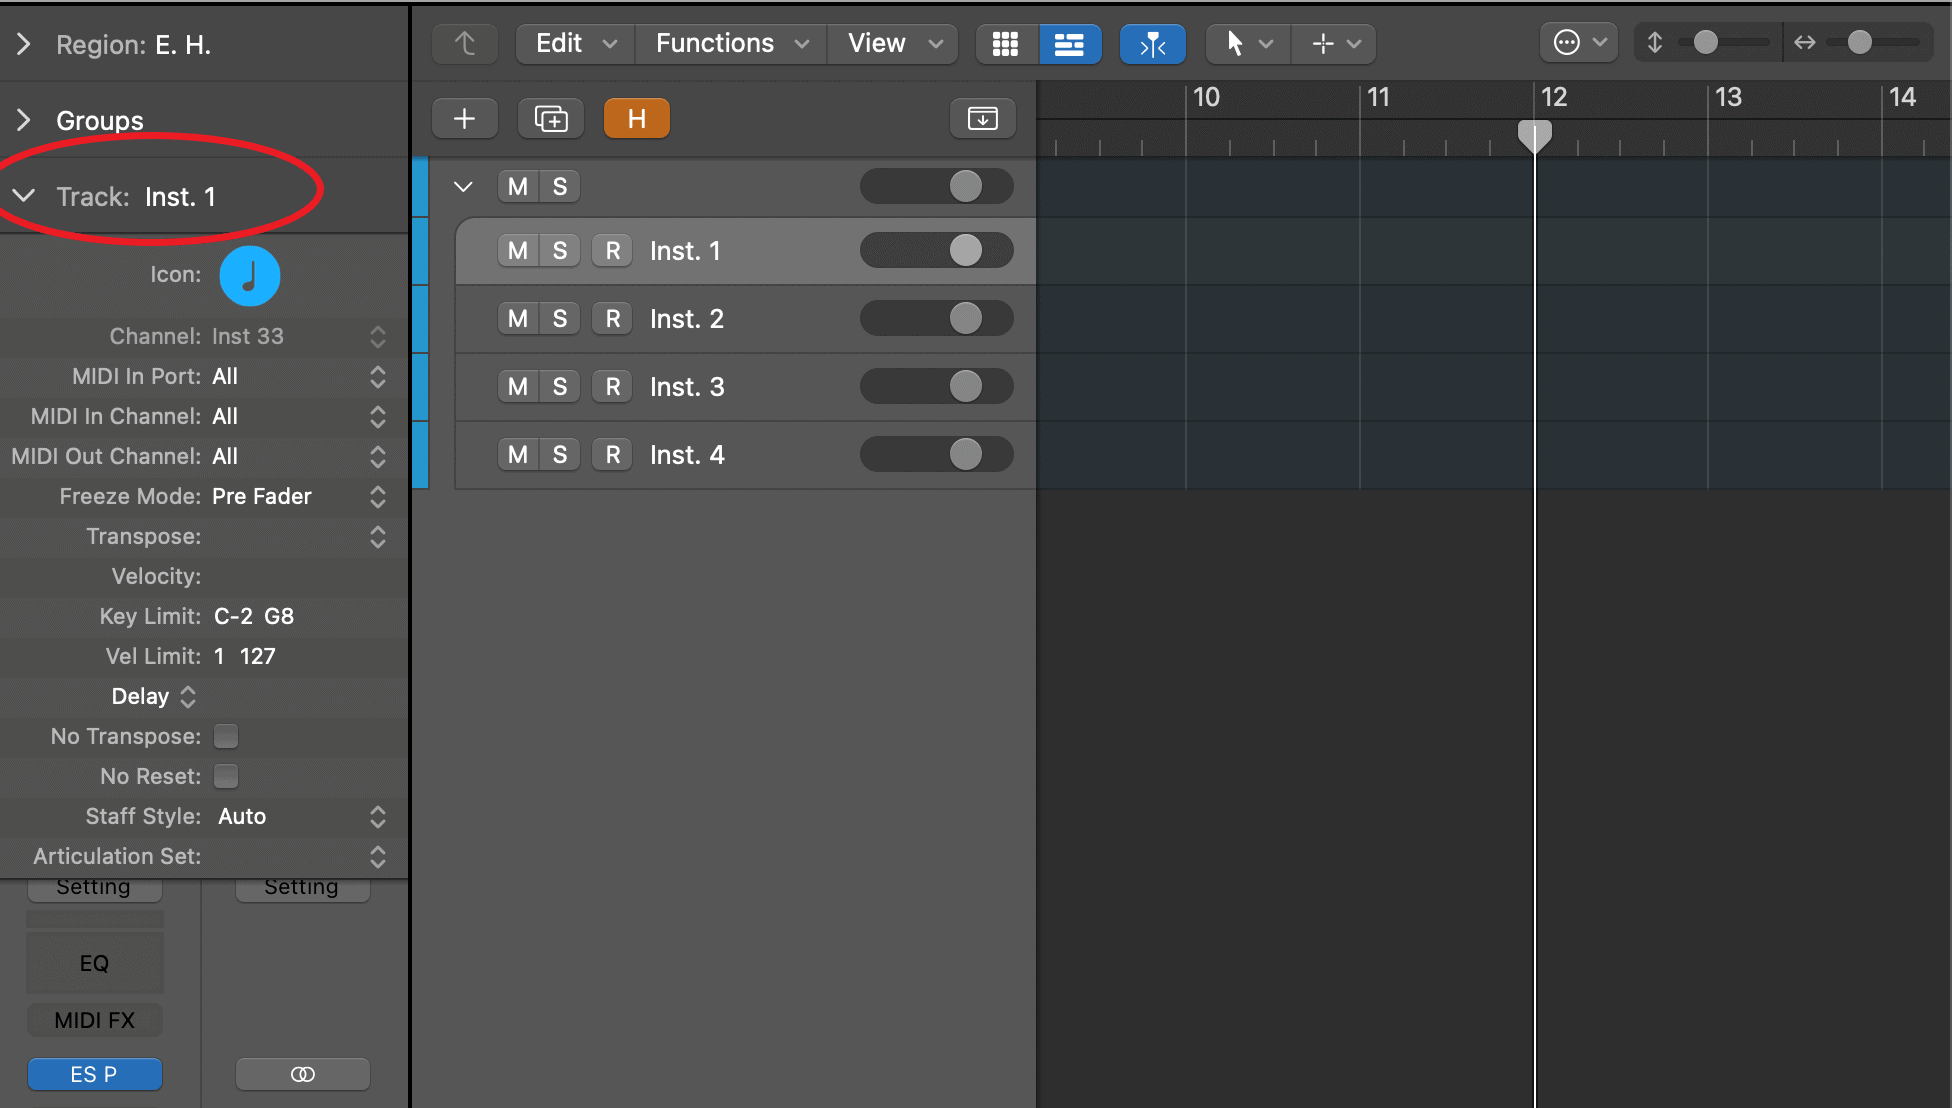
- Go to the “MIDI In Port” Menu and select “Divisimate Port 01” as Input. On the second track in this menu select “Divisimate Port 02”, on the third “Divisimate Port 03”, and so on.
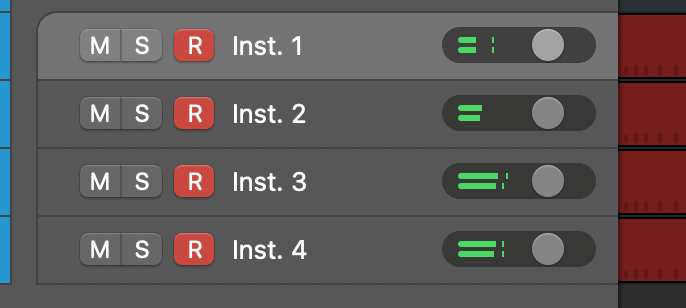
- Now record-enable all the tracks and you are ready to go!
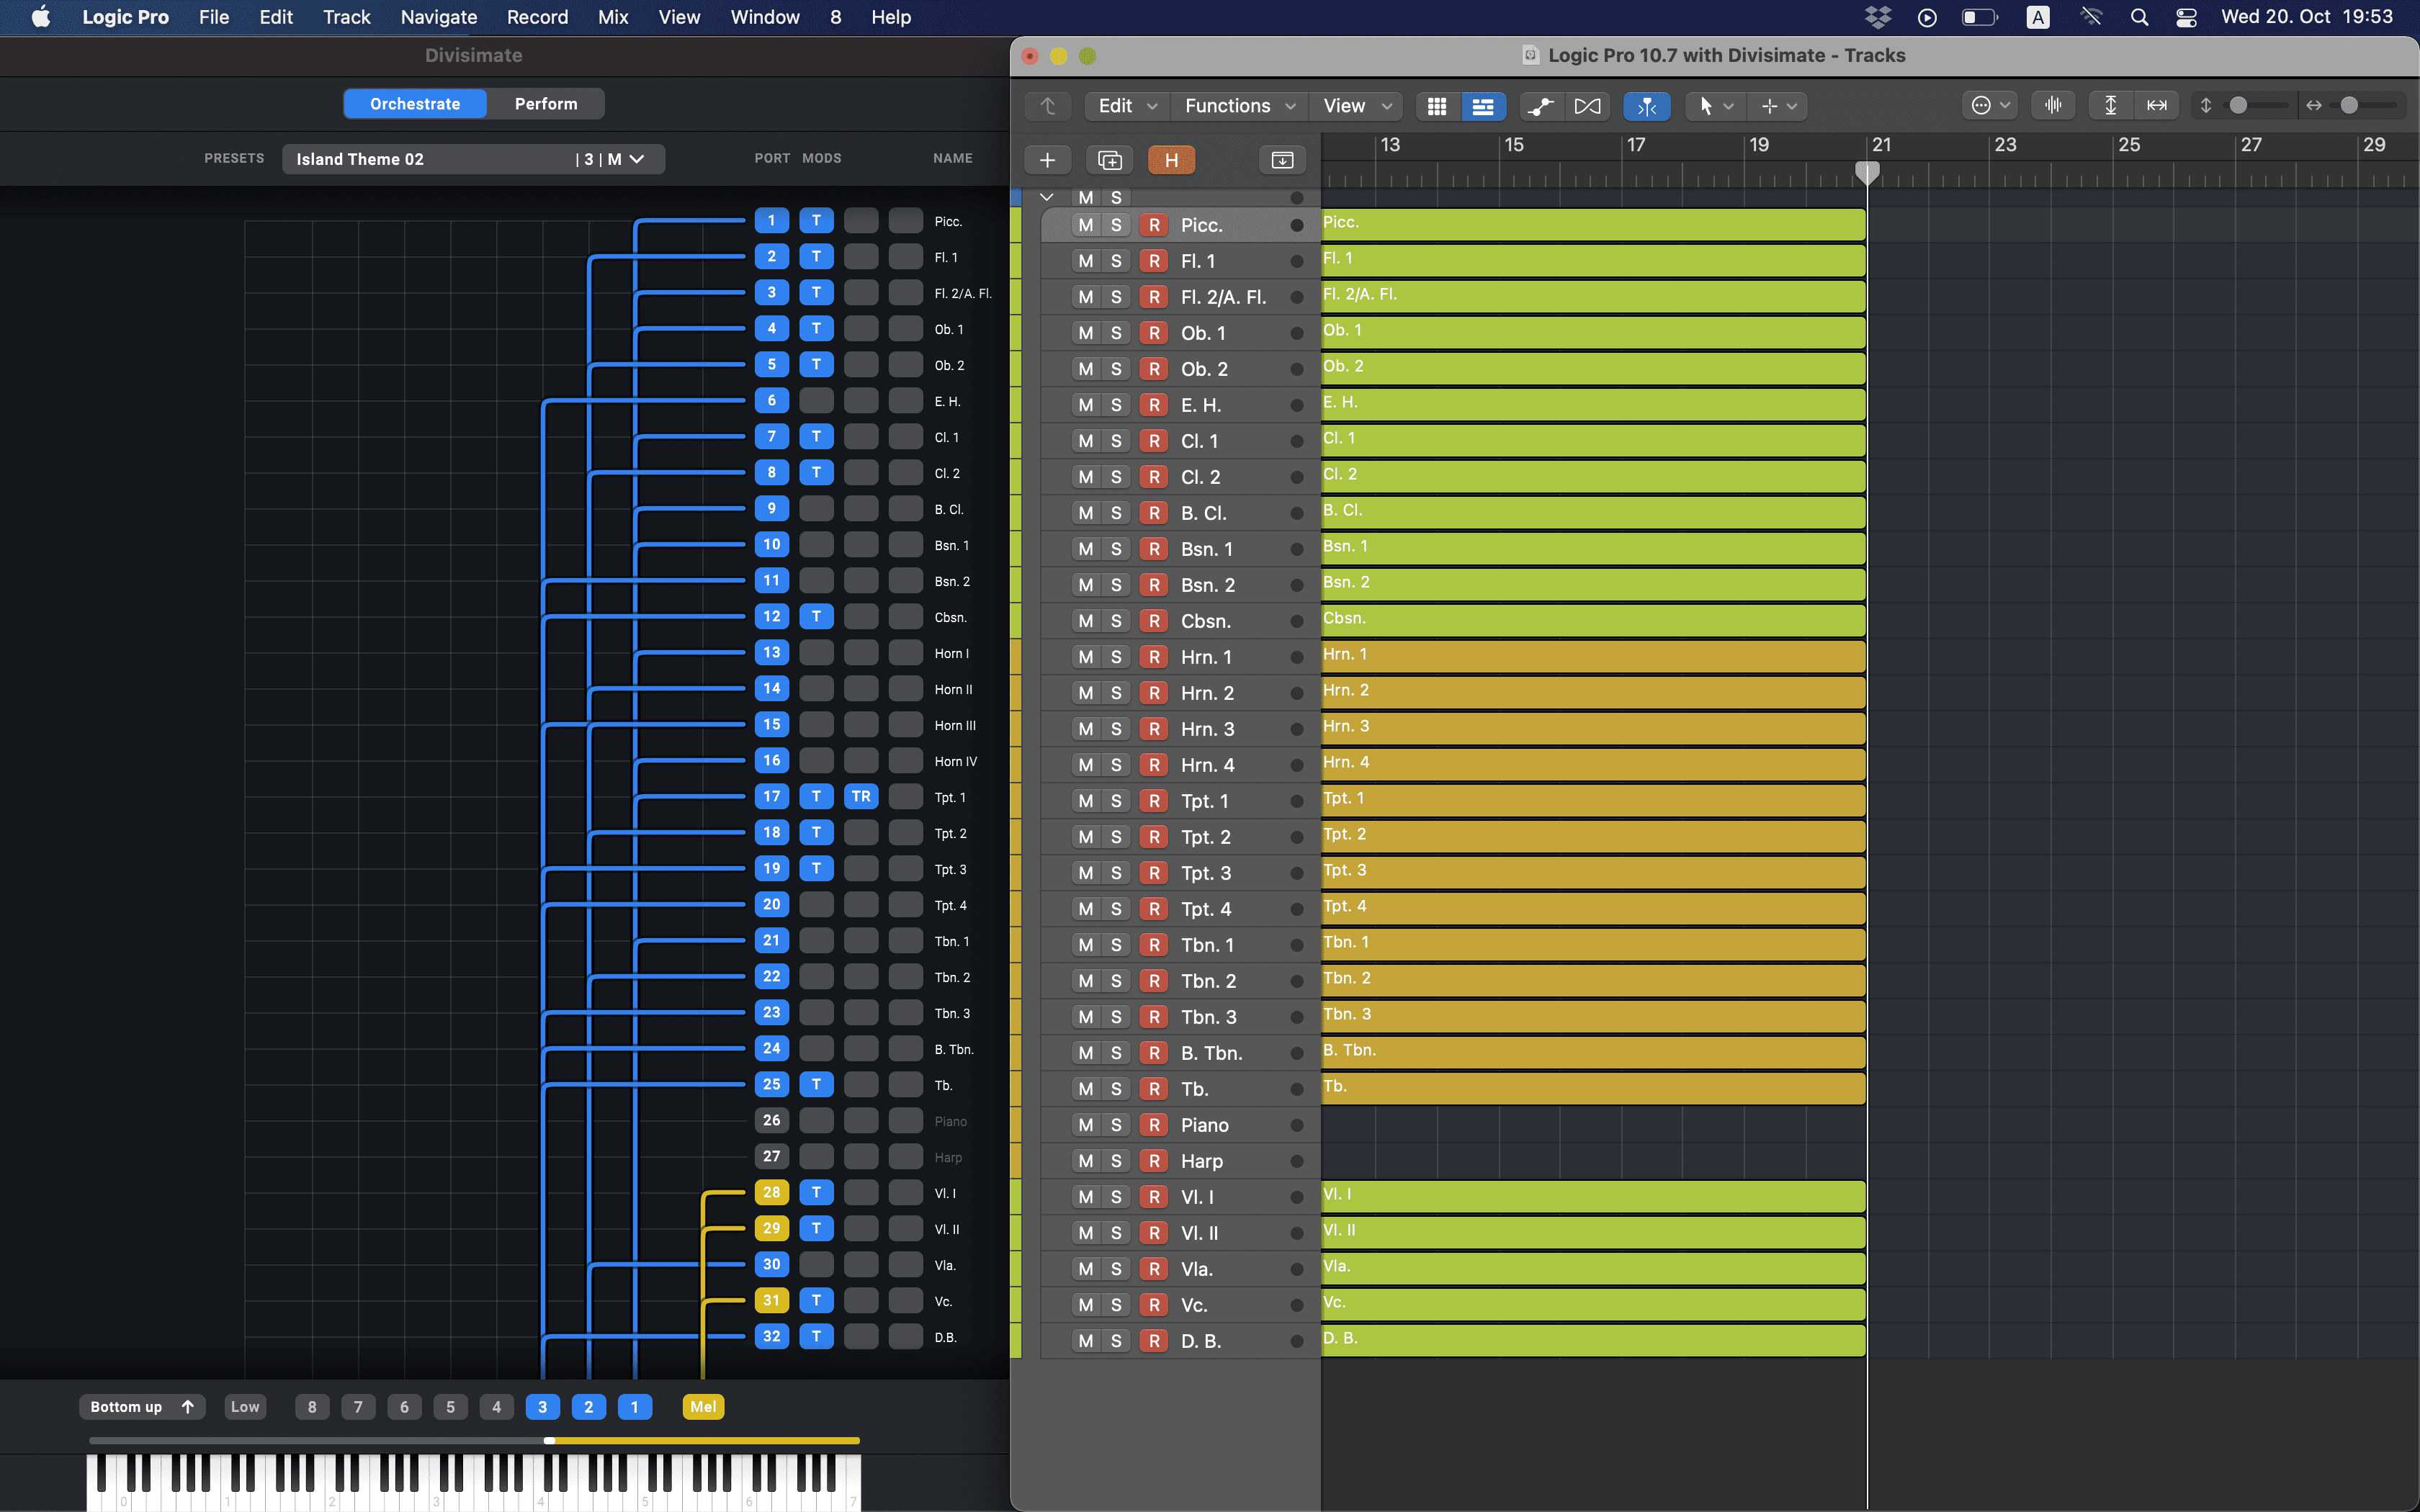
- With this method you can build a full template with up to 32 individual parts, and record complex orchestrations right onto the tracks through Divisimate. Have fun orchestrating, performing and composing!
Track Recording Limitation
Logic at this time unfortunately has a limitation of playing a maximum of 32 tracks at once. It can record more than that, but while playing they will not produce sound or receive MIDI. If you use the plugin version of Divisimate 2 make sure to place it on the top of your session so it definitely gets played.
Important Settings
If you want to go back to working the traditional way track-by-track, simply press ‘Bypass’ or the shortcut b in Divisimate. Divisimate will then send all midi events and CCs directly through to all ports without any delay or latency. This way you can just record enable any track alone and play them as if Divisimate was not there.
Careful: If you have instruments using the option “All MIDI In”, you should use the power button (or the ESC key) to turn Divisimate off when you record those instruments to avoid note duplicates.
If you can’t see Divisimate Ports in your input section, go to Logic Pro X > Preferences > MIDI and make sure they are activated as inputs. It can also be a good idea to deactivate your MIDI keyboard here, to avoid any duplicates.
If you are having trouble with CPU spikes while playing multiple instruments, go to Preferences > Audio > Devices and make sure that under Multithreading the option Playback & Live tracks is enabled.
Additional Ressources
Working with Vienna Ensemble Pro in Logic Pro
Walkthrough: SWAM Big Band Template for Logic Pro
In this quickstart we will go through the steps to send the individual notes from 4-note chords to four different instruments in Universal Audio’s LUNA Recording System with the standalone version of Divisimate 2.
Setup Divisimate
- Open Divisimate and make sure that the correct port configuration for the software is selected in the Nextmidi Hub in the sytem tray (win) / menu bar (mac).
- Manually activate 4 voices in the lower part of the GUI above the keyboard by clicking on ‘4’ and connect the 4 voices to the first 4 Out-Ports on the right by clicking in the matrix.
Alternatively you can load the factory preset “4vc – 4 parts” on the perform page.
- Make sure that your MIDI input device is activated in the settings.
Setup LUNA
- Open a new project in LUNA.
- Go to the upper left section and create 4 Instrument Tracks with the virtual instruments of your choice.
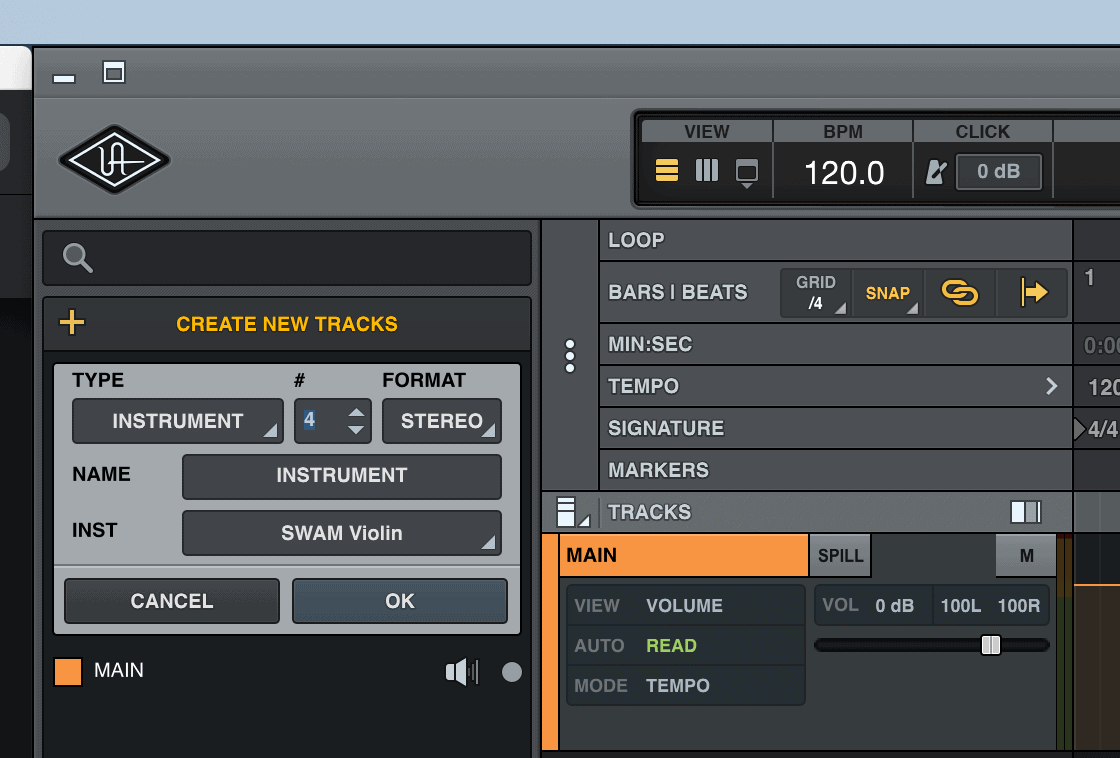
- Set the first track’s midi-input from All to Divismate Port 01 ALL, the following track’s midi input to Divisimate Port 02 and so on. To play the 4-voice-preset you built in Divisimate, you need to connect at least Port 01-04.
- Record-enable all the tracks and then you’re already done. Now you can play the four instruments with Divisimate and record the result in Luna!

In this tutorial we will go through the steps to send the individual notes 4-note chords to four different instruments in MainStage with the standalone version of Divisimate 2.
Setup Divisimate
- Open Divisimate and make sure that the correct port configuration for the software is selected in the Nextmidi Hub in the menu bar.
- Manually activate 4 voices in the lower part of the GUI above the keyboard by clicking on ‘4’ and connect the 4 voices to the first 4 Out-Ports on the right by clicking in the matrix.
Alternatively you can load the factory preset “4vc – 4 parts” on the perform page.
- Make sure that your MIDI input device is activated in the settings.
Setup MainStage
To use Divisimate with MainStage, you have to create MIDI devices for each Divisimate Port in the layout window. You can do this manually for as many Divisimate ports as you need, and design your layout as you like. This is especially useful if you have a larger setup and only want to incoporate Divisimate partially.
If you want to get started quickly, you can also take a shortcut and use a layout with all 32 ports that we prepared for you.
Manual Setup
- Open a new Concert – you can use the keyboard minimalist preset, or any other simple template.
- Go to the layout tab and delete everything in the layout manager all elements of the layout to start with a completely empty setup.
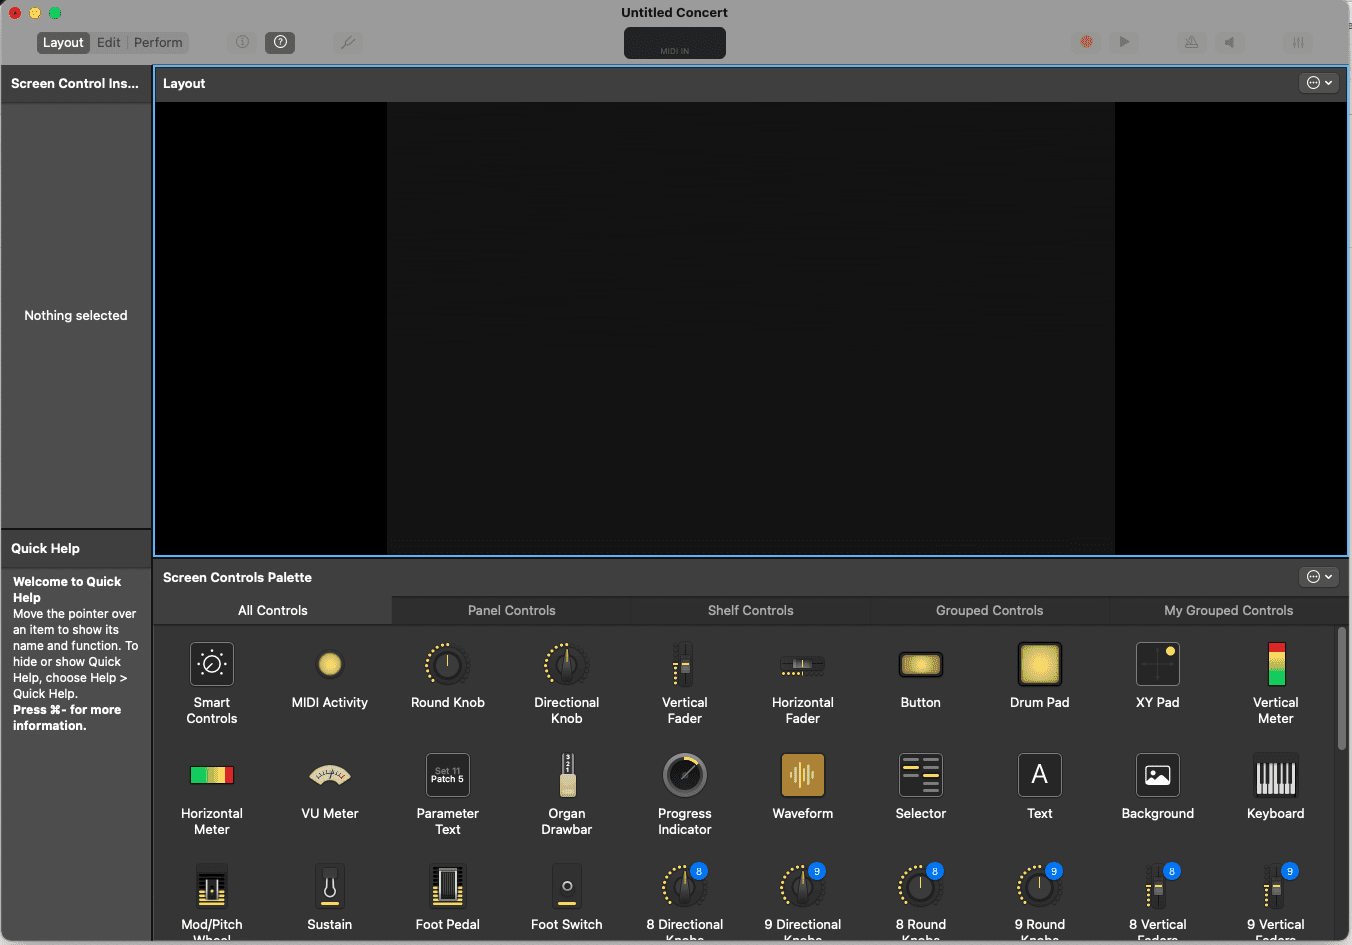
- Now create a new screen control that can utilize a MIDI Input. We choose to use the MIDI Activity widget here, as it takes up only very little space, and we will need multiple of them.
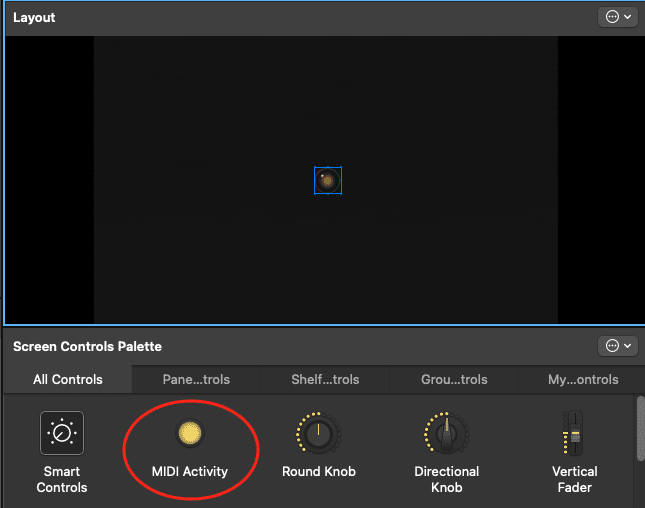
- Now with this element selected go to the screen control inspector on the left and under “MIDI Port” select “Divisimate Port 01”
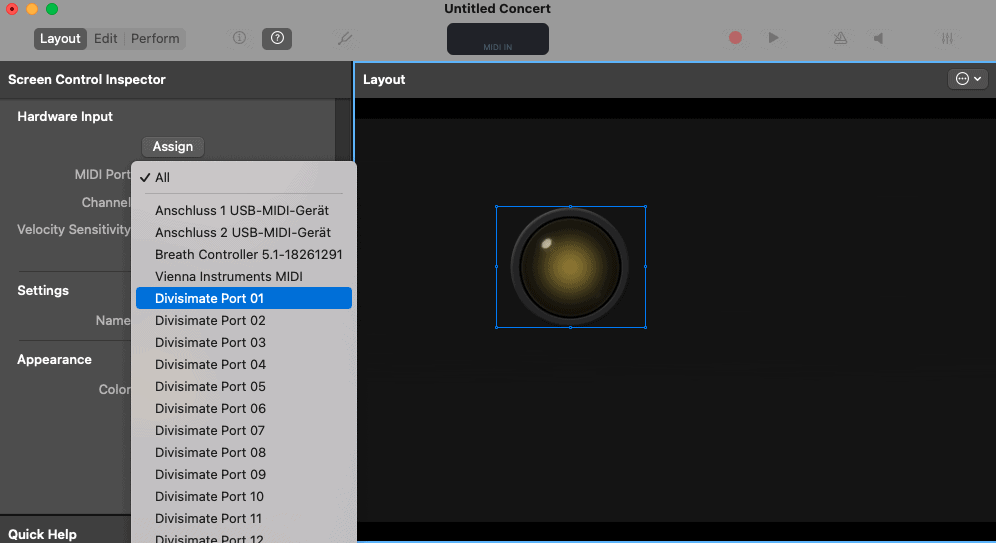
- Repeat steps 2 and 3, and choose Divisimate Port 02, 03 and 04 respectively.
- Head over to the “Edit” view and on the right add four software instruments. You can load the instruments of your choice in the channel strips.
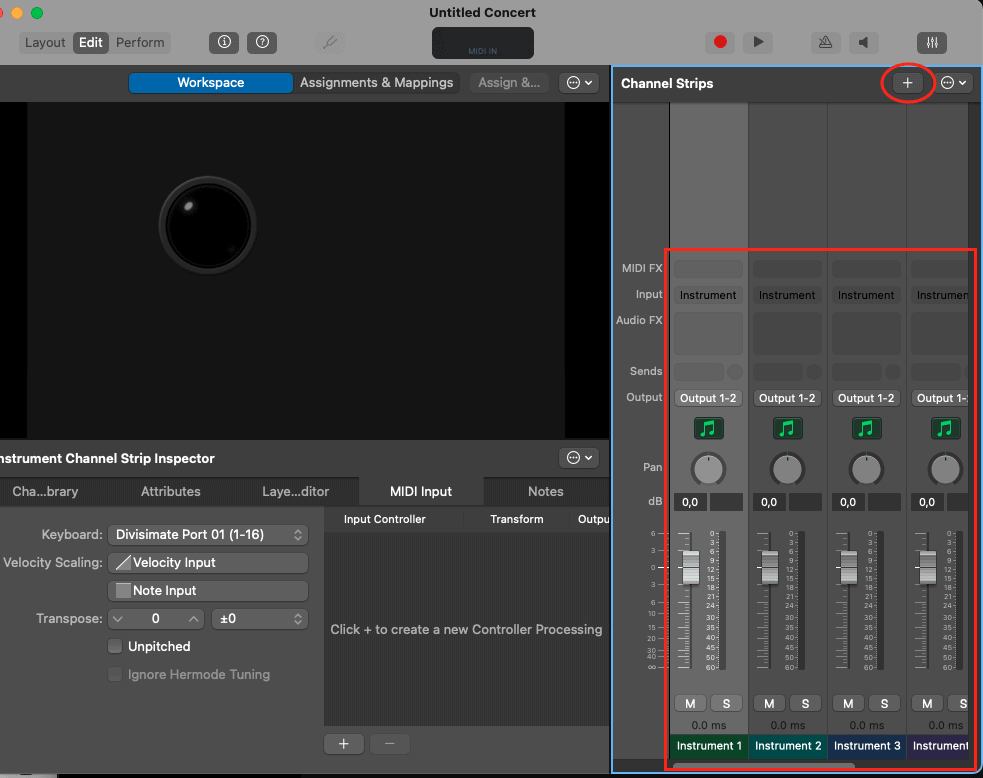
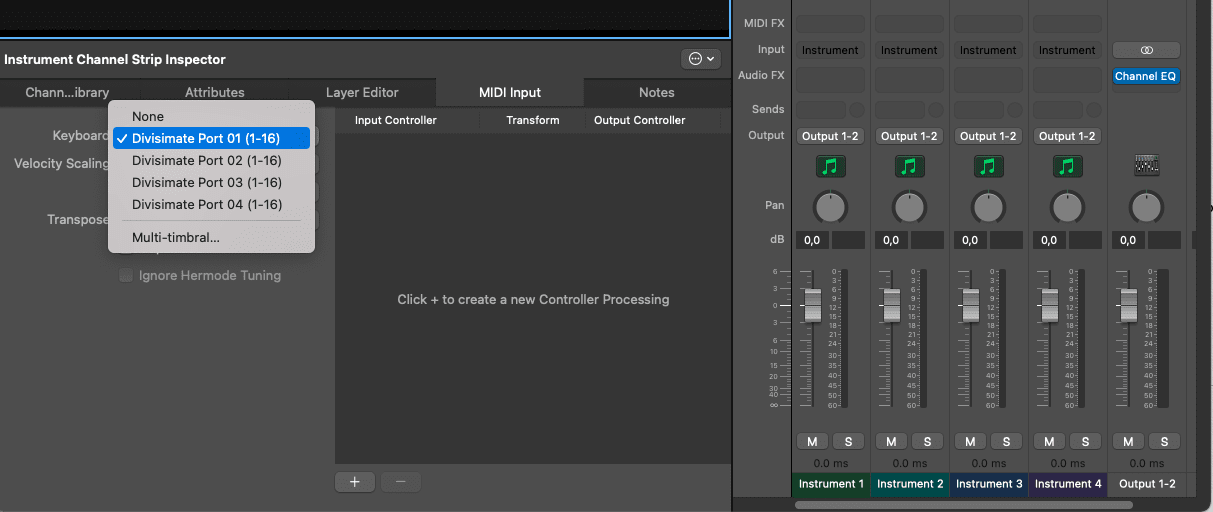
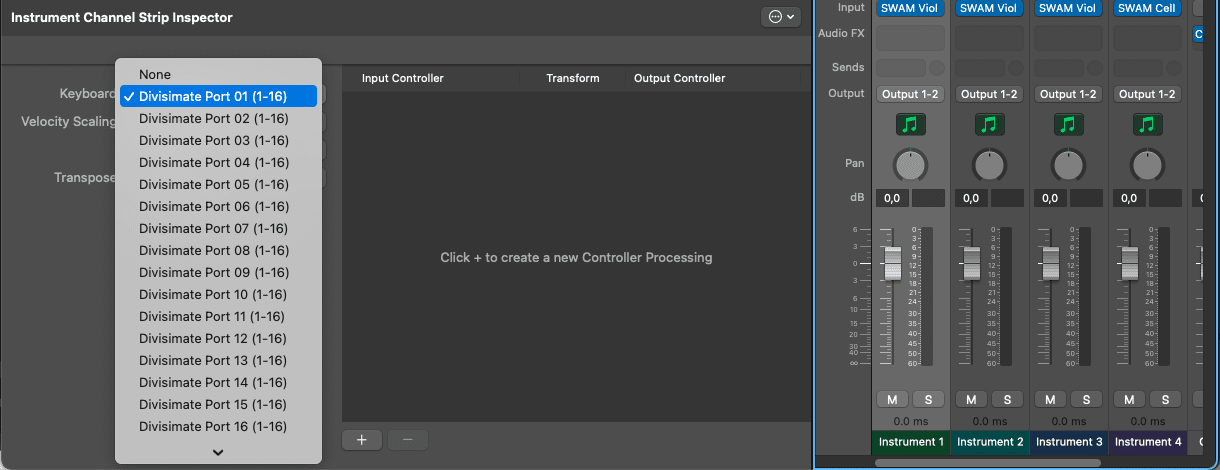
- Select the channel strip and in the channel strip inspector go to the tab “MIDI Input”. Under “Keyboard” you can now choose from the four Divisimate Ports that you set up. Choose Port 1 for the first instrument, Port 2 for the second one, and so on.
Refreshing Input Names in the MIDI Input Menu
MainStage seems to have a bug where the names of Devices in the Instrument Channel Strip Inspector do not update reliably. Closing and reopening Mainstage usually solves this issue.
- Now those four instruments react to one Divisimate Port each and you can play those four voices through Divisimate. You can add more Divisimate Ports to your layout with the same method and build complex orchestrations in Divisimate. Have fun orchestrating and performing!
Shortcut Setup
Since the manual process can be unnecessarily long for creating all 32 Divisimate ports, we have done this work for you. You can download our layout file for you to import into your project here:
*The layout is compressed in a .zip-Archive. Make sure you unzip the file in the finder before you try to import it.
- Open a new Concert – you can use the keyboard minimalist preset, or any other simple template.
- Go to the layout page and on the top right of the layout window open the menu and choose “Import Layout”.
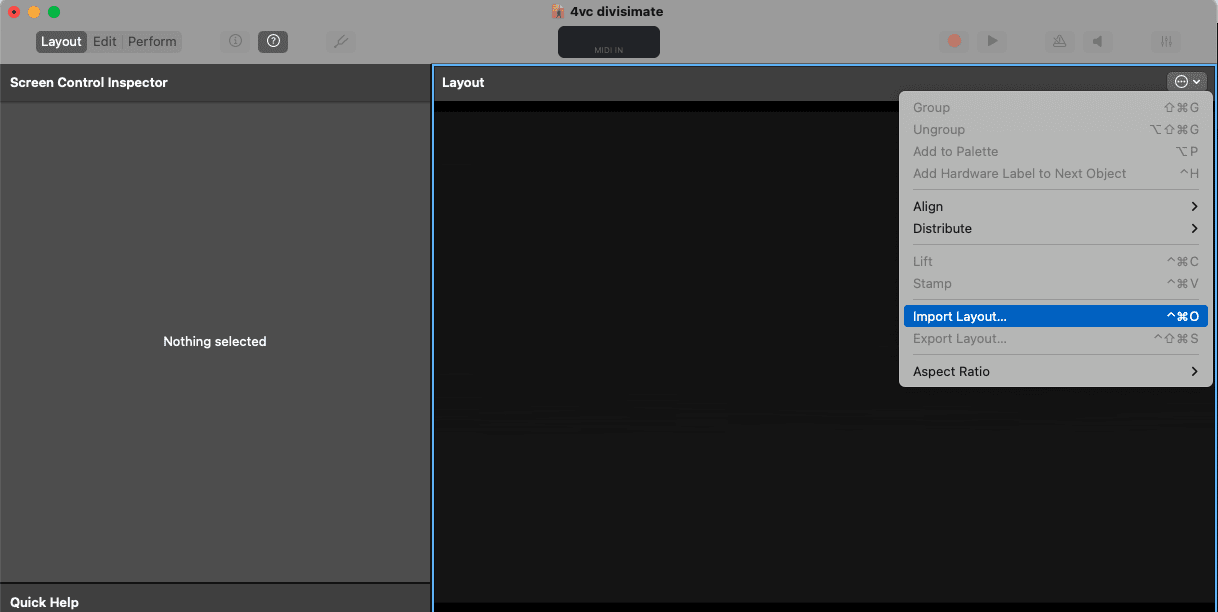
- In the “Import Layout” Menu choose the layout file you just downloaded above.
- This will import a layout with 32 prepared Divisimate port set up as devices, looking like this:
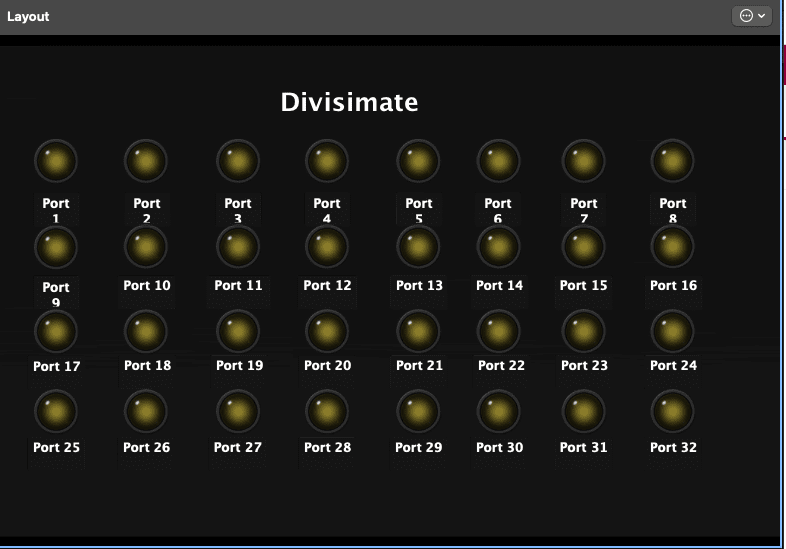
- Now you can head over to the “Edit” tab and just create any number of instruments. For each Instrument Channel Strip you can now select one of the 32 Divisimate Ports as an input.
Refreshing Input Names in the MIDI Input Menu
MainStage seems to have a bug where the names of Devices in the Instrument Channel Strip Inspector do not update reliably. Closing and reopening Mainstage usually solves this issue.
- Any Instrument Channel Strips you set up this way can now pbe played through Divisimate. You can now build complex orchestrations in Divisimate. Have fun orchestrating and performing!
Important Settings
If you want to go back to working the traditional way track-by-track, simply press ‘Bypass’ or the shortcut b in Divisimate. Divisimate will then send all midi events and CCs directly through to all ports without any delay or latency. This way you can just record enable any track alone and play them as if Divisimate was not there.
Careful: If you have instruments using the option “All MIDI In”, you should use the power button (or the ESC key) to turn Divisimate off when you record those instruments to avoid note duplicates.
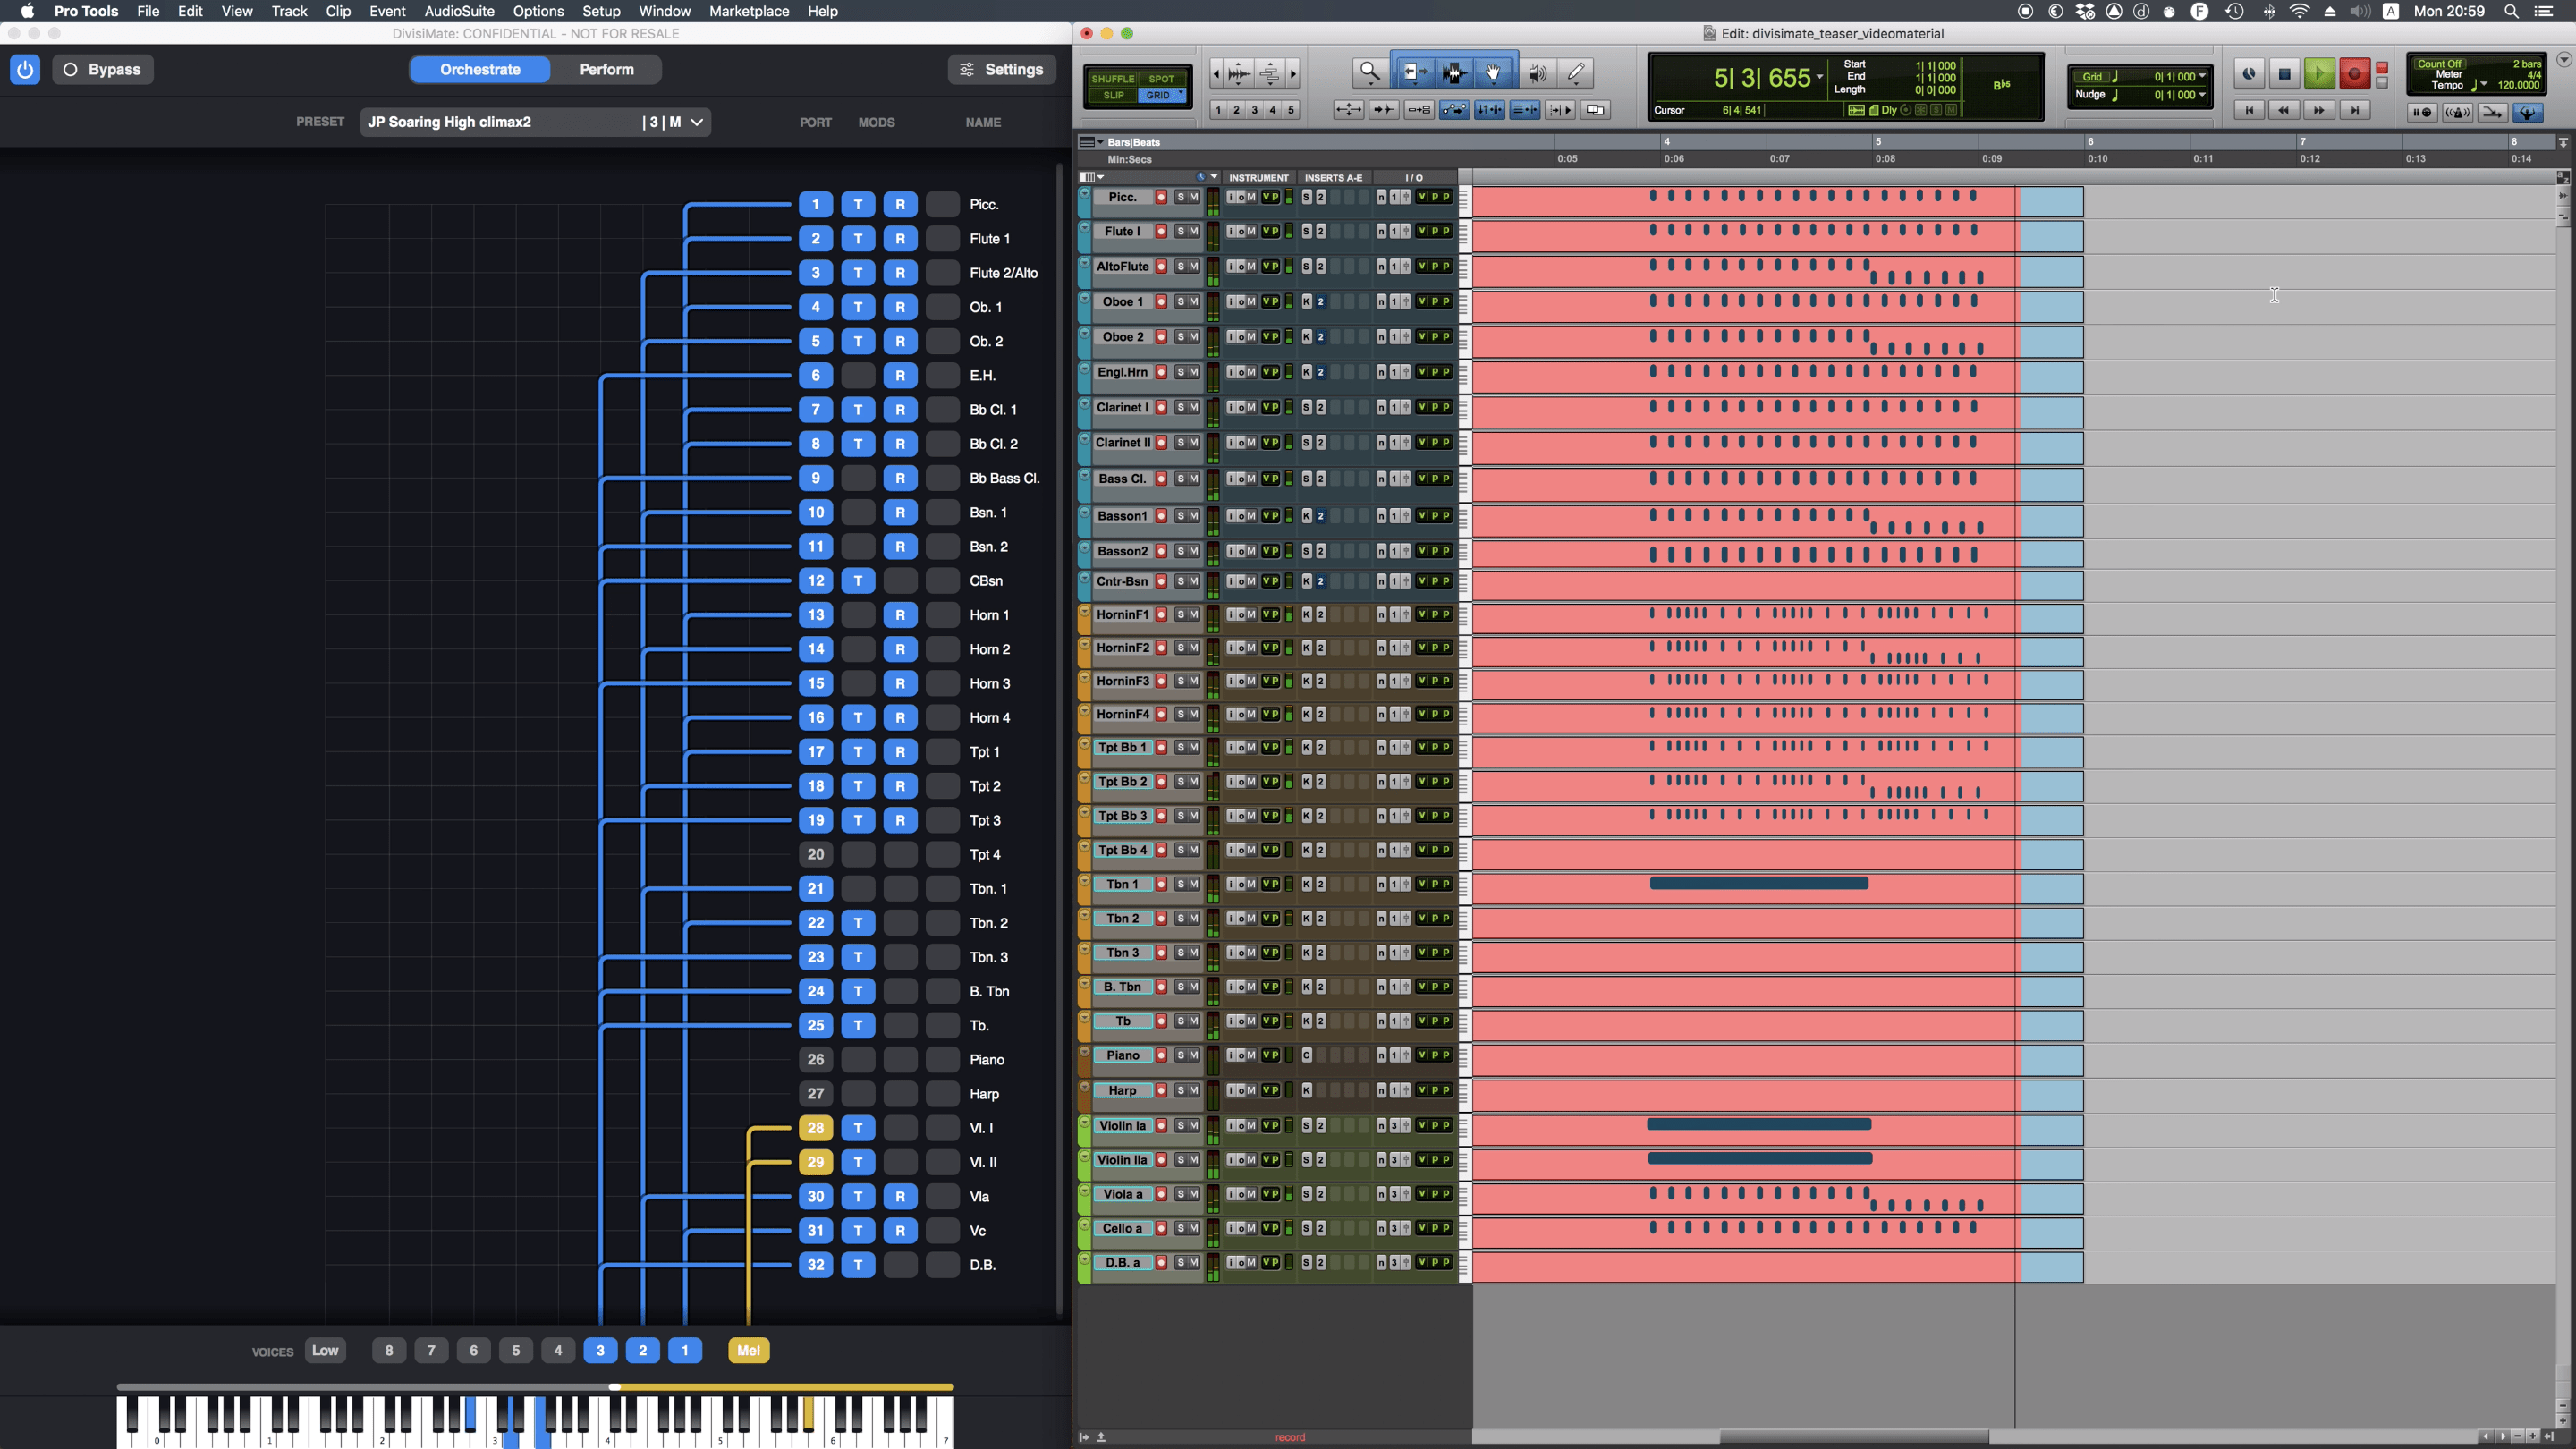
In this tutorial we will go through the steps to send the individual notes 4-note chords to four different instruments in Pro Tools with the standalone version of Divisimate 2. Please note that the use of Multitimbral Ports is not supported by Pro Tools.
Setup Divisimate
- Open Divisimate and make sure that the correct port configuration for the software is selected in the sytem tray (win) / menu bar (mac).
- Manually activate 4 voices in the lower part of the GUI above the keyboard by clicking on ‘4’ and connect the 4 voices to the first 4 Out-Ports on the right by clicking in the matrix.
Alternatively you can load the factory preset “4vc – 4 parts” on the perform page.
- Make sure that your MIDI input device is activated in the settings.
Setup Pro Tools
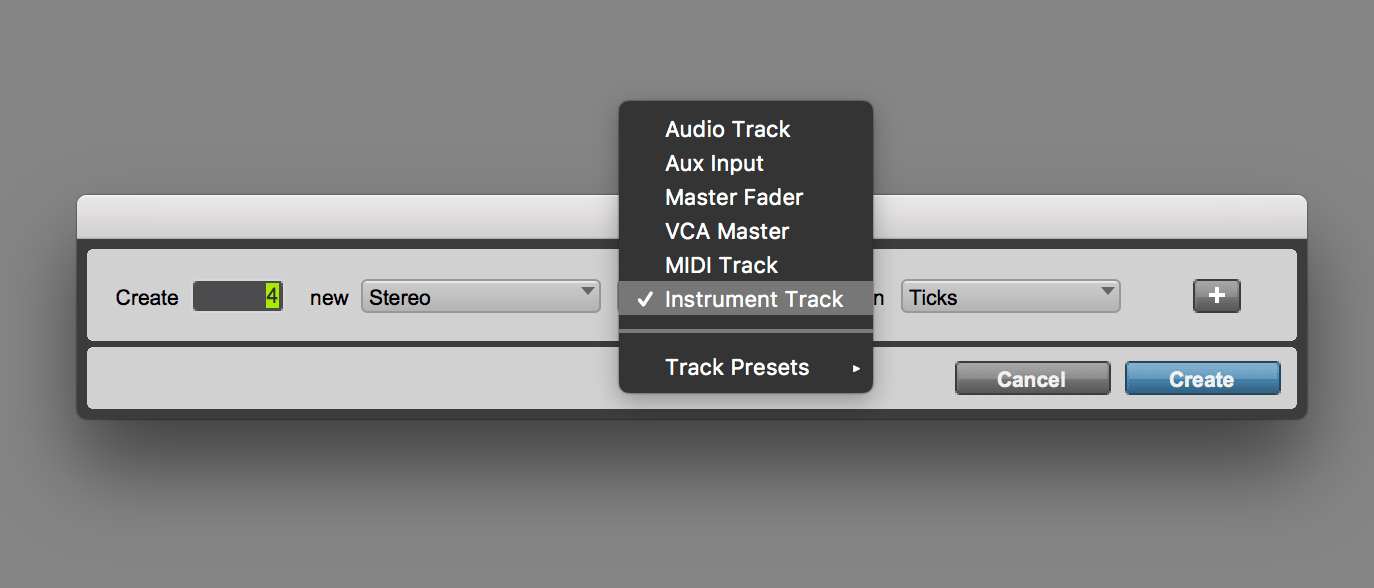
- Open a new session in Pro Tools and create 4 Instrument-Tracks
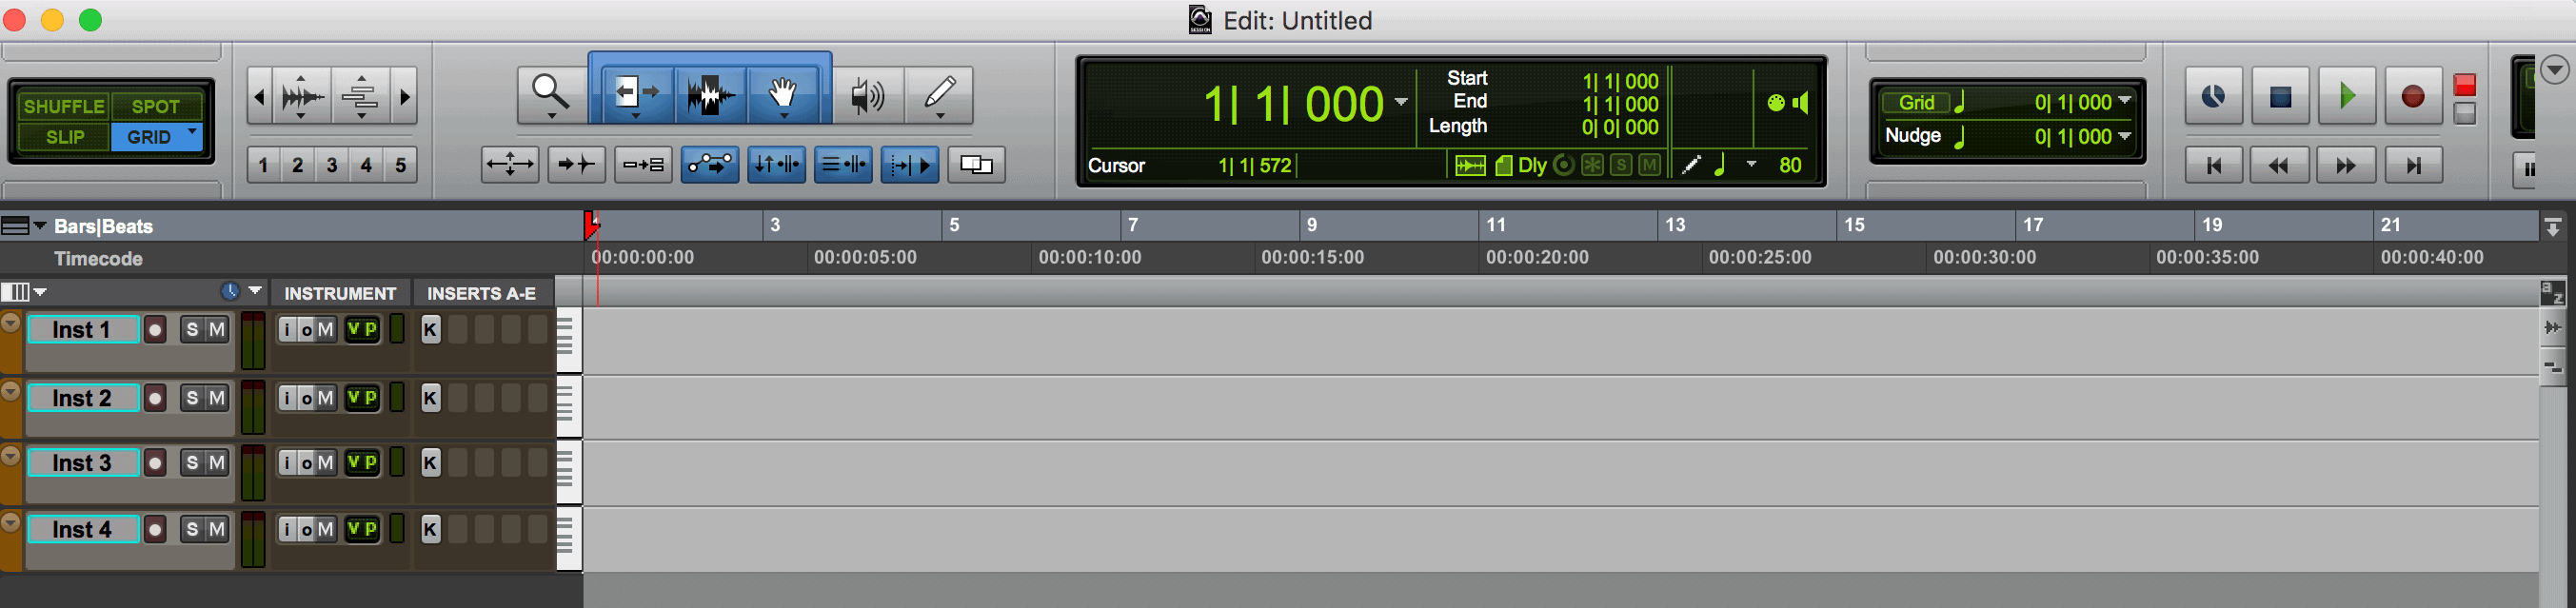
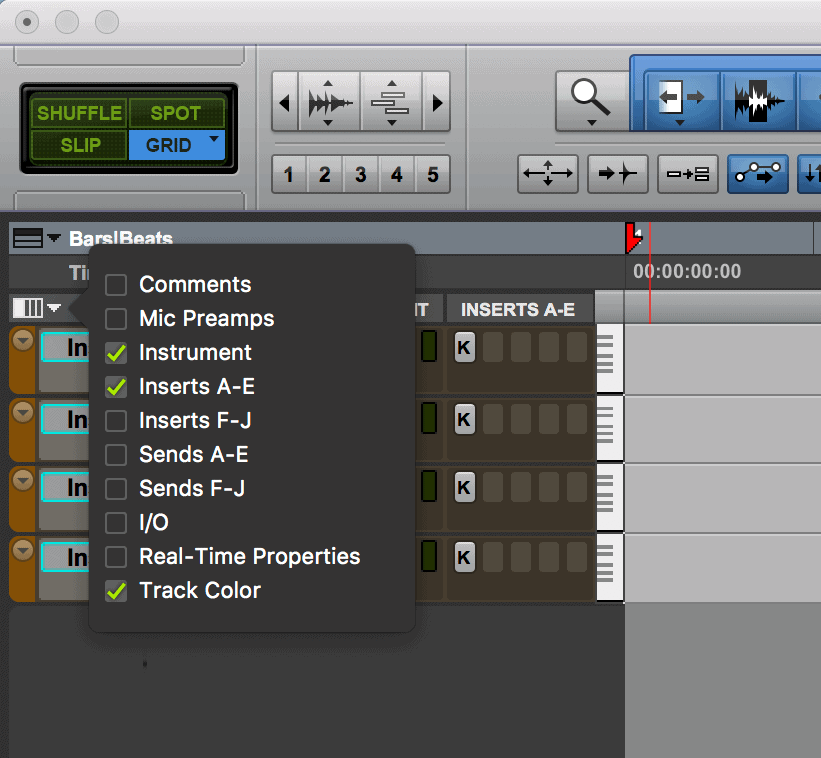
- Go the left side above the tracks to make sure you can see the ‘Instrument properties’ and the ‘Inserts’ in your track view.
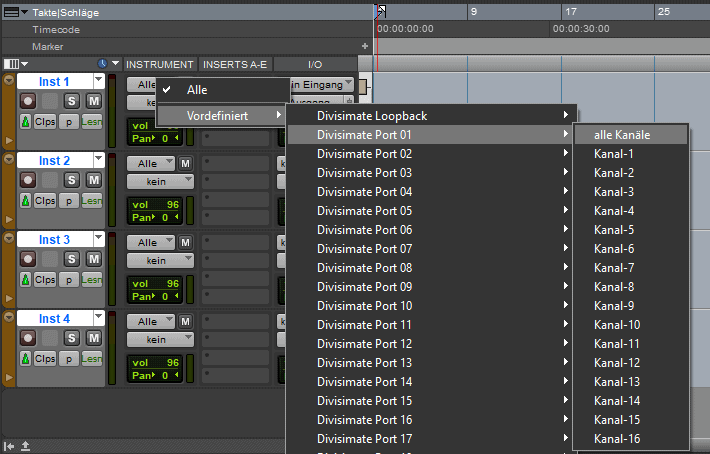
- Set the first instrument’s midi-input from ‘All’ to ‘Divisimate Port 01’, the following track’s midi input to ‘Divisimate Port 02’ and so on.
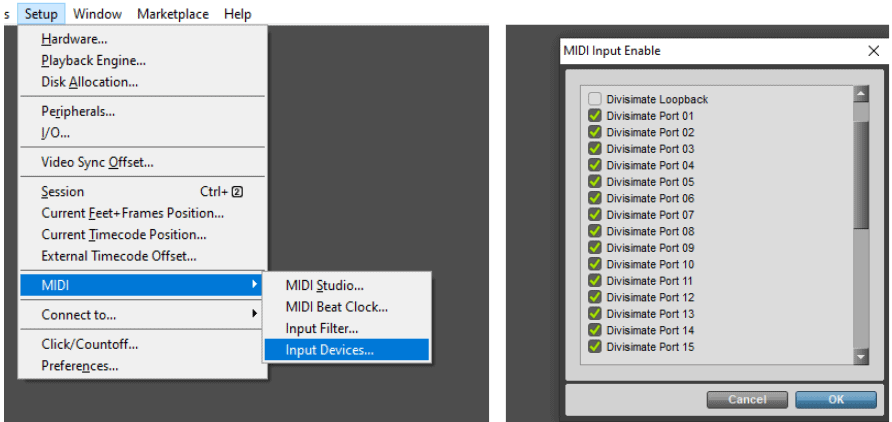
- If you can not see any Divisimate Ports as input options for your instrument tracks, go to Setup/MIDI/Input Devices and make sure all Divisimate Ports are activated.
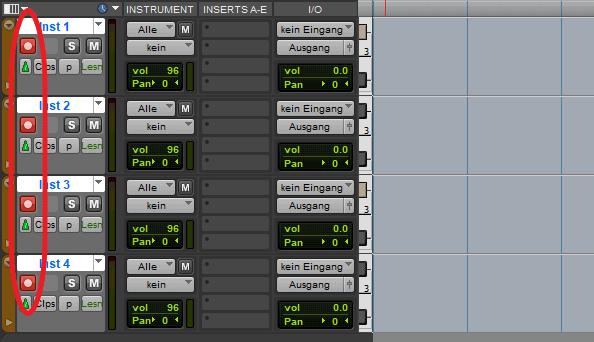
- Make sure that all four tracks are record enabled by holding shift and clicking on the button.
- Now you can play the four instruments through Divisimate an record the result in Pro Tools. Now that you got the hang of it, you can expand your template, add more instruments and create your own orchestrations.
Have fun orchestrating and composing!
Important Settings
If you want to go back to working the traditional way track-by-track, simply press ‘Bypass’ or the shortcut b in Divisimate. Divisimate will then send all midi events and CCs directly through to all ports without any delay or latency. This way you can just record enable any track alone and play them as if Divisimate was not there.
Careful: If you have instruments using the option “All MIDI In”, you should use the power button (or the ESC key) to turn Divisimate off when you record those instruments to avoid note duplicates.
Additional Ressources
Creating a Loopback Track in Pro Tools
Skip to 5:55 to learn how to set up a loopback track in Pro Tools.
In this quickstart we will go through the steps to send the individual notes from 4-note chords to four different instruments in Reaper.
Divisimate 2 can be used either in standalone mode or as a plugin. If you want to use standalone mode keep reading. If you want to use Divisimate 2 as a plugin, go to Divisimate 2 Plugin Setup.
Divisimate 2 Standalone Setup
- Open Divisimate and make sure that the correct port configuration for the software is selected in the sytem tray (win) / menu bar (mac).
- Manually activate 4 voices in the lower part of the GUI above the keyboard by clicking on ‘4’ and connect the 4 voices to the first 4 Out-Ports on the right by clicking in the matrix.
Alternatively you can load the factory preset “4vc – 4 parts” on the perform page.
- Make sure that your MIDI input device is activated in the settings.
Now open a new session in Reaper and continue with the > Track Setup.
Divisimate 2 Plugin Setup
- Open a new session in Reaper
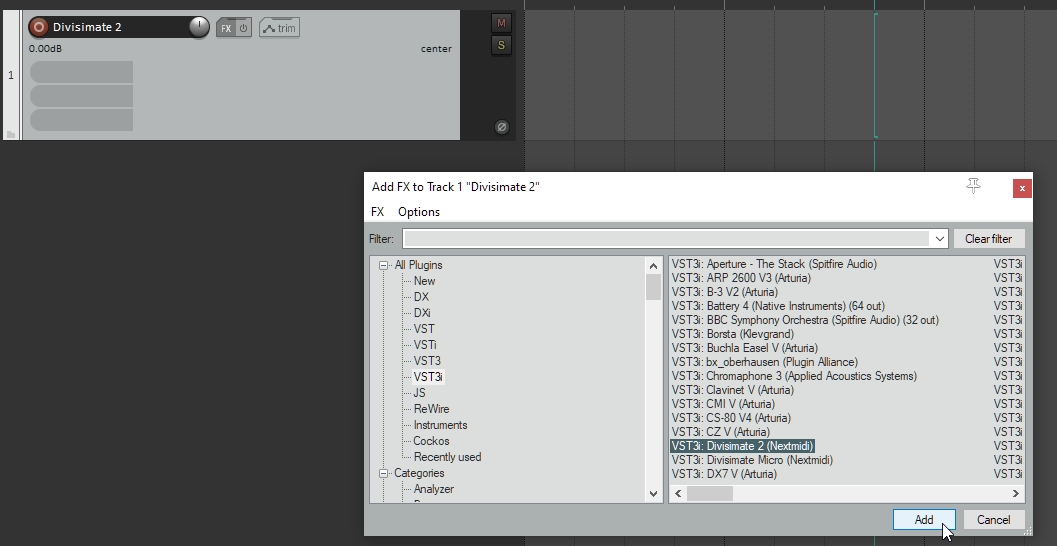
- Create a new track and name it Divisimate 2.
- Load the VST3i instrument plugin Divisimate 2 into this track. Divisimate 2 will open. Close the plugin window for the time being.
- Make sure that the correct port configuration for the software is selected in the sytem tray (win) / menu bar (mac).
- Manually activate 4 voices in the lower part of the GUI above the keyboard by clicking on ‘4’ and connect the 4 voices to the first 4 Out-Ports on the right by clicking in the matrix.
- Choose your MIDI controller as input.
If you use multiple controllers, activate the > Nextmidi Merger Port in the Nextmidi Hub, choose the controllers that should be merged and select the Nextmidi Merger Port as your input for the Divisimate 2 track. Don’t set it to All MIDI Inputs since this will create a feedback loop!
Track Setup
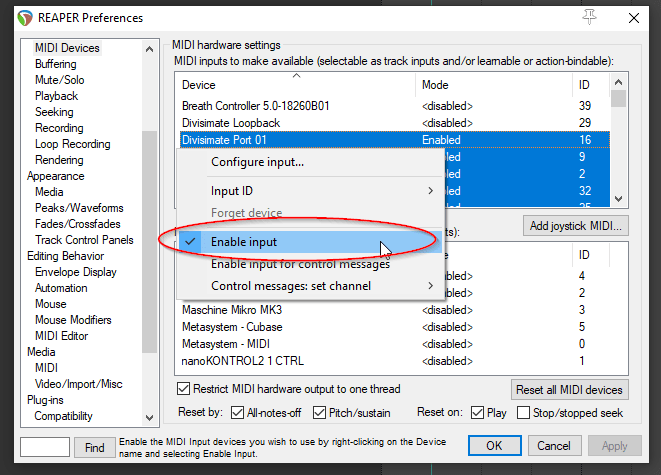
- In Reaper go to Options > Preferences > Audio > MIDI Devices and make sure all Divisimate Ports are enabled. You can click on the first one, shift-click on the last one and enable them all in one go with right-click/ctrl-click > enable input.
You also have to disable the checkbox all MIDI controllers you want to use through Divisimate; propably at least your keyboard and your fader or breath controller, if you use a dedicated one.
- Create at least 4 Instrument-Tracks by clicking Track > Insert virtual instrument on new track
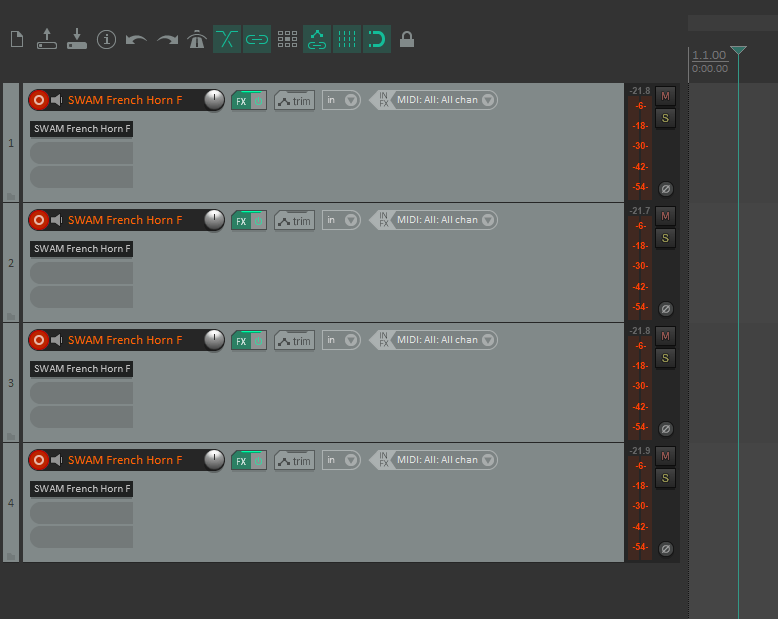
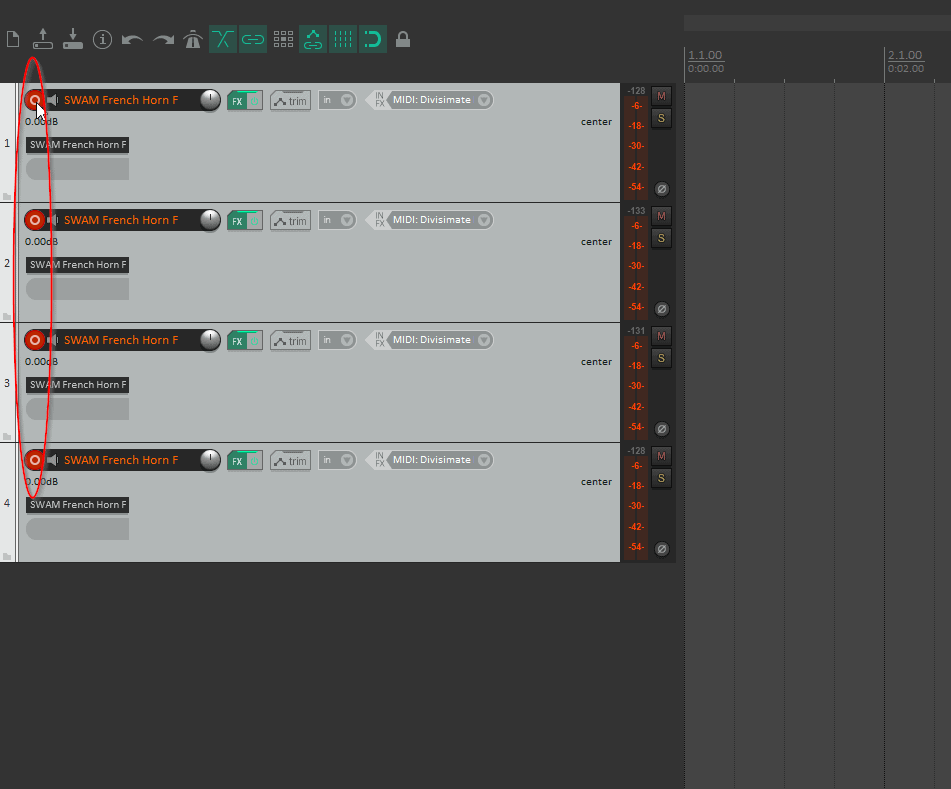
- Make sure, that the tracks are record-enabled. If they are not, enable them by shift-clicking the arm-button of the tracks you want to play. You can also enable a bunch all at once by selecting them (click on the first one and shift-click on the last one) before clicking on record-arm.
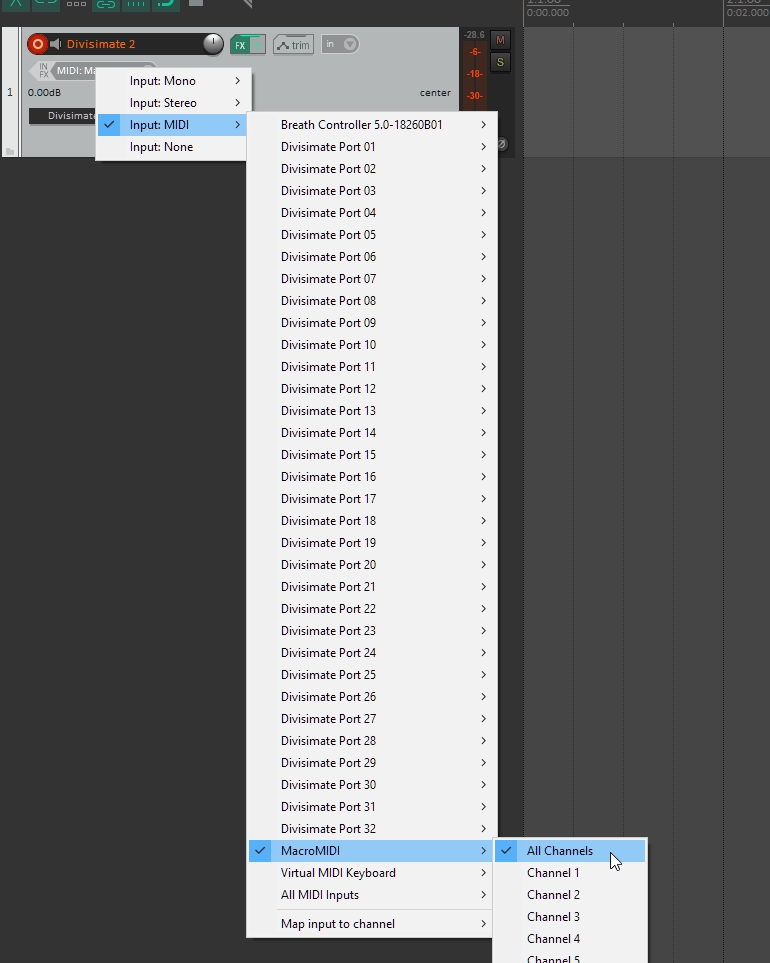
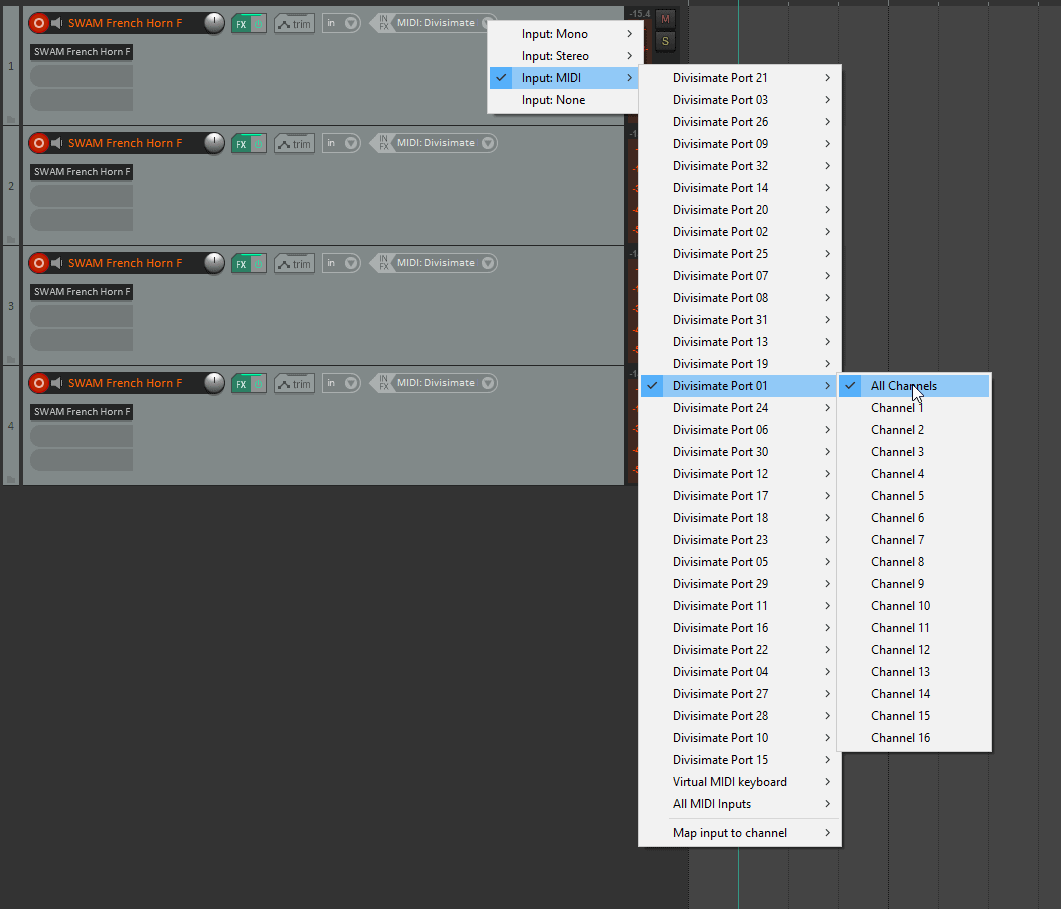
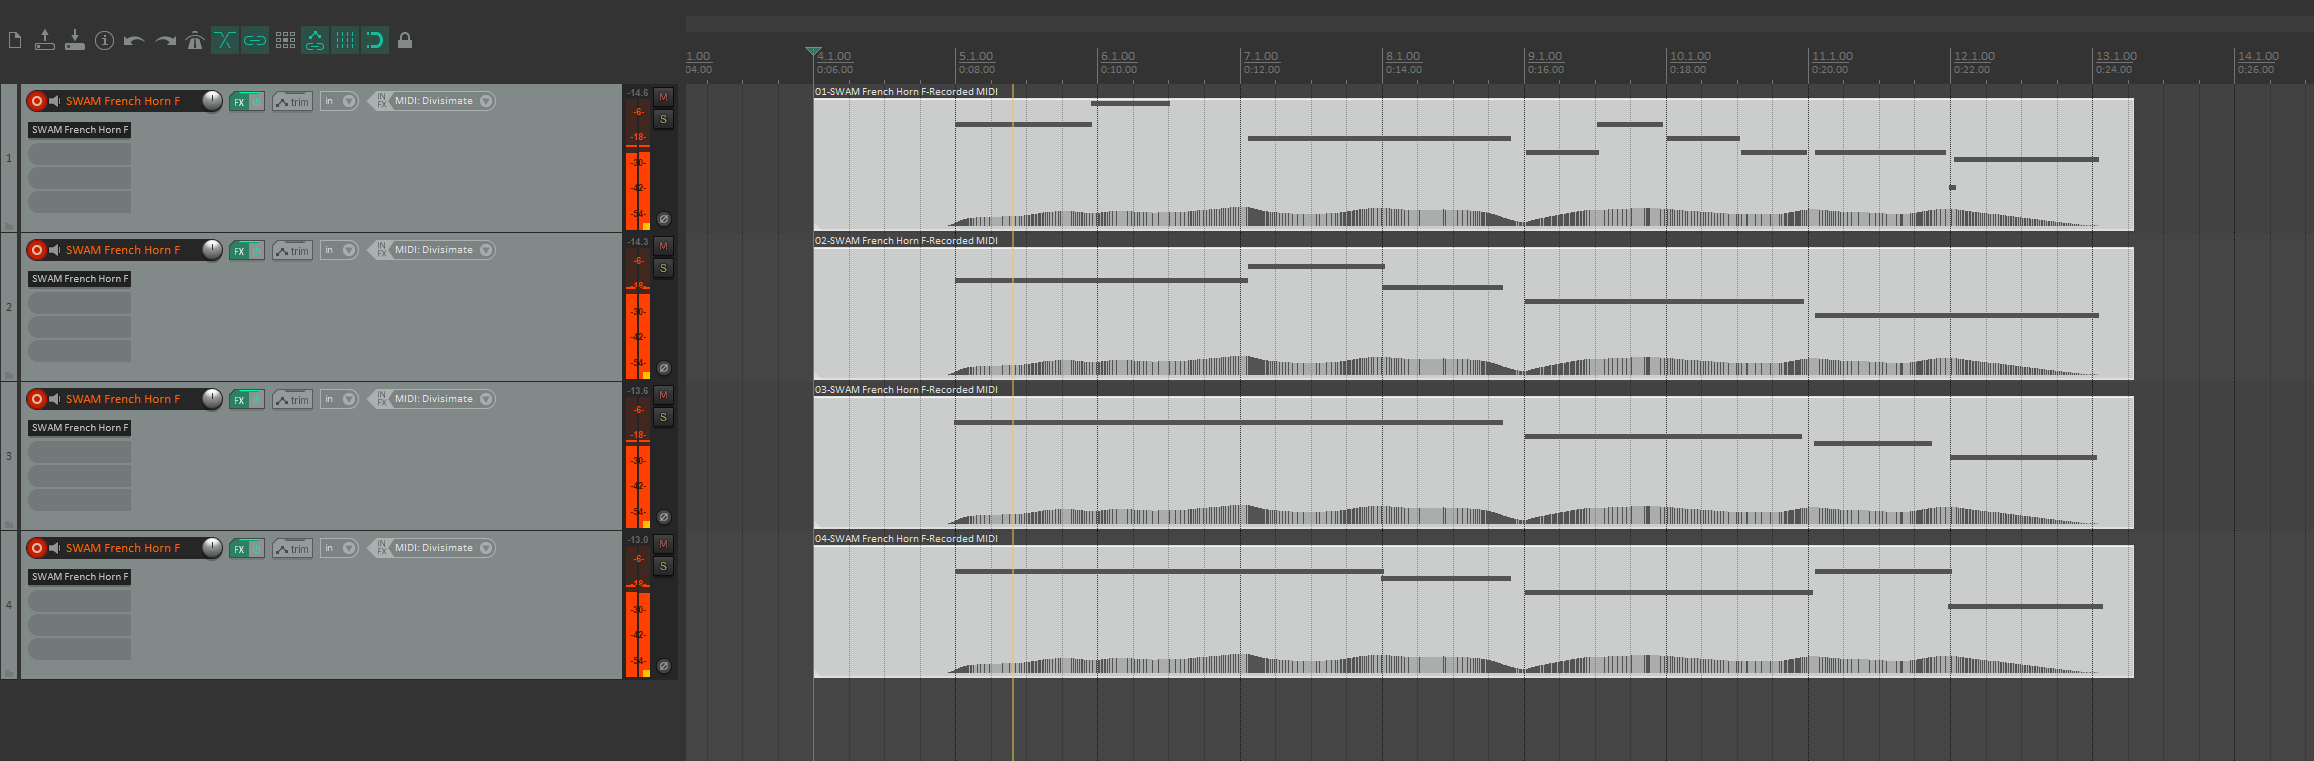
- Set the first track’s midi-input from MIDI: All: All channels to Input: MIDI > Divismate Port 01 > All Channels, the following track’s MIDI input to MIDI > Divismate Port 02 > All Channels and so on. To play the 4-voice-preset you built in Divisimate, you need to connect at least Port 01-04.
- Now you can play the four instruments through Divisimate an record the result in Reaper. Have fun orchestrating and composing!
Important Settings
If you want to go back to working the traditional way track-by-track, simply press ‘Bypass’ or the shortcut b in Divisimate. Divisimate will then send all midi events and CCs directly through to all ports without any delay or latency. This way you can just record enable any track alone and play them as if Divisimate was not there.
Careful: If you have instruments using the option “All MIDI In”, you should use the power button (or the ESC key) to turn Divisimate off when you record those instruments to avoid note duplicates.
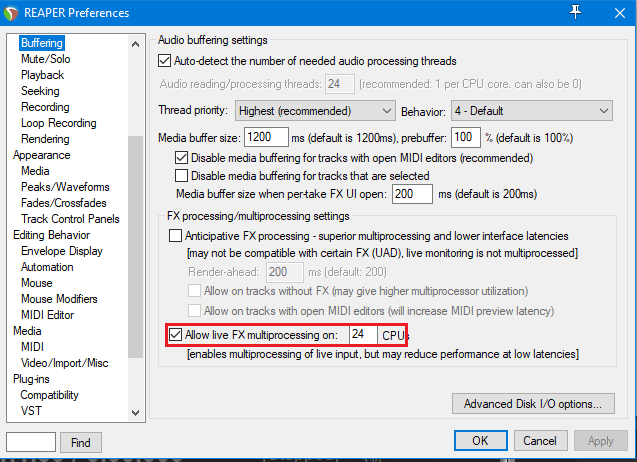
If you want to play many instruments live in Reaper it is important to turn on live FX multiprocessing to distribute the CPU load across multiple cores.
Additional Ressources
Creating a Loopback Track in Reaper
Skip to 0:58 to learn how to set up a loopback track in Reaper.
In this tutorial we will go through the steps to send the individual notes 4-note chords to four different instruments in Studio One.
Divisimate 2 can be used either in standalone mode or as a plugin. If you want to use standalone mode keep reading. If you want to use Divisimate 2 as a plugin, go to Divisimate 2 Plugin Setup.
Divisimate 2 Standalone Setup
- Open Divisimate and make sure that the correct port configuration for the software is selected in the sytem tray (win) / menu bar (mac).
- Manually activate 4 voices in the lower part of the GUI above the keyboard by clicking on ‘4’ and connect the 4 voices to the first 4 Out-Ports on the right by clicking in the matrix.
Alternatively you can load the factory preset “4vc – 4 parts” on the perform page.
- Make sure that your MIDI input device is activated in the settings.
Now open a new session in Studio One and continue with the > Divisimate Port Setup.
Divisimate 2 Plugin Setup
- Open a new session in Studio One
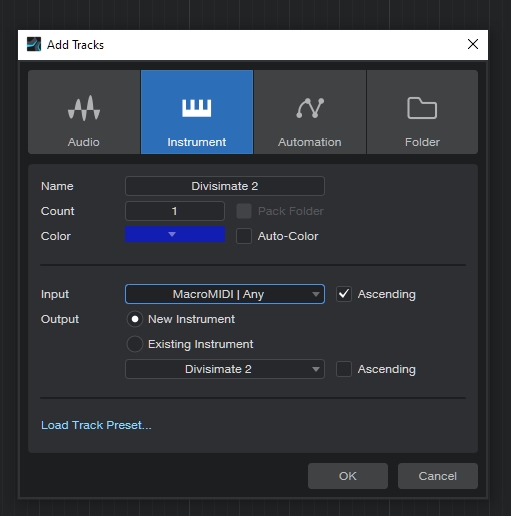
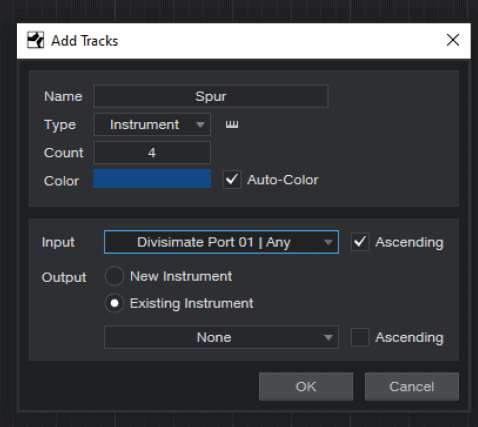
- Click Track > Add Tracks… and select the Instrument tab.
- Set the name to Divisimate 2, count to 1, choose a color of your liking,
- Choose your MIDI controller as input. Don’t leave it to All Inputs since this will create a feedback loop!
Multiple Input Controllers
If you want to use multiple controllers activate the > Nextmidi Merger Port in the Nextmidi Hub, choose the controllers that should be merged. Then select the Nextmidi Merger Port as your input for the Divisimate 2 track. If it is your first time using the Nextmidi Merger Port in Studio One, you have to set it up as a »New Keyboard« in the same way you set up the Divisimate Ports in Studio One (refer to the next section).
- Make sure that the correct port configuration for the software is selected in the sytem tray (win) / menu bar (mac).
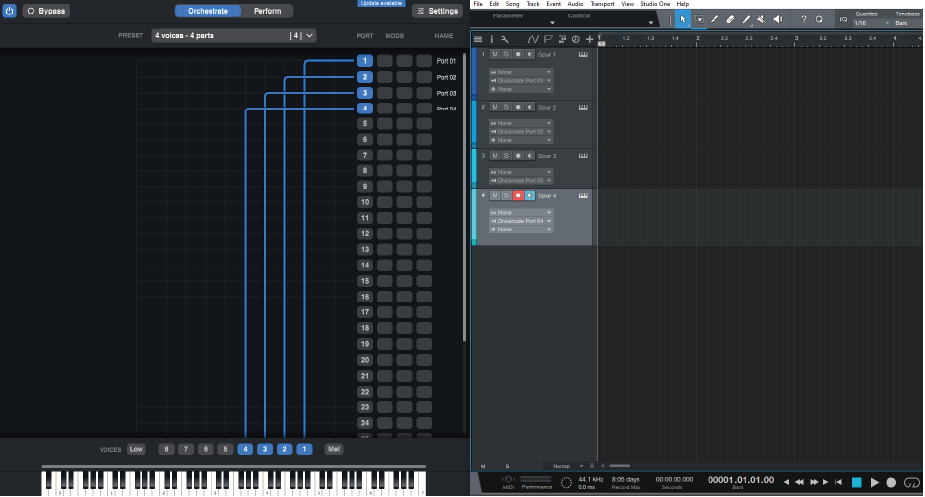
- Manually activate 4 voices in the lower part of the GUI above the keyboard by clicking on ‘4’ and connect the 4 voices to the first 4 Out-Ports on the right by clicking in the matrix.
Track Setup
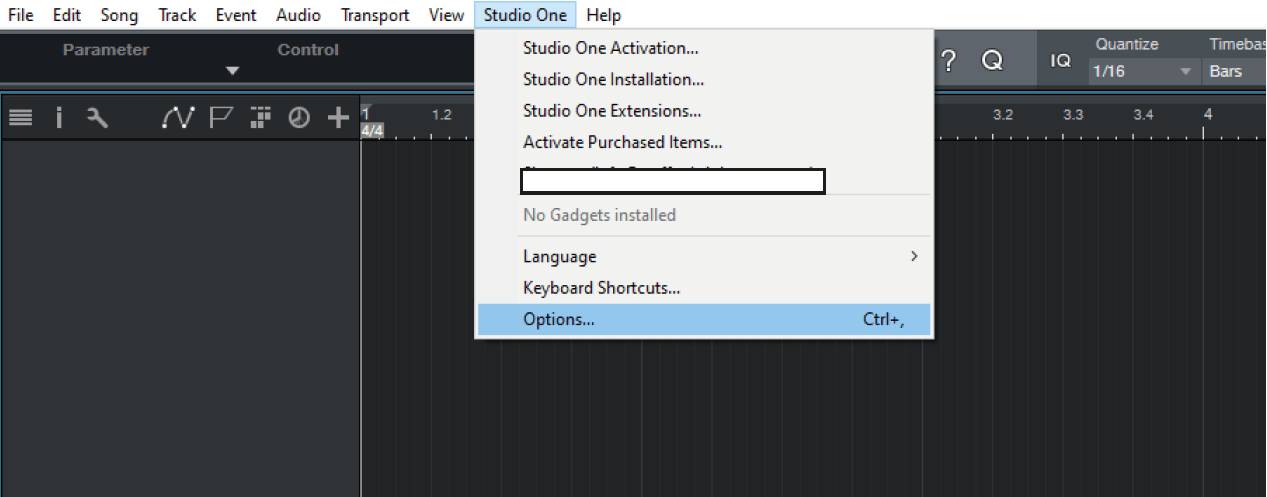
- “Options…”-Panel in Studio One.
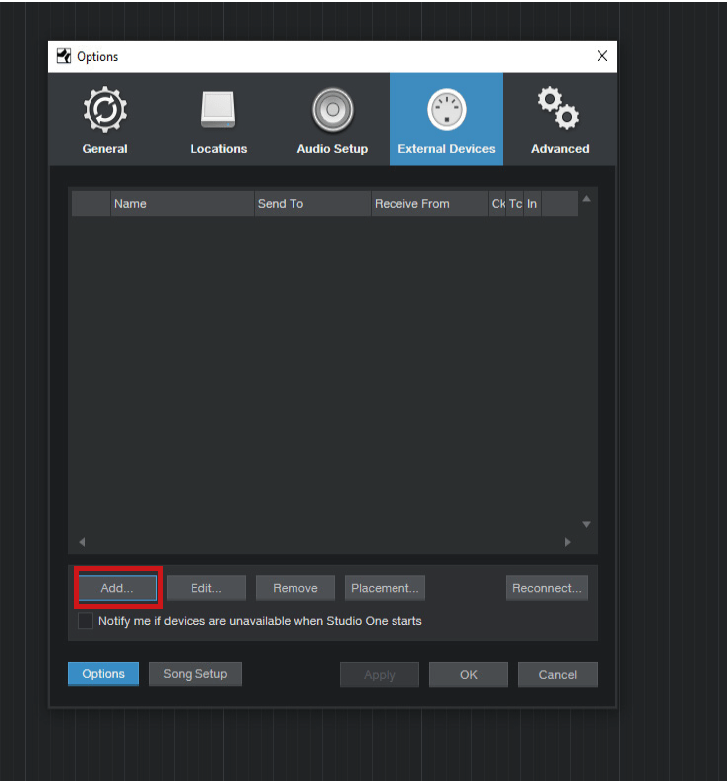
- Navigate to the “External Devices” and click on “Add…”
- Select “New Keyboard” and type in the Port Name under “Device Name”
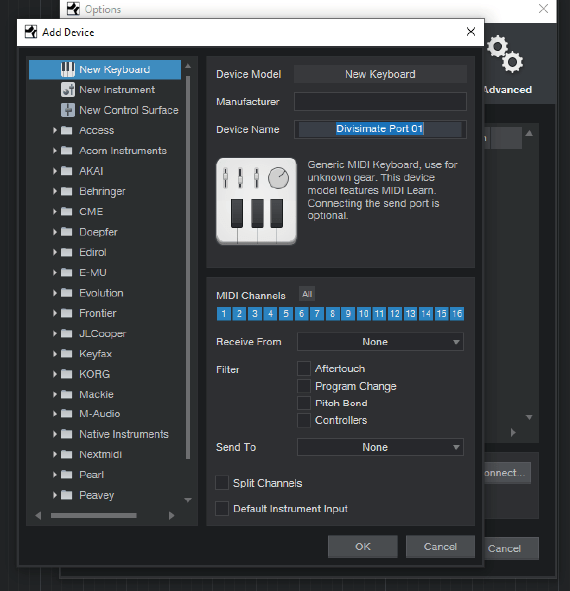
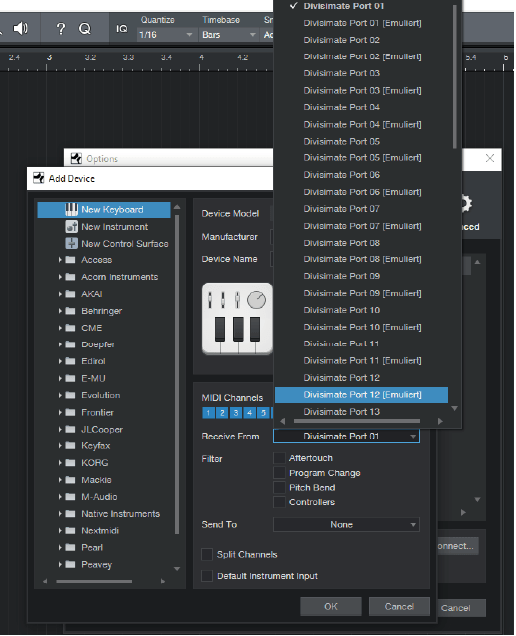
- Under “Receive from” select the Divisimate Port you are setting up, in this case Divisimate Port 01
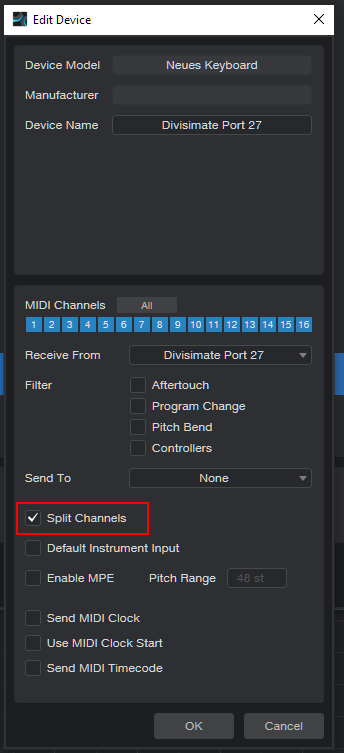
- If you plan on using Multitimbral Ports, check the option Split Channels and click OK.
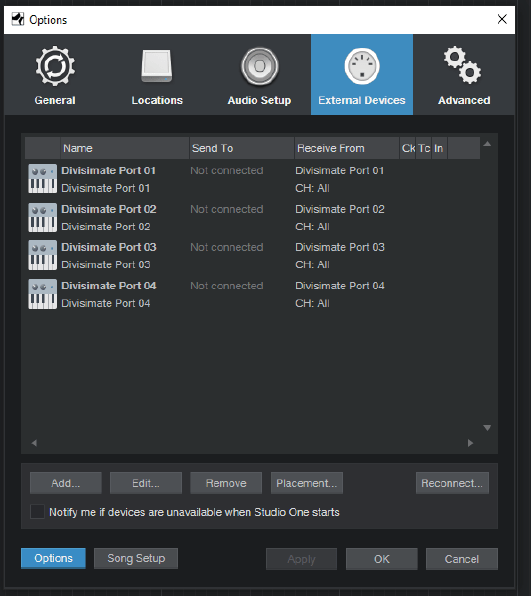
- Repeat this process for every Divisimate Port you want to use, we’re adding 4 ports here. The bad news is to use all 32, you will need to add them all manually. The good news is that you only have to do that once, and then the connections will be saved.
- Go back to your project and add 4 instrument tracks. Select Divisimate Port 01 as Input and click “Ascending” to automatically assign different Ports to each track.
- Now you can play the four instruments with Divisimate and record the result in Studio One!
Important Settings
If you want to go back to working the traditional way track-by-track, simply press ‘Bypass’ or the shortcut b in Divisimate. Divisimate will then send all midi events and CCs directly through to all ports without any delay or latency. This way you can just record enable any track alone and play them as if Divisimate was not there.
Careful: If you have instruments using the option “All MIDI In”, you should use the power button (or the ESC key) to turn Divisimate off when you record those instruments to avoid note duplicates.
Additional Ressources
Creating a Loopback Track in Studio One
Skip to 7:09 to learn how to set up a loopback track in Studio One.