Quickstart Divisimate Core
Choose your DAW:
In this quickstart we will go through the steps to send the individual notes from 4-note chords to four different instruments in Ableton Live.
Divisimate Core installs as a plugin that can be found in the Instruments folder in Ableton.
In Ableton, Divisimate can only be used with up to 2x16 dedicated Divisimate Ports. Unfortunately the Plugin Out functionality can not be used in Ableton Live at this time, as plugin MIDI output can not be split up by channel in this DAW. We hope for this limitation to be removed in the future, but for now, users of Ableton Live have to stay with the Divisimate Port workflow.
- Open a new session in Ableton Live and delete all default tracks, leave one MIDI track.
- Load the VST3 instrument plugin Divisimate Core into this track.
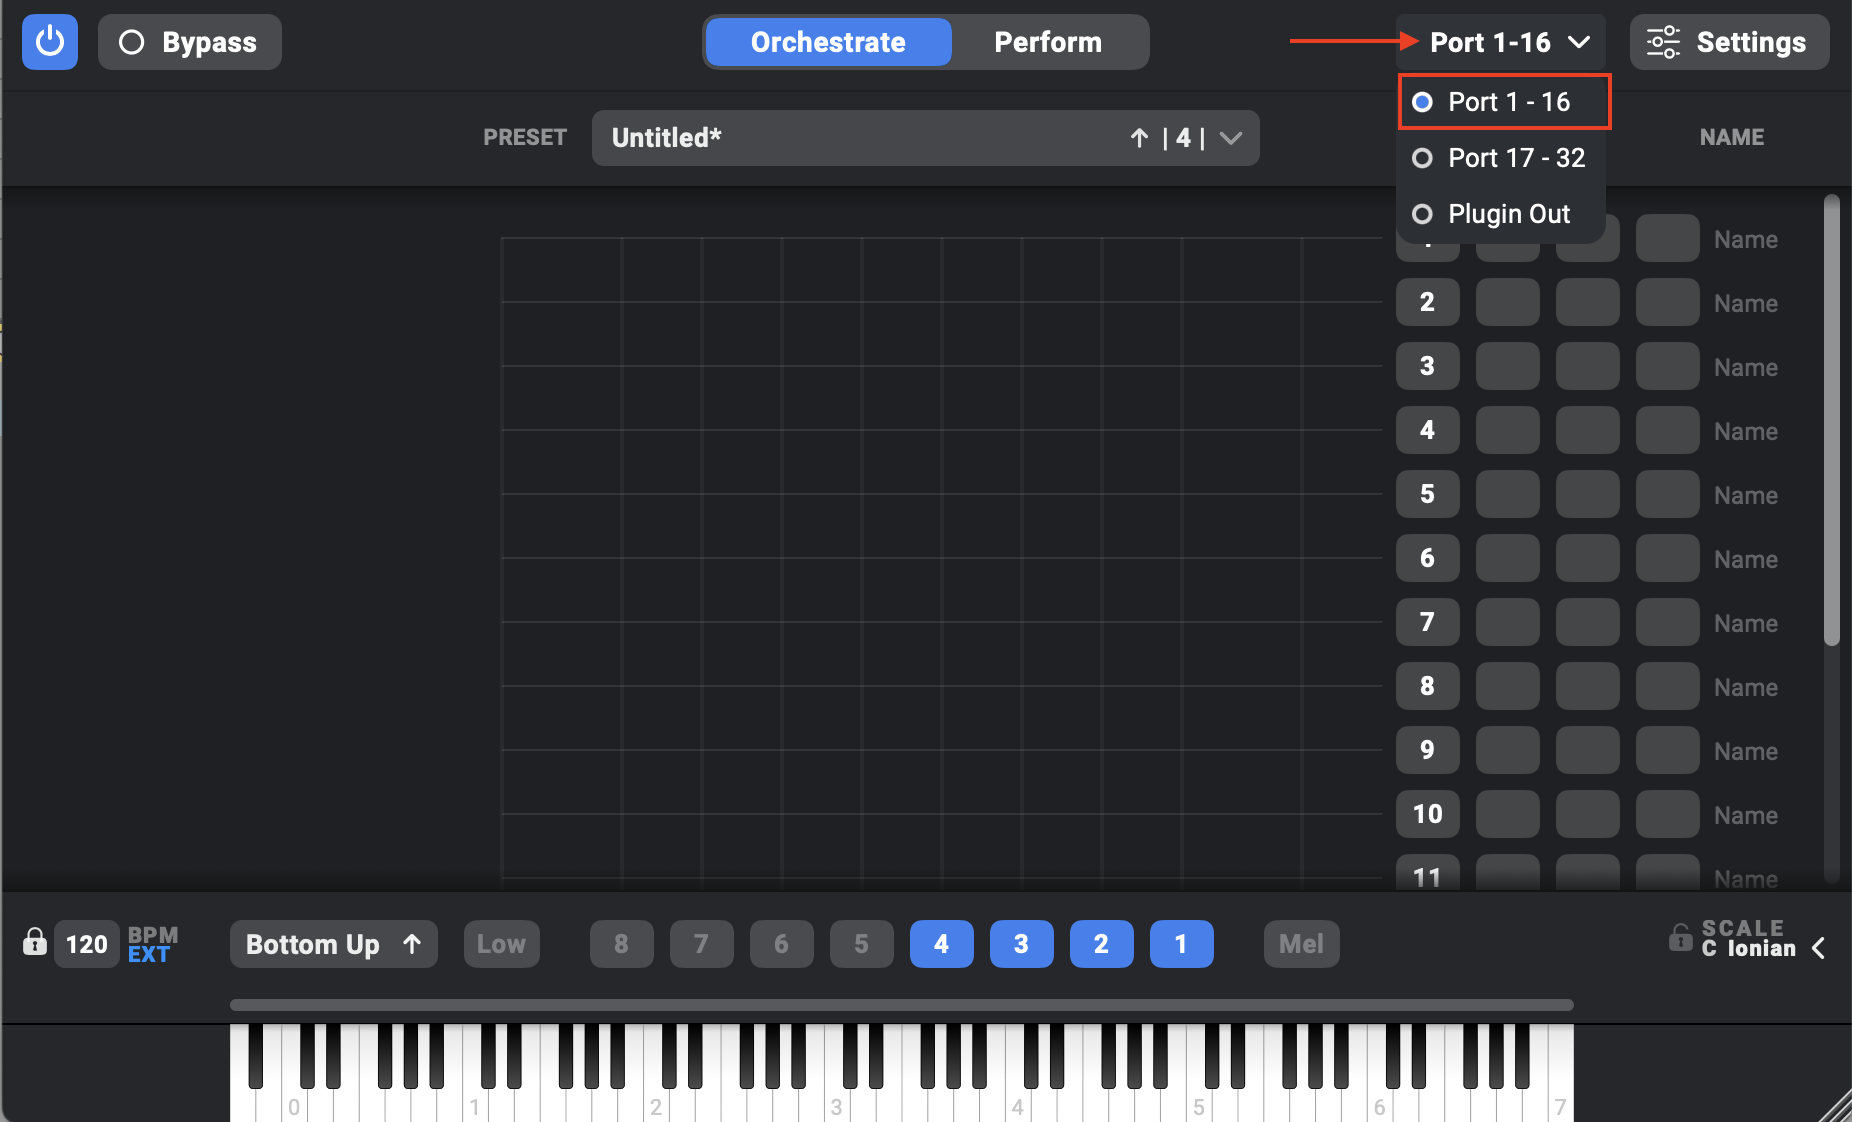
- Divisimate Core should open. Set the output configuration in the upper right corner to Port 01 - 16.
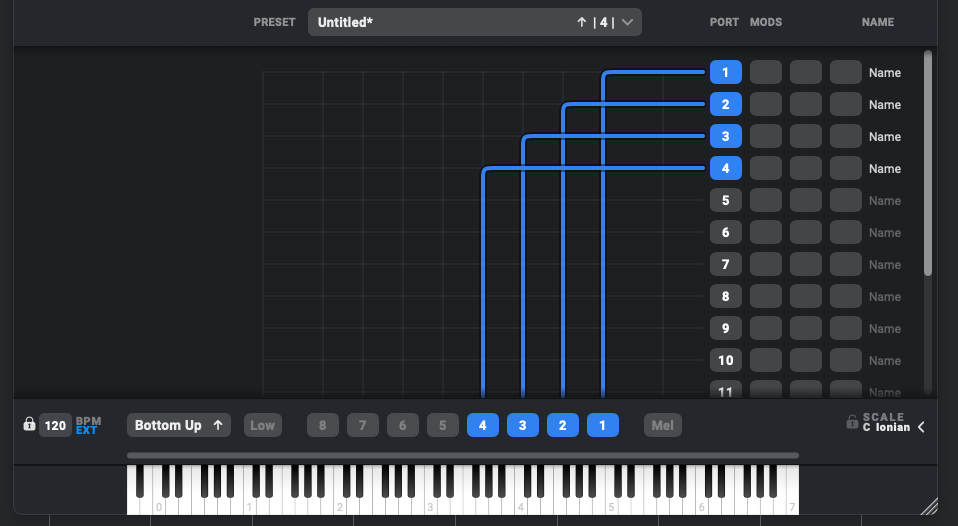
- Make sure 4 voices are activated in the lower part of the GUI above the keyboard (if not, you can activate the voices by clicking on ‘4’) and connect the 4 voices to the first 4 rows on the right by clicking in the matrix.
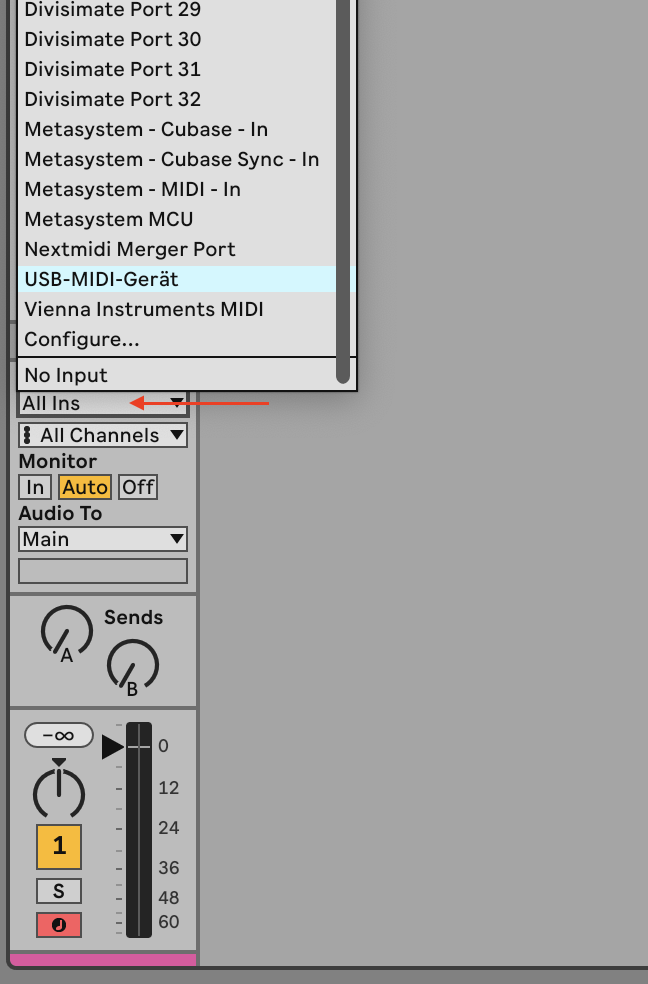
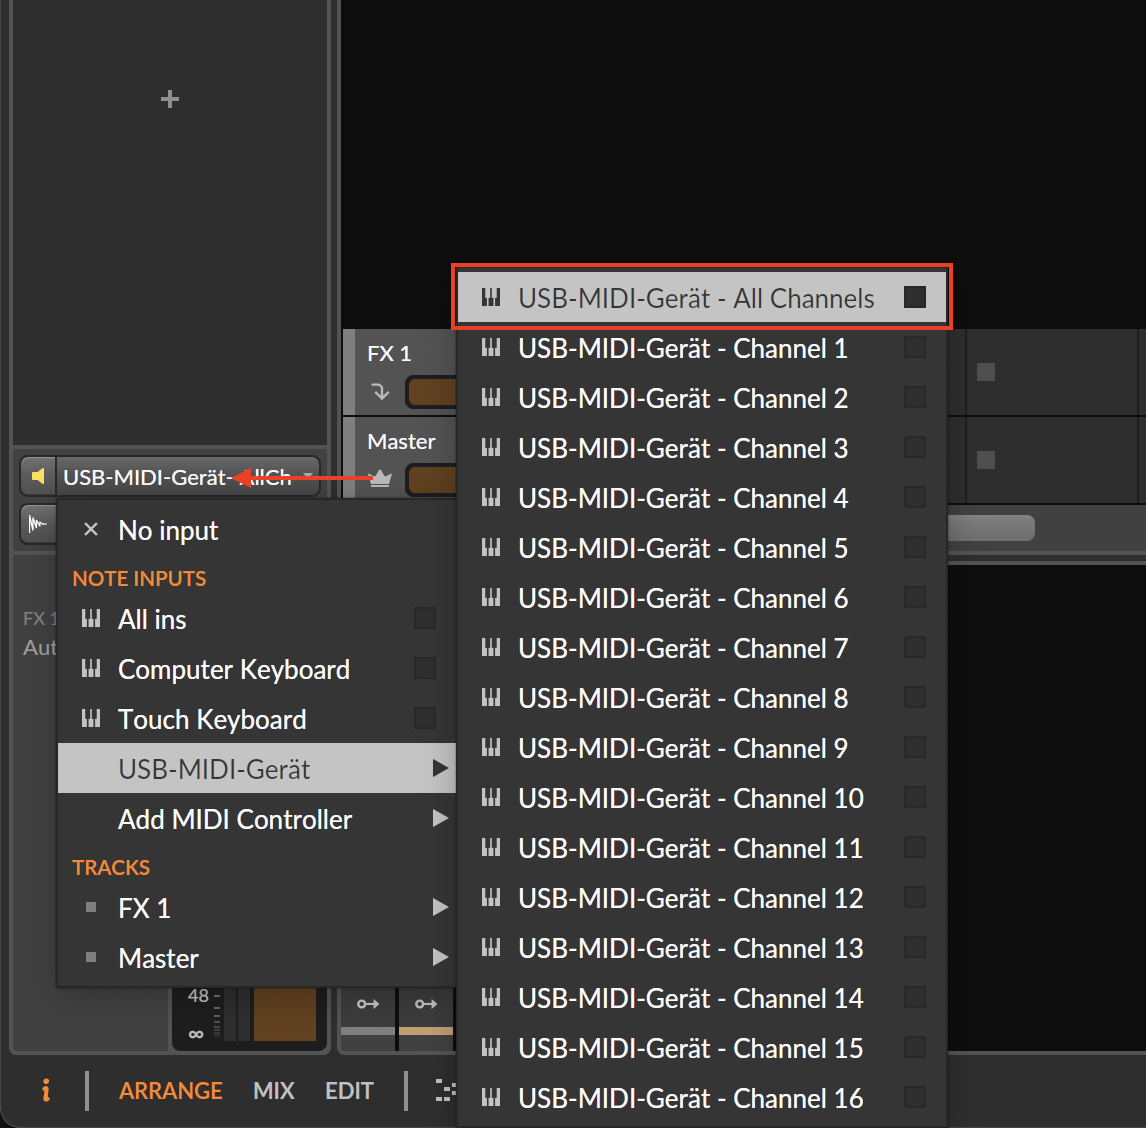
- Choose your MIDI controller as input. Don’t leave it to All MIDI Inputs, otherwise you can create a feedback loop!
If you want to use multiple input devices on your Divisimate Core track, you can use the Nextmidi Merger Port, which was installed automatically with Divisimate Core. Learn how to use it in the following video.
- Now, create four additional midi tracks that you want to connect with Divisimate Core and load instruments of your choice. Set the track inputs ("MIDI From") to Divisimate Port 01 for the first instrument track, Divisimate Port 02 for the second instrument track and so on.

- Record enable all 5 tracks and you can play your instruments by playing 4-note-chords.
Important Settings
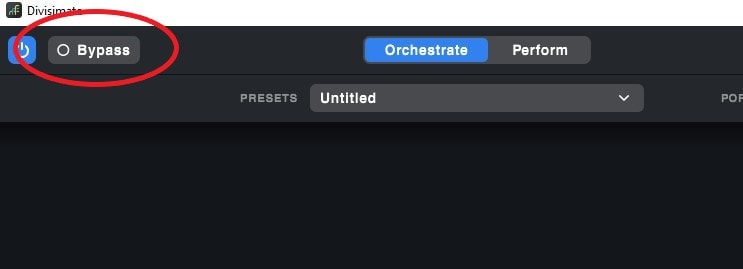
If you want to go back to working the traditional way track-by-track, simply press ‘Bypass’ or the shortcut b in Divisimate. Divisimate will then send all midi events and CCs directly through to all ports without any delay or latency.
Careful: If you have instruments using the option “All MIDI In”, you should use the power button (or the ESC key) to turn Divisimate off when you record those instruments to avoid note duplicates.
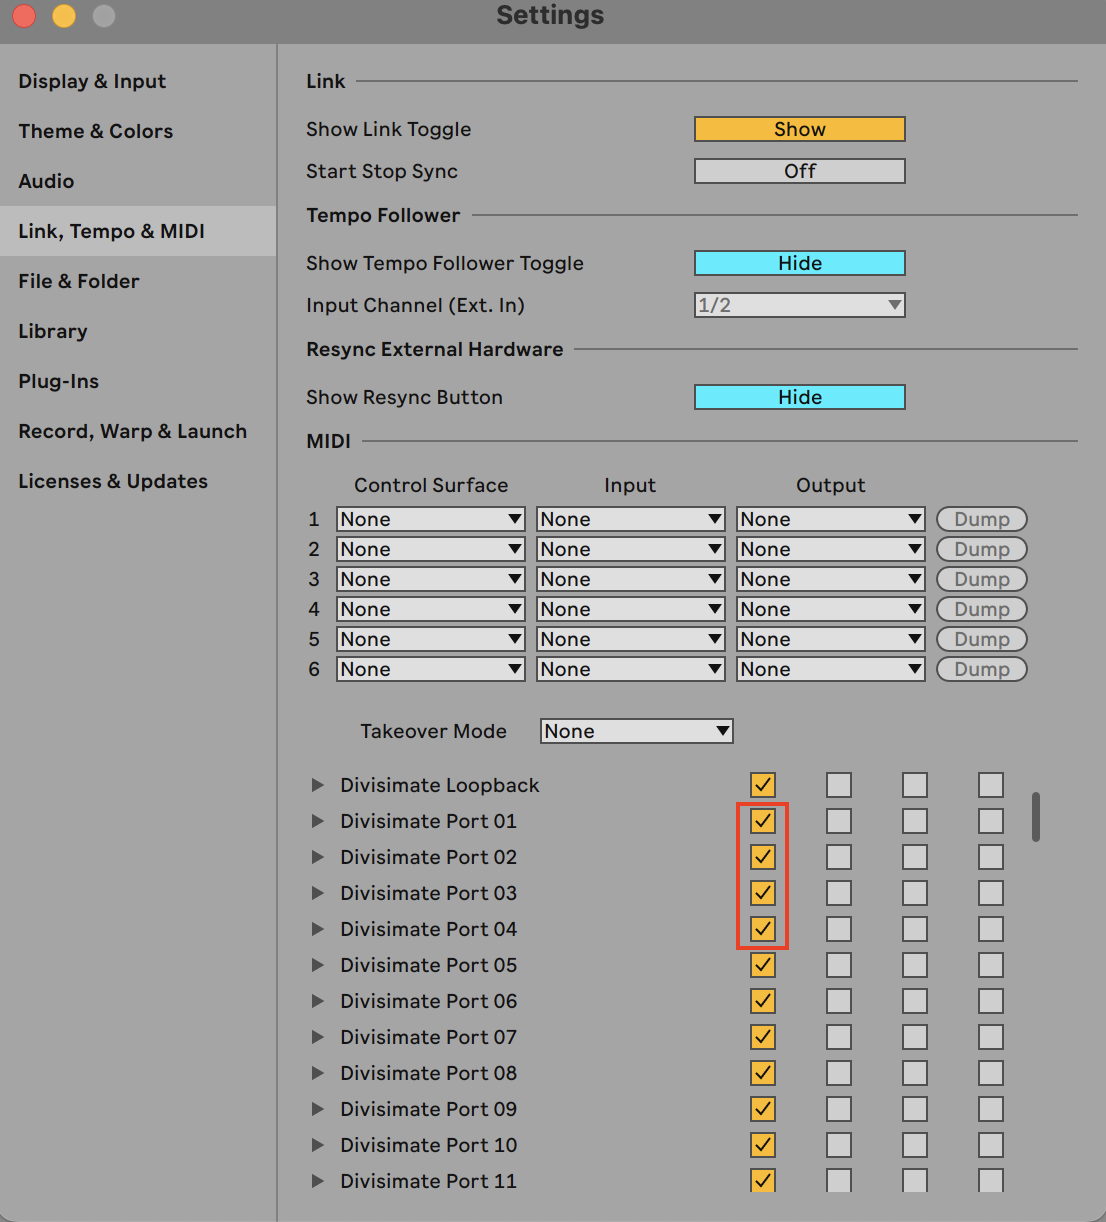
If the Divisimate Ports are not displayed in the input selection menu of your tracks make sure that the ports are enabled for tracks in the preferences.
In this quickstart we will go through the steps to send the individual notes from 4-note chords to four different instruments in Bitwig.
Divisimate Core installs as a plugin that can be found in the Instruments category in Bitwig. It can be used either with up to 2x16 dedicated Divisimate Ports or with the Plugin Out function. If you want to use Divisimate Core with the plugin out, keep reading. If you want to use the dedicated Divisimate ports, scroll down to Divisimate Core Port Setup.
Divisimate Core Plugin Out Setup
- Open a blank session in Bitwig.
- Create a new Instrument Track and choose Divisimate Core as the instrument.
- Divisimate Core should open. Set the output configuration in the upper right corner to Plugin Out.
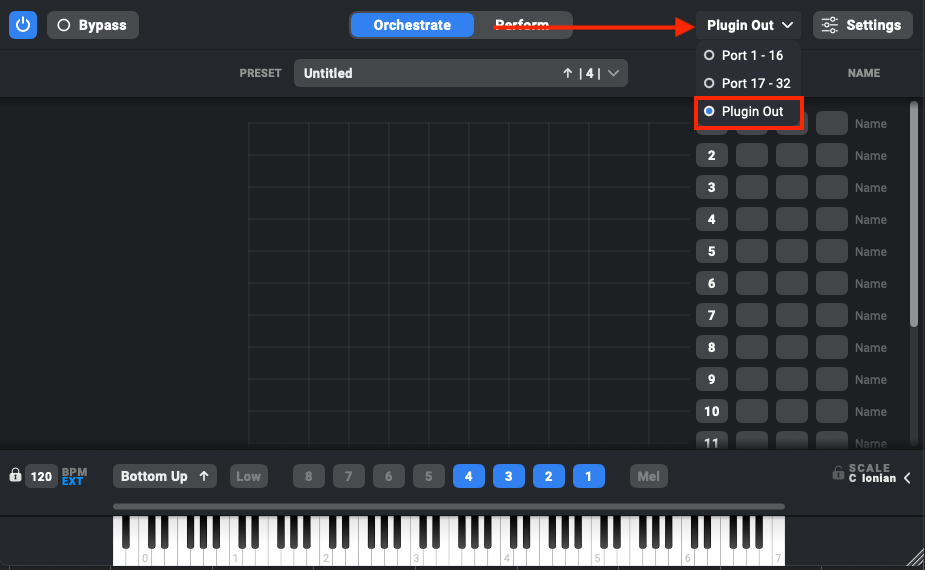
- Make sure 4 voices are activated in the lower part of the GUI above the keyboard (if not, you can activate the voices by clicking on ‘4’) and connect the 4 voices to the first 4 rows on the right by clicking in the matrix.
- Choose your MIDI controller as input. Don’t leave it to All ins, otherwise you can create a feedback loop!
If you want to use multiple input devices on your Divisimate Core track, you can use the Nextmidi Merger Port, which was installed automatically with Divisimate Core. Learn how to use it in the following video.
- Now, create four additional instrument tracks that you want to connect with Divisimate Core and load instruments of your choice. On each of those tracks set the input to Divisimate Core (Device).
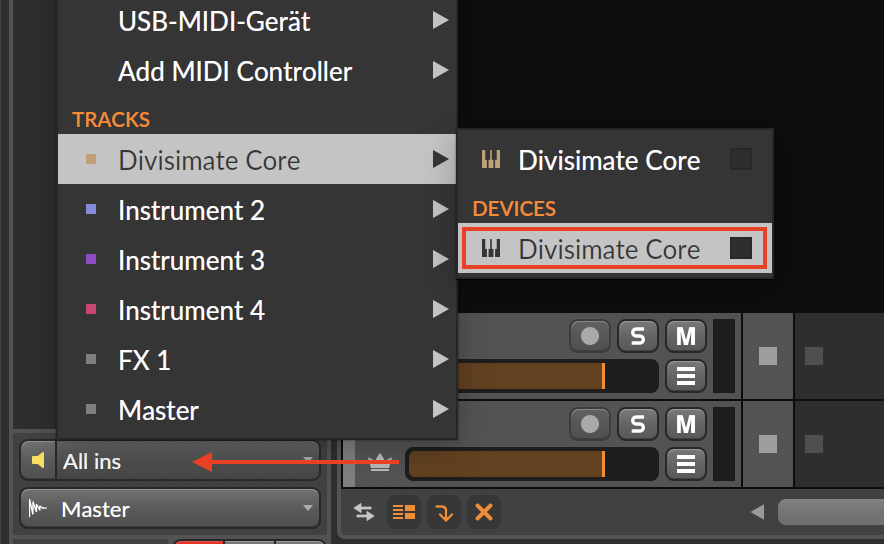
- Set the input channel to 1 for Instrument 1, 2 for Instrument 2 and so on.

- Record enable all 5 tracks. Now you are ready to play the four instruments by playing chords with 4 notes.
Divisimate Core Port Setup
- Open a new session in Bitwig
- Create a new Instrument Track and choose Divisimate Core as the instrument.
- Divisimate Core should open. Set the output configuration in the upper right corner to Port 01 - 16.
- Make sure 4 voices are activated in the lower part of the GUI above the keyboard (if not, you can activate the voices by clicking on ‘4’) and connect the 4 voices to the first 4 rows on the right by clicking in the matrix.
- Choose your MIDI controller as input. Don’t leave it to All ins, otherwise you can create a feedback loop!
If you want to use multiple input devices on your Divisimate Core track, you can use the Nextmidi Merger Port, which was installed automatically with Divisimate Core. Learn how to use it in the following video.
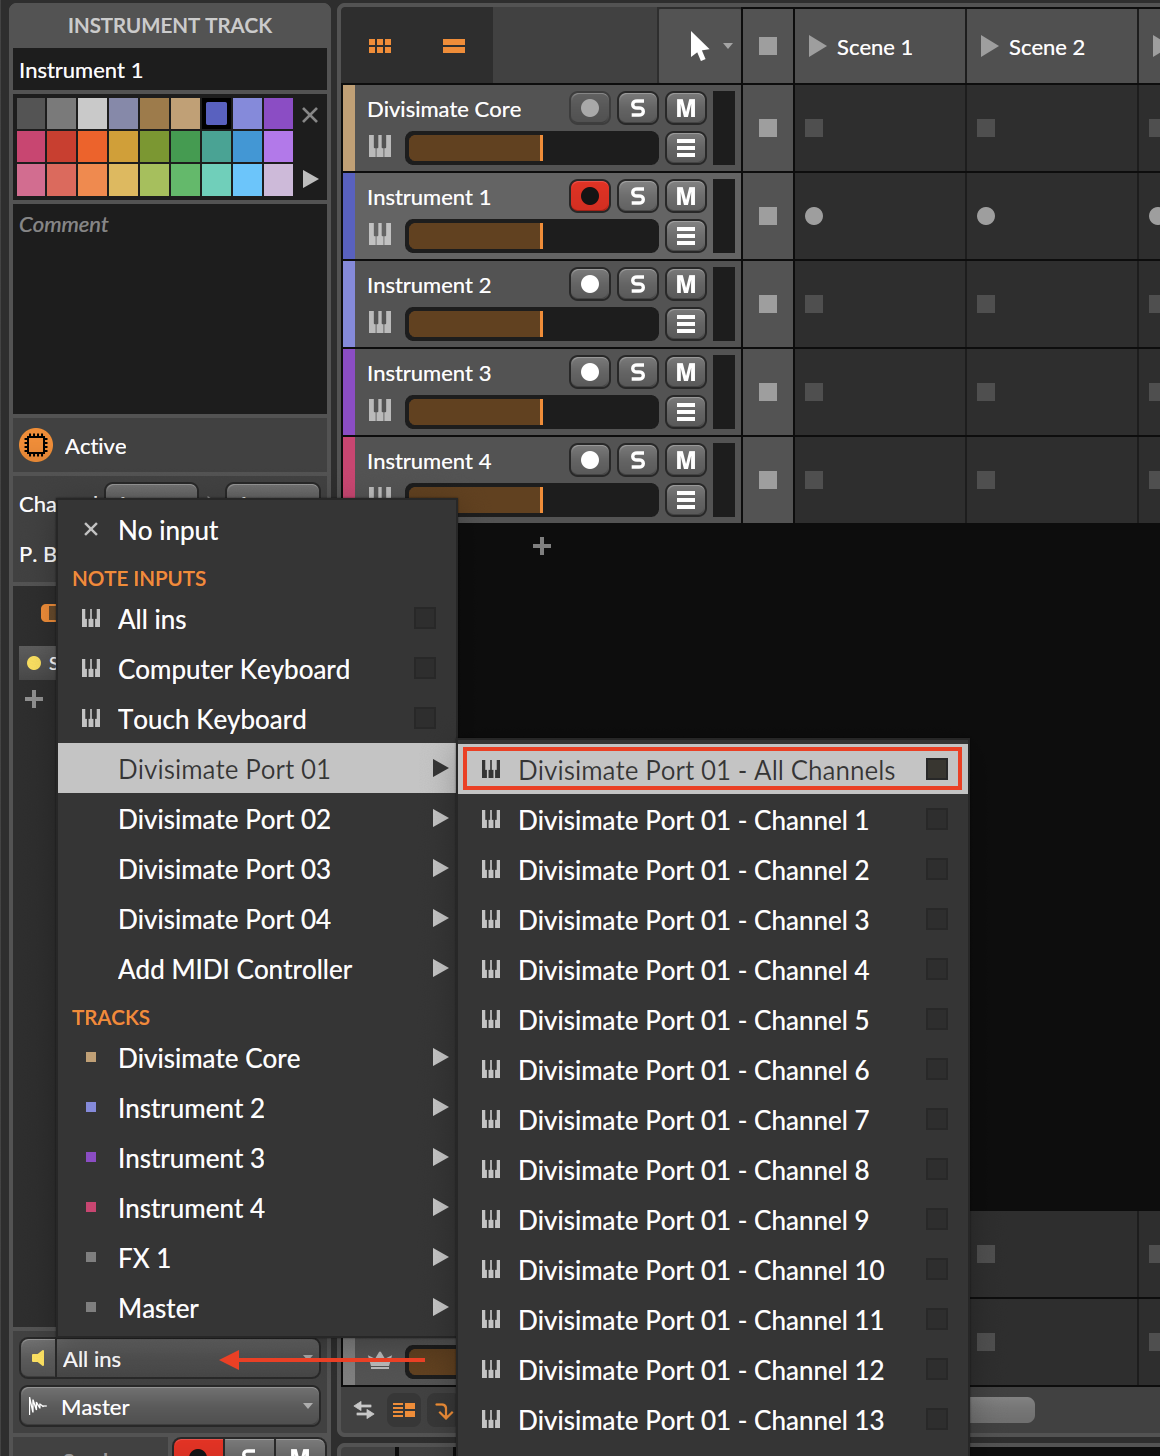
- Now, create four additional instrument tracks that you want to connect with Divisimate Core and load instruments of your choice. Select Divisimate Port 01 for track 1, Divisimate Port 02 for track 2 and so on. You may have to choose Add MIDI Controller, if you use Divisimate for the first time. Note: On Windows, the ports can appear out of order. Cubase sorts the ports by an arbitrary ID given to the devices by Windows, so there is nothing we can do about this, unfortunately.
- Record enable all 5 tracks. Now you are ready to play the four instruments by playing chords with 4 notes.
Important Settings
Bypass
If you want to go back to working the traditional way track-by-track, simply ‘Bypass’ Divisimate. Divisimate will then send all midi events and CCs directly through to all outputs or ports without any delay or latency. This way you can just record enable any track alone and play them as if Divisimate was not there.
In this quickstart, we’ll walk through the steps needed to send the individual notes from 4-note chords to four different instruments in Camelot.
Divisimate Core installs as a plugin, available in both the MIDI processors and instruments sections in Camelot. While you can use Camelot with virtual Divisimate Ports, we recommend using the direct plugin output, which is what this guide covers.
There are at least two general approaches for using Divisimate Core in Camelot. The first is simpler but less flexible, with all instruments on a single layer. The second is more complex but offers greater flexibility for routing and mixing, using multiple layers. If you want to use Divisimate Core with the simpler single layer setup, keep reading. If you want to use the more complex multi layer setup, scroll down to Divisimate Core Multi Layer Setup.
Divisimate Core Single Layer Setup
- Create a new scene from scratch in Camelot.
- Create a new layer and select your MIDI controller(s) as input for your layer by clicking on the input symbol on the left hand side of the layer. If your controller doesn't appear in the list, you might need to enable it in the settings first.
- Insert Divisimate Core onto the layer. To do this, click the plus sign on the right side of the layer, select Pre-Processors, search for Divisimate Core, and click the result.
- Double-click on the Divisimate Core tile on the layer to open Divisimate. Set the output configuration in the upper right corner to Plugin Out.
- Ensure that 4 voices are activated in the lower part of the GUI, above the keyboard (if not, click ‘4’ to activate them). Then, connect the 4 voices to the first 4 rows on the right by clicking in the matrix.
- Now, insert 4 instruments of your choice onto the same layer next to Divisimate.
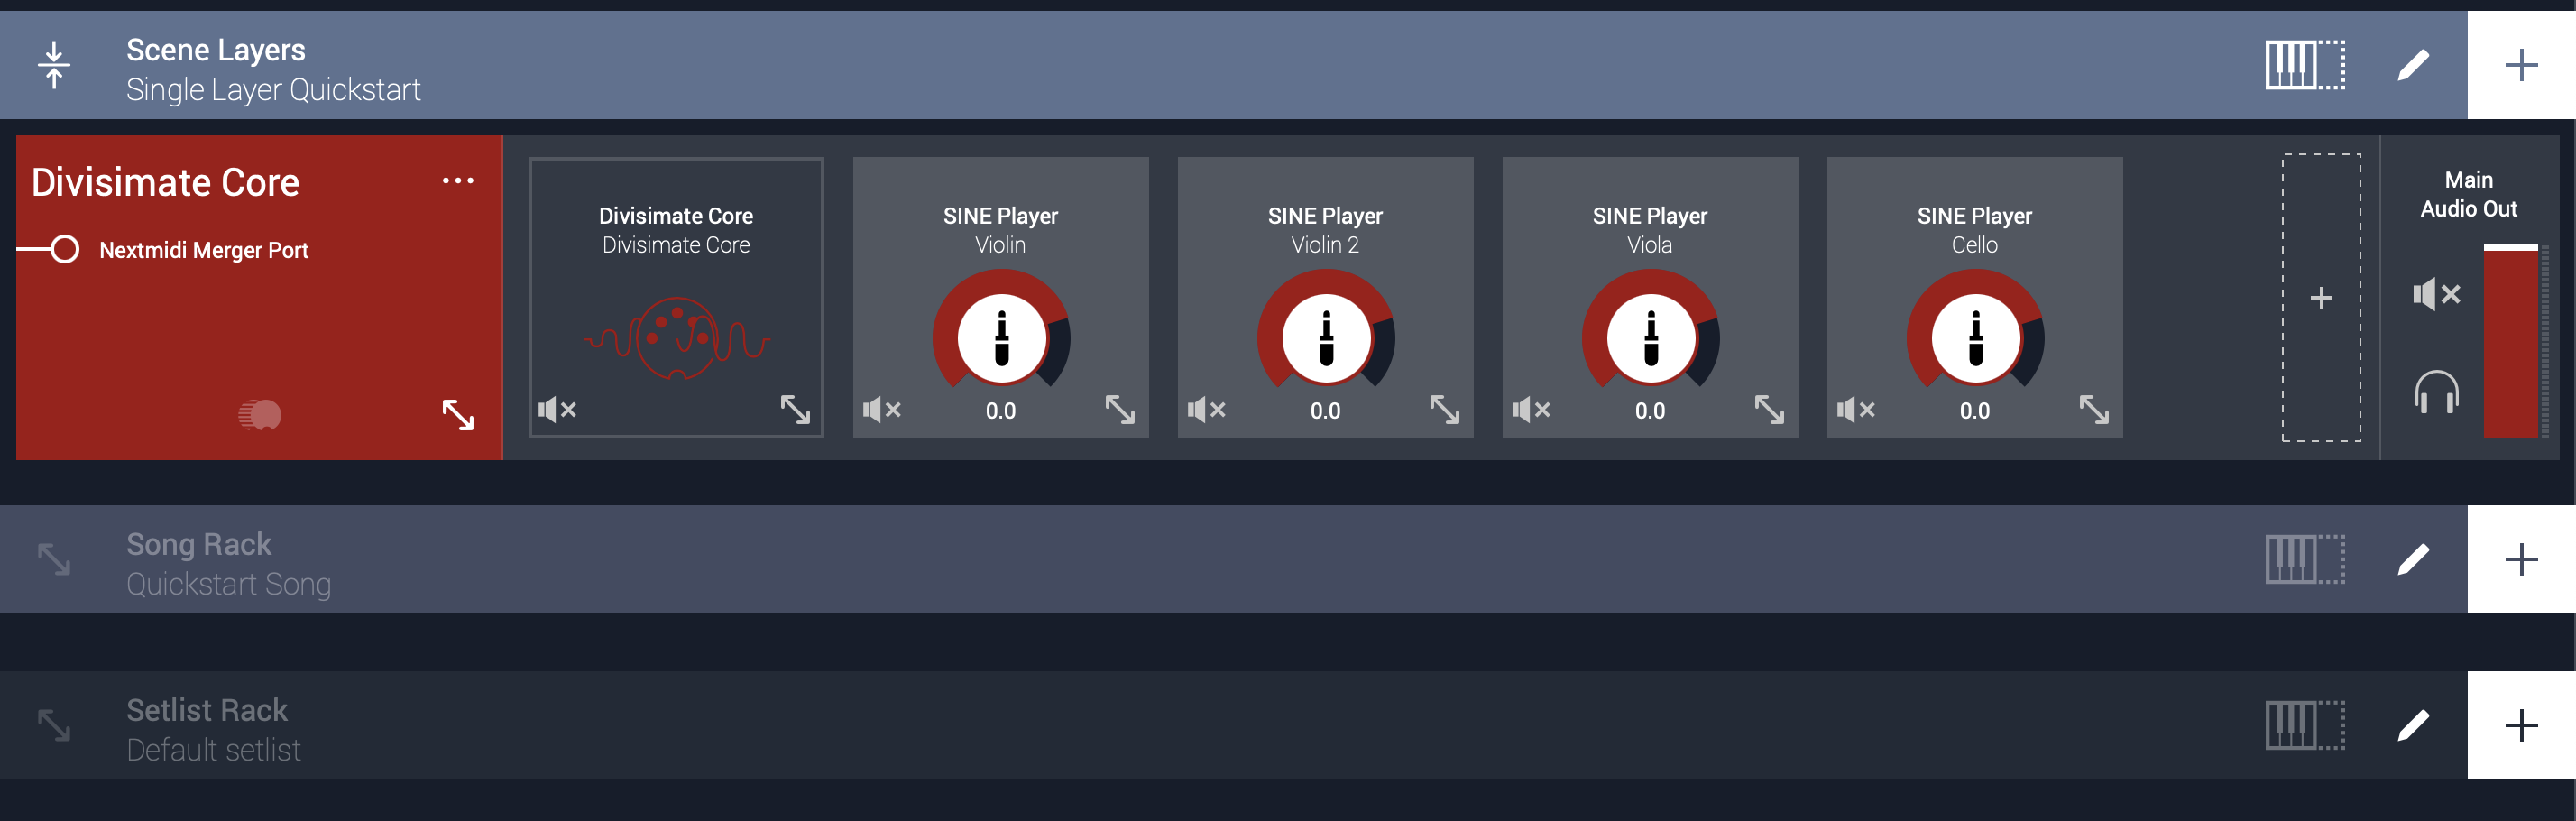
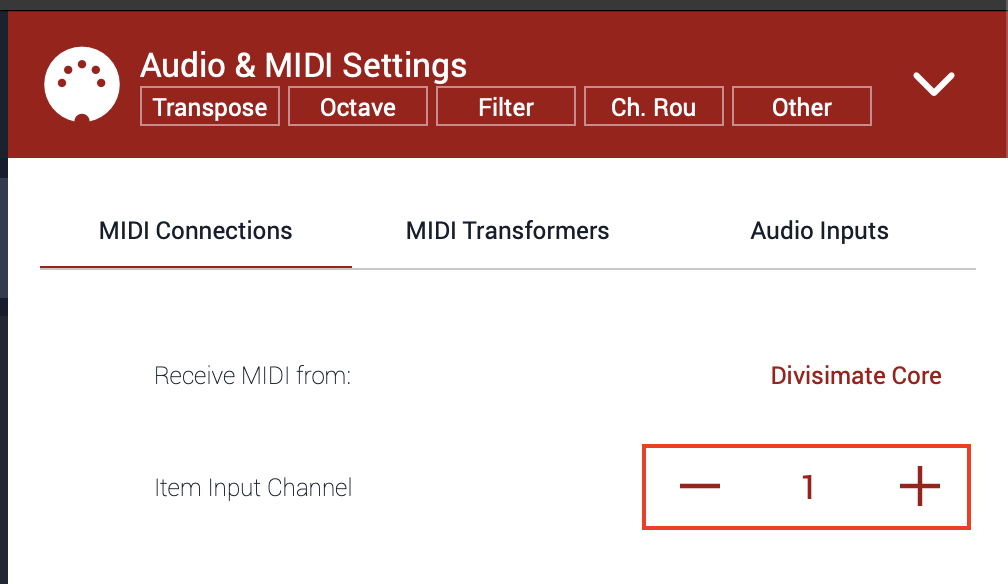
- Go to the Audio & MIDI Settings of each instrument by clicking on the tile and expanding the "Audio & MIDI Settings" section at the bottom. Set Item Input Channel to 1 for your first instrument, 2 for your second instrument and so on. Do this for all 4 instruments.
- And that's all, now you can play all 4 instruments at once by playing 4-note chords.
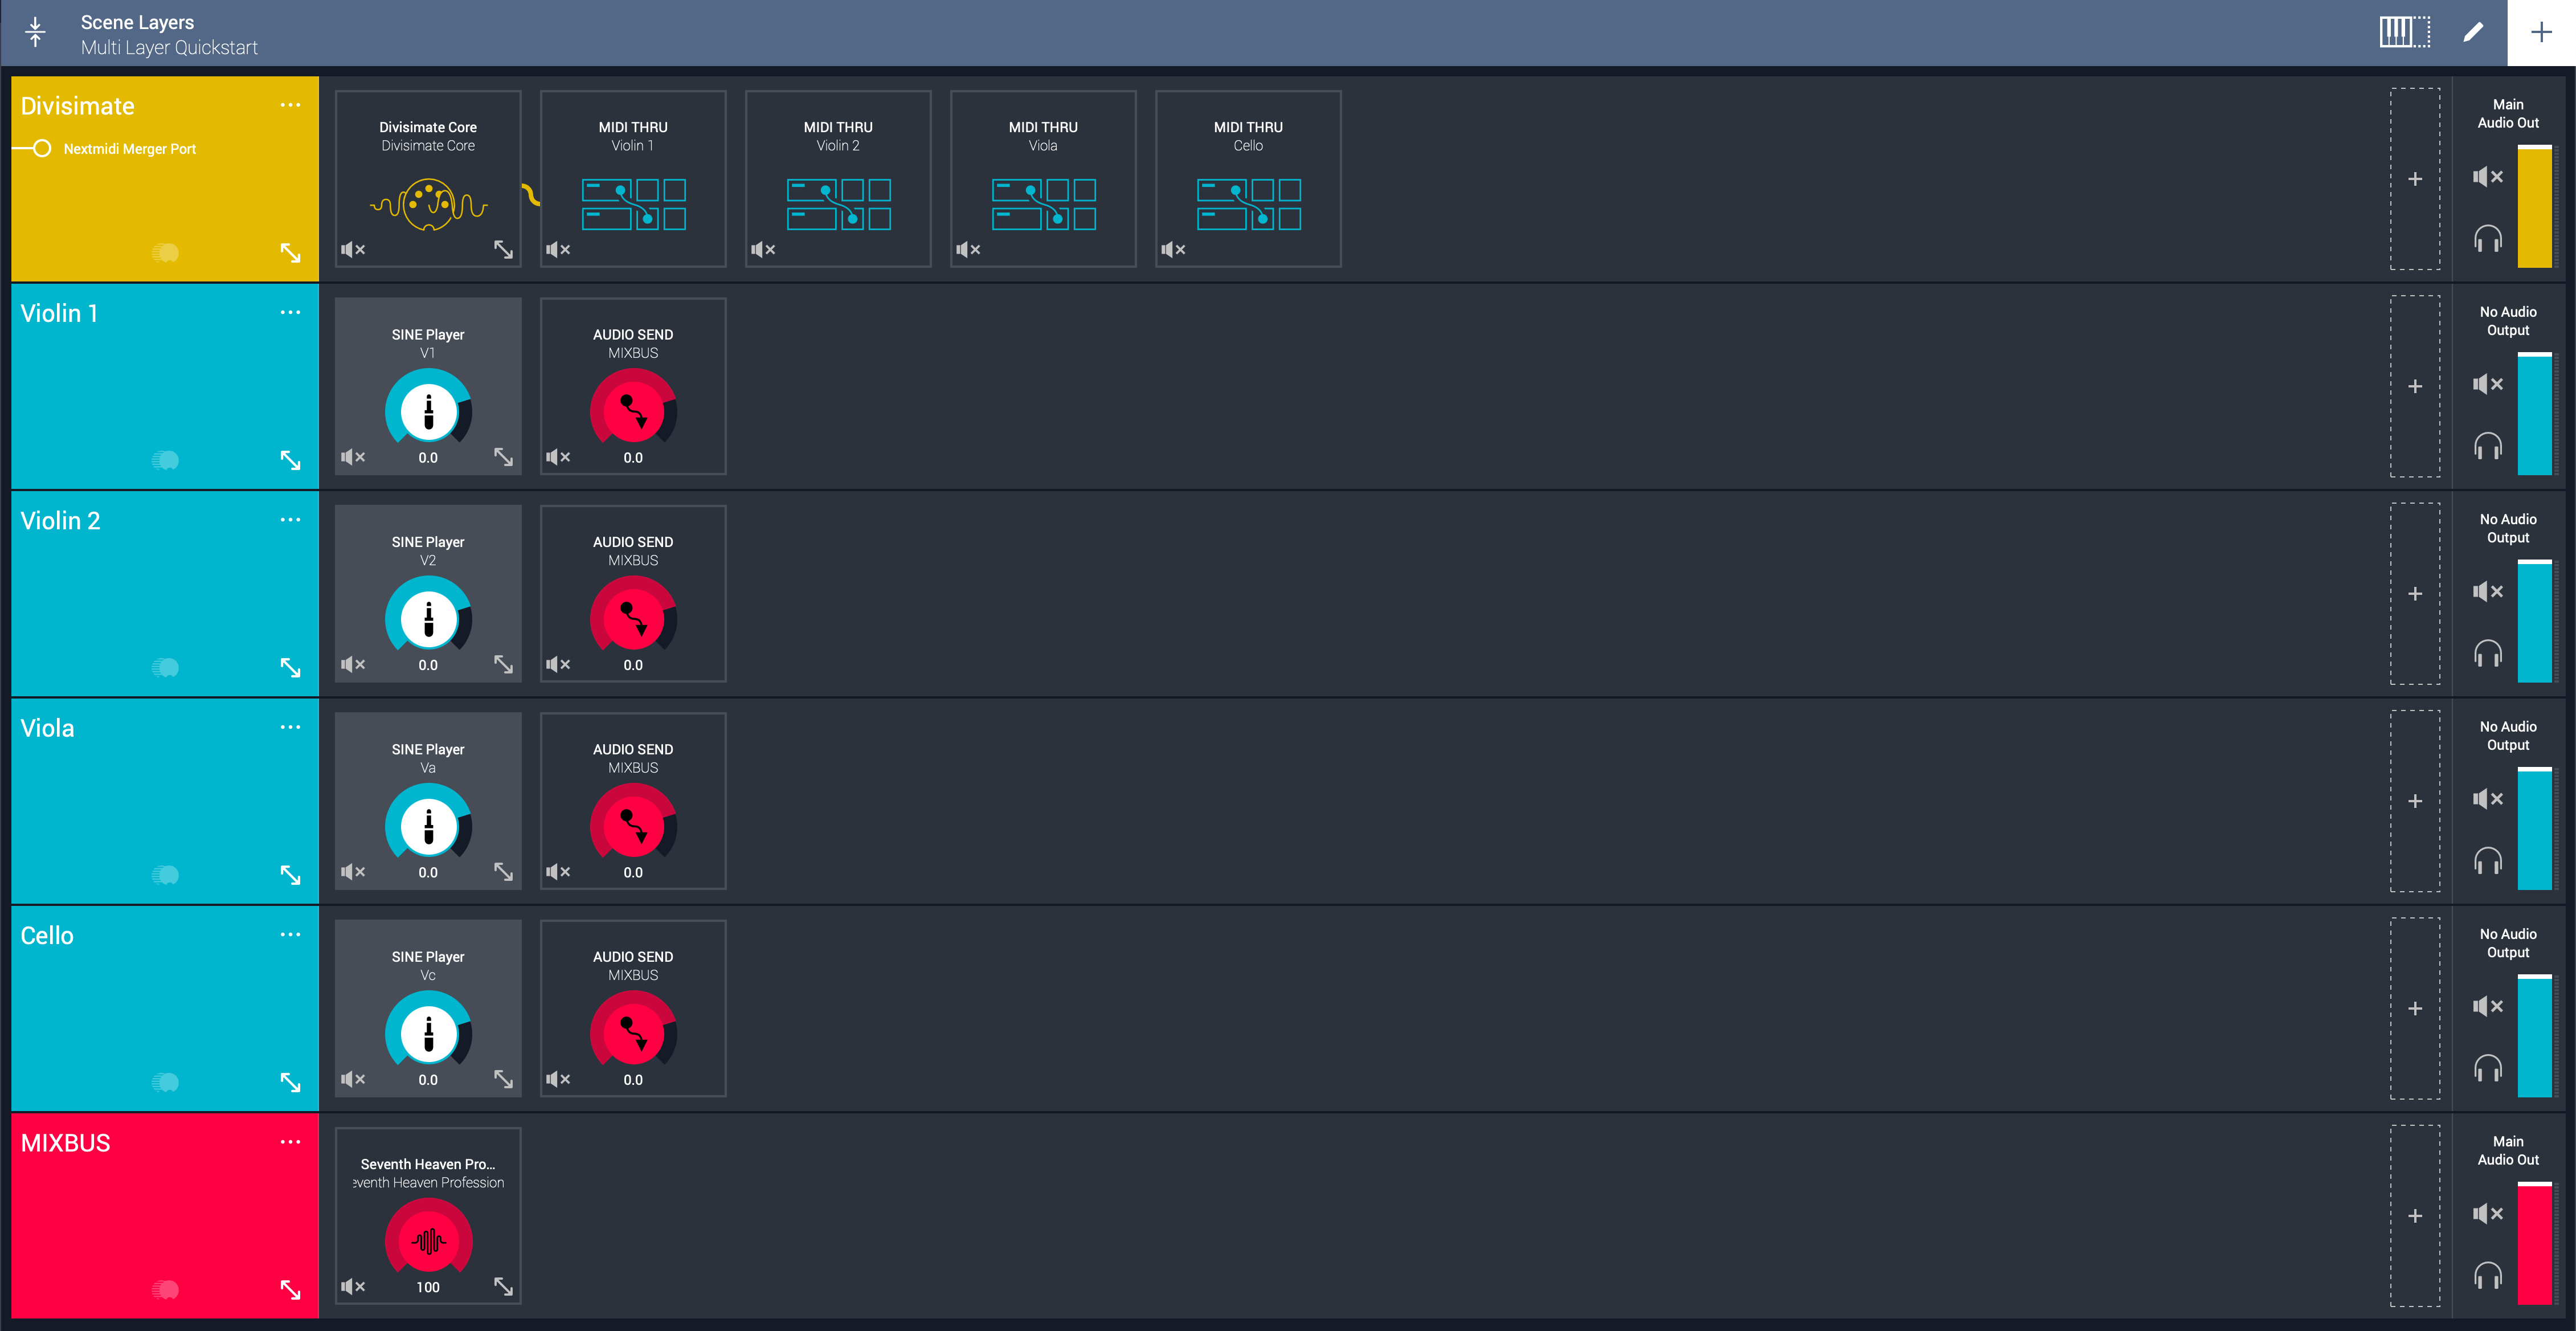
Divisimate Core Multi Layer Setup
- Create a new scene from scratch in Camelot.
- Create a new layer and select your MIDI controller(s) as input for your layer by clicking on the input symbol on the left hand side of the layer. If your controller doesn't appear in the list, you might need to enable it in the settings first.
- Insert Divisimate Core onto the layer. To do this, click on the plus sign on the right hand side of the layer, choose Pre-Processors and search for Divisimate Core, then click on the search result.
- Double-click on the Divisimate Core tile on the layer to open Divisimate. Set the output configuration in the upper right corner to Plugin Out.
- Make sure 4 voices are activated in the lower part of the GUI above the keyboard (if not, you can activate the voices by clicking on ‘4’) and connect the 4 voices to the first 4 rows on the right by clicking in the matrix.
- Now, create four additional layers, one for each instrument, and insert an instrument of your choice on each layer.
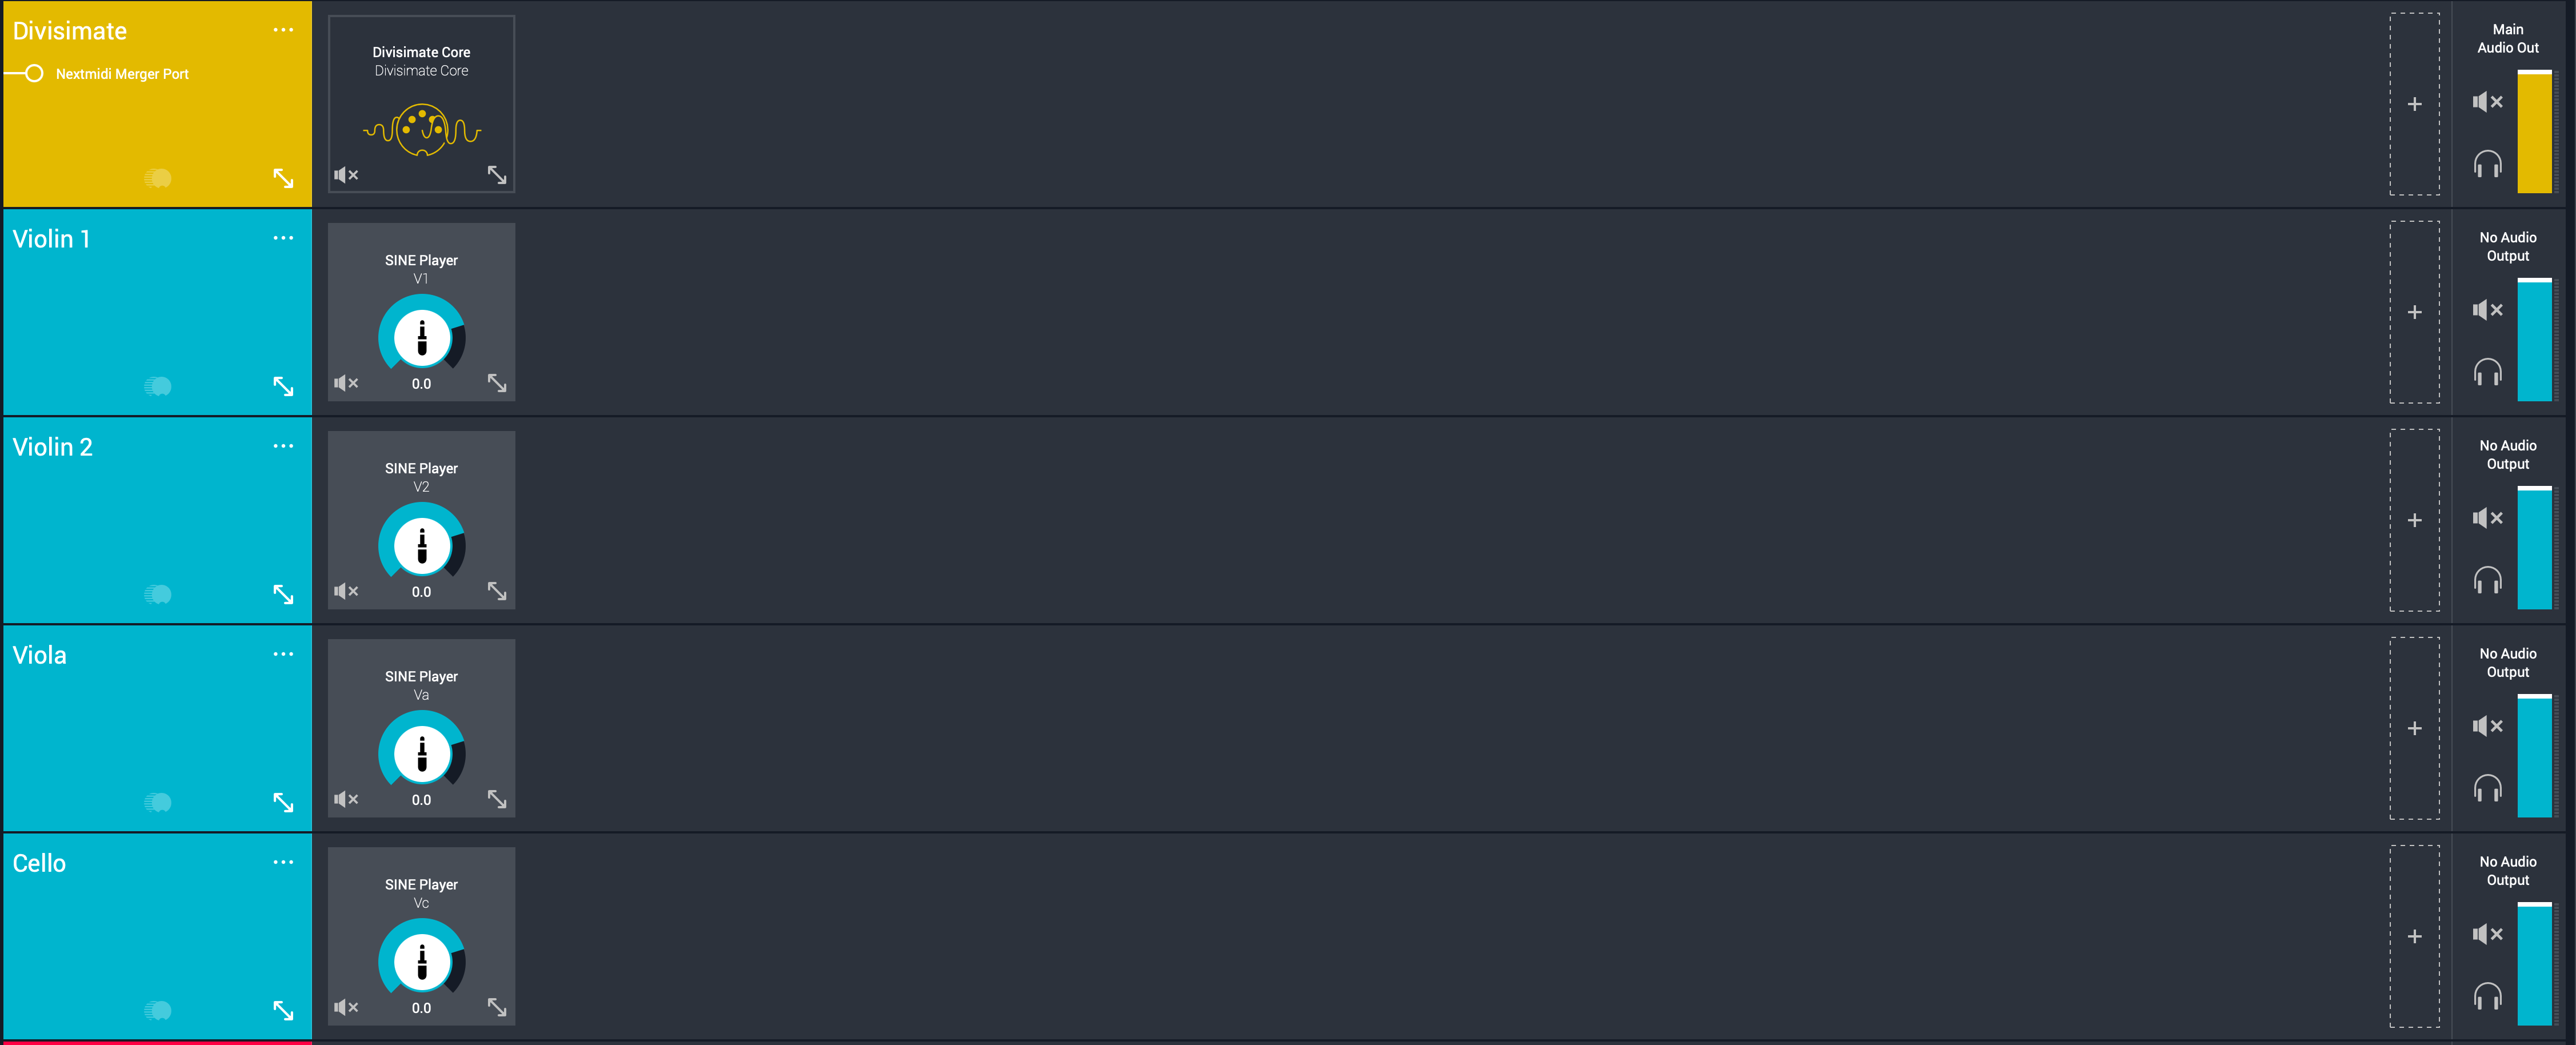
- Next, add 4 MIDI through connectors (found under Pre-Processors > MIDI Layer Connectors). Route the first connector to your first instrument layer (e.g., Violin 1), the second to the second layer (e.g., Violin 2), and so on. For each connector, open the Audio & MIDI Settings section at the bottom and set the Item Input Channel: 1 for the first connector, 2 for the second, and so on.

- Now you could already go ahead and play the four instruments. If you like, you can also add a mixbus layer in order to process all instruments at once. To do this, add another layer.
- Add an Audio Send to every instrument layer, you can find them under Post-Processors > Audio Layer Connectors. Send all of them to your new layer, "MIXBUS" in this case.
- Finally, set the output of your instrument layers to none so that the instruments are sent exclusively to the mixbus. You can now add plugins—such as EQ, compression, or reverb—to each instrument individually or to the entire mix. That’s it! You can now play all 4 instruments at once by playing 4-note chords.
In this quickstart we will go through the steps to send the individual notes from 4-note chords to four different instruments in Cubase/Nuendo.
Divisimate Core installs as a plugin that can be found in the Instruments folder in Cubase. It can be used either with up to 2x16 dedicated Divisimate Ports or with the Plugin Out function. If you want to use Divisimate Core with the plugin out, keep reading. If you want to use the dedicated Divisimate ports, scroll down to Divisimate Core Port Setup.
Divisimate Core Plugin Out Setup
- Open a new session in Cubase or Nuendo.
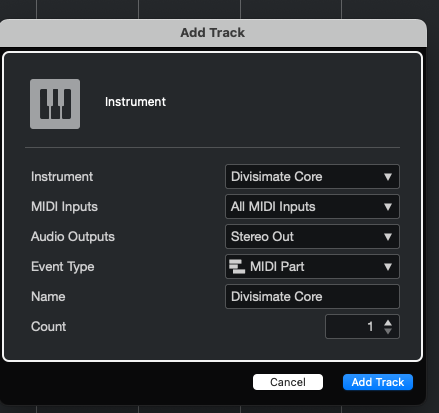
- Create a new Instrument Track and choose Divisimate Core as the instrument.
- Divisimate Core should open. Set the output configuration in the upper right corner to Plugin Out.
- Make sure 4 voices are activated in the lower part of the GUI above the keyboard (if not, you can activate the voices by clicking on ‘4’) and connect the 4 voices to the first 4 rows on the right by clicking in the matrix.
- Choose your MIDI controller as input. Don’t leave it to All MIDI Inputs, otherwise you can create a feedback loop!

If you want to use multiple input devices on your Divisimate Core track, you can use the Nextmidi Merger Port, which was installed automatically with Divisimate Core. Learn how to use it in the following video.
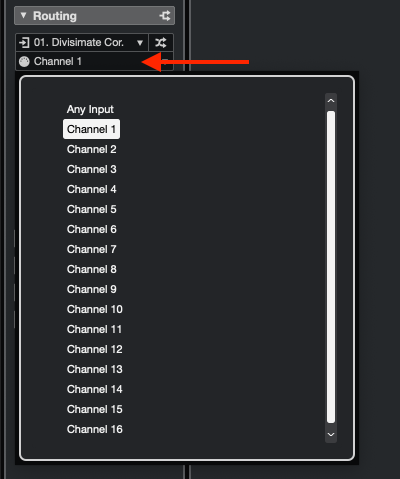
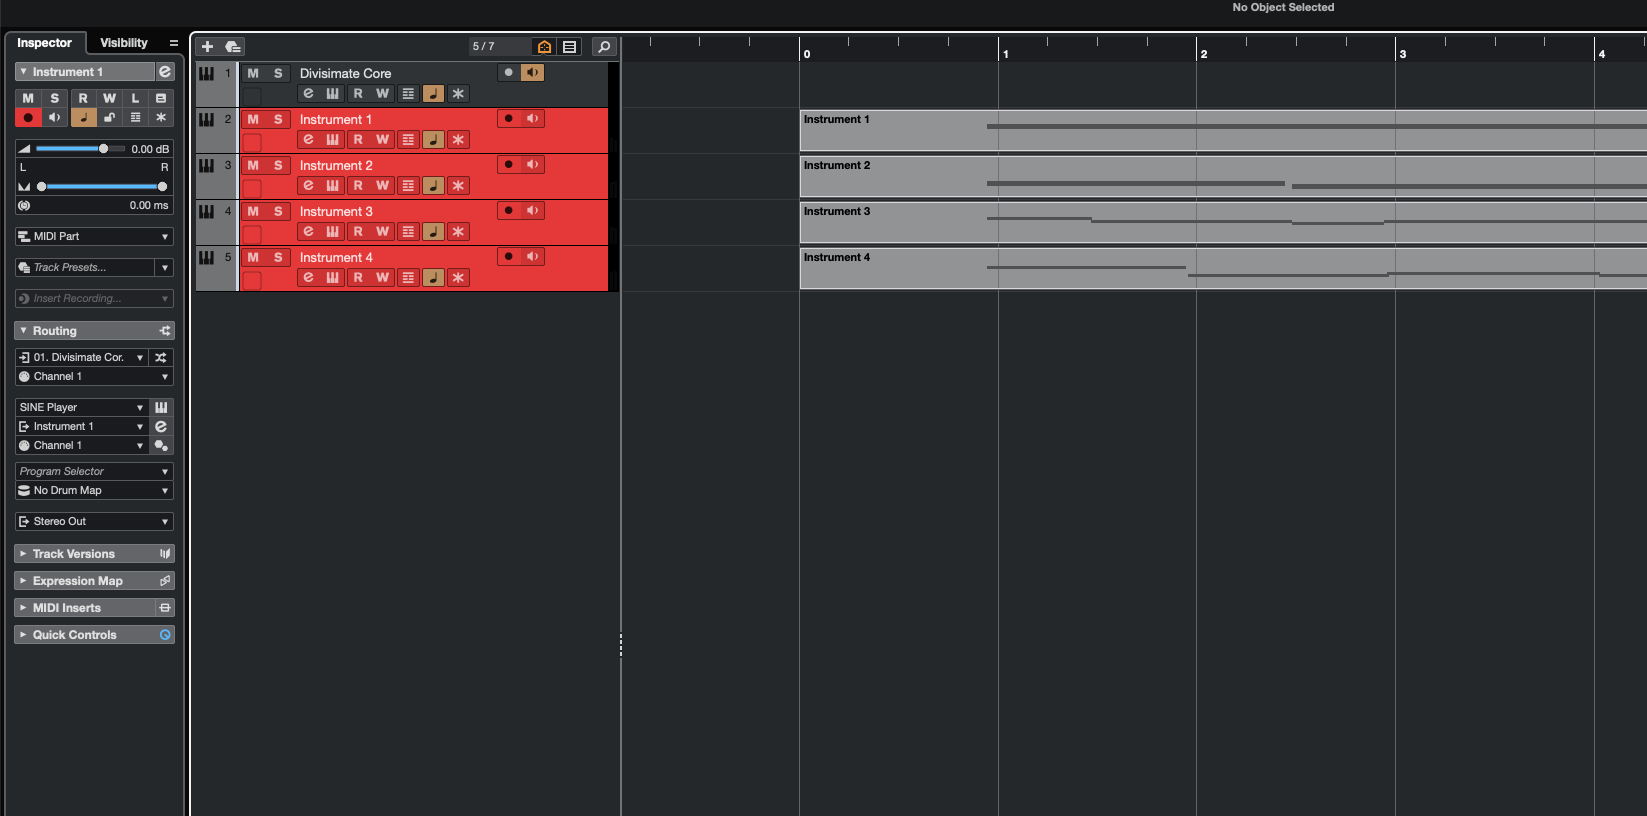
- Now, create four additional instrument tracks that you want to connect with Divisimate Core and load instruments of your choice. On each of these instrument tracks go to the inspector on the left hand side and in the "Routing" section select "Divisimate Core – MIDI Output" as the input.

- Just below that select Channel 1 on the first instrument, Channel 2 on the second instrument and so on.
- Enable monitoring on the Divisimate Core track by clicking on the small loudspeaker symbol and record enable the 4 instrument tracks. Now you are ready to play the four tracks by playing chords with 4 notes.
Divisimate Core Port Setup
- Open a new session in Cubase or Nuendo.
- Create a new Instrument Track and choose Divisimate Core as the instrument.
- Divisimate Core should open. Set the output configuration in the upper right corner to Port 01 - 16.
- Make sure 4 voices are activated in the lower part of the GUI above the keyboard (if not, you can activate the voices by clicking on ‘4’) and connect the 4 voices to the first 4 rows on the right by clicking in the matrix.
- Choose your MIDI controller as input. Don’t leave it to All MIDI Inputs, otherwise you can create a feedback loop!
If you want to use multiple input devices on your Divisimate Core track, you can use the Nextmidi Merger Port, which was installed automatically with Divisimate Core. Learn how to use it in the following video.
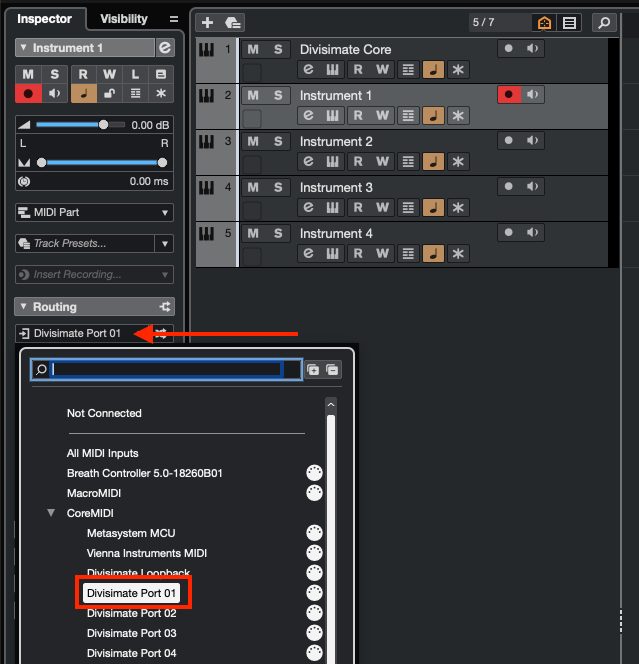
- Now, create four additional instrument tracks that you want to connect with Divisimate Core and load instruments of your choice. Go to the inspector on the left hand side and in the "Routing" section select Divisimate Port 01 for track 1, Divisimate Port 02 for track 2 and so on. Note: On Windows, the ports can appear out of order. Cubase sorts the ports by an arbitrary ID given to the devices by Windows, so there is nothing we can do about this, unfortunately. But there’s a search function in this menu, so you still can find the ports you’re looking for rather quickly. After entering the menu, type in the port number you are looking for and the list will get filtered.
- Enable monitoring on the Divisimate Core track by clicking on the small loudspeaker symbol and record enable the 4 instrument tracks. Now you are ready to play the four tracks by playing chords with 4 notes.
Important Settings
Bypass
If you want to go back to working the traditional way track-by-track, simply ‘Bypass’ Divisimate. Divisimate will then send all midi events and CCs directly through to all outputs or ports without any delay or latency. This way you can just record enable any track alone and play them as if Divisimate was not there.
All MIDI In
The following is only relevant if you work with the Divisimate Ports and not the Plugin Out, but it's recommended to set this up anyways, should you want to work with ports at some point down the road. There is no disadvantage and this way you make sure youdon't forget it later.
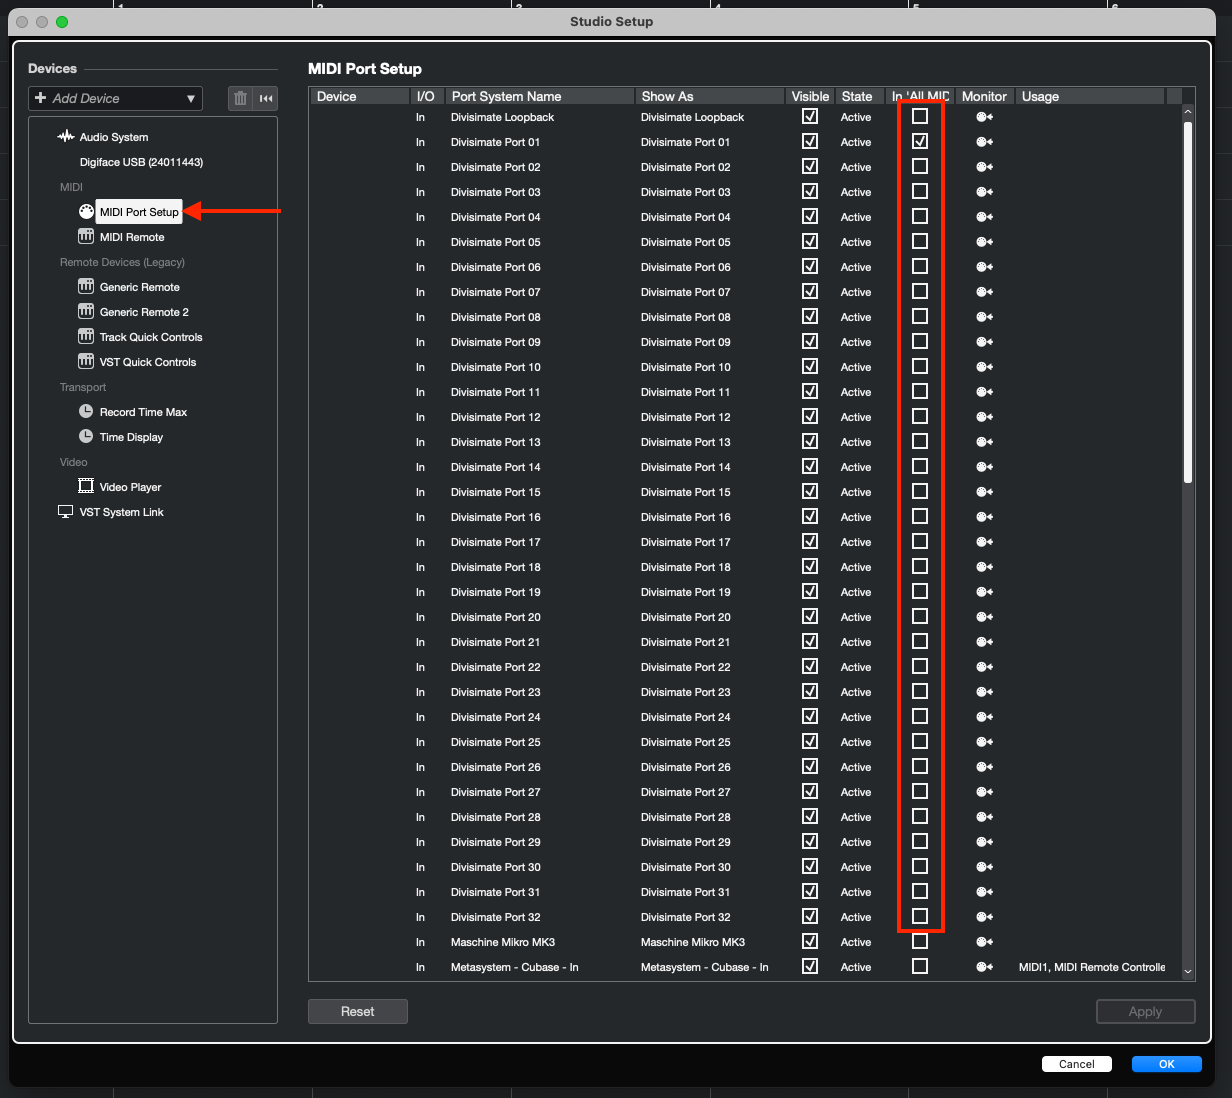
To avoid duplicates on the “All MIDI Inputs” menu, go to Studio > Studio Setup > MIDI Port Setup.
Disable the checkbox In ‘All MIDI Inputs’ for all Divisimate Ports except for Divisimate Port 01. This is necessary, to prevent Cubase from receiving 32 duplicates of the incoming signal, when Divisimate is bypassed and forwarding MIDI-messages simultaneously to all MIDI ports
In this quickstart we will go through the steps to send the individual notes from 4-note chords to four different instruments in Digital Performer. Divisimate Core installs as a plugin that can be found in the Instruments section in Digital Performer. It can be used either with up to 2x16 dedicated Divisimate Ports or with the Plugin Out function.
Note: We had the best experience working with the VST version of Divisimate in DP. Especially, if you plan on using the plugin out, since that is a feature not supported by AU. So we recommend just sticking to the VST version of Divisimate.
Unfortunately, at the moment Digital Performer does not support MIDI CC or pitch bend via plugin out. That's why we can't recommend using that mode in Digital Performer and suggest using it with the dedicated Divisimate ports instead. If you want to use Divisimate Core with the dedicated Divisimate ports keep reading. If you want to learn how to set up the plugin out despite the limitations, scroll down to Divisimate Core Plugin Out Setup.
Divisimate Core Port Setup
- Open a new session in Digital Performer and make sure Multi Record is enabled in the Studio menu.
- Create a new Instrument Track and choose Divisimate Core as the instrument.
- Divisimate Core should open. Set the output configuration in the upper right corner to Port 01 - 16.
- Make sure 4 voices are activated in the lower part of the GUI above the keyboard (if not, you can activate the voices by clicking on ‘4’) and connect the 4 voices to the first 4 rows on the right by clicking in the matrix.
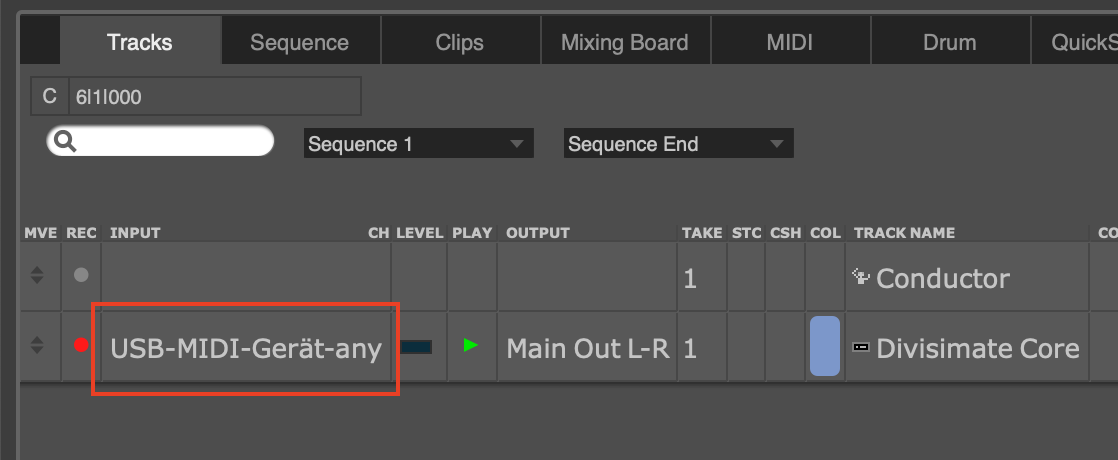
- Choose your MIDI controller as input.
If you want to use multiple input devices on your Divisimate Core track, you can use the Nextmidi Merger Port, which was installed automatically with Divisimate Core. Learn how to use it in the following video.
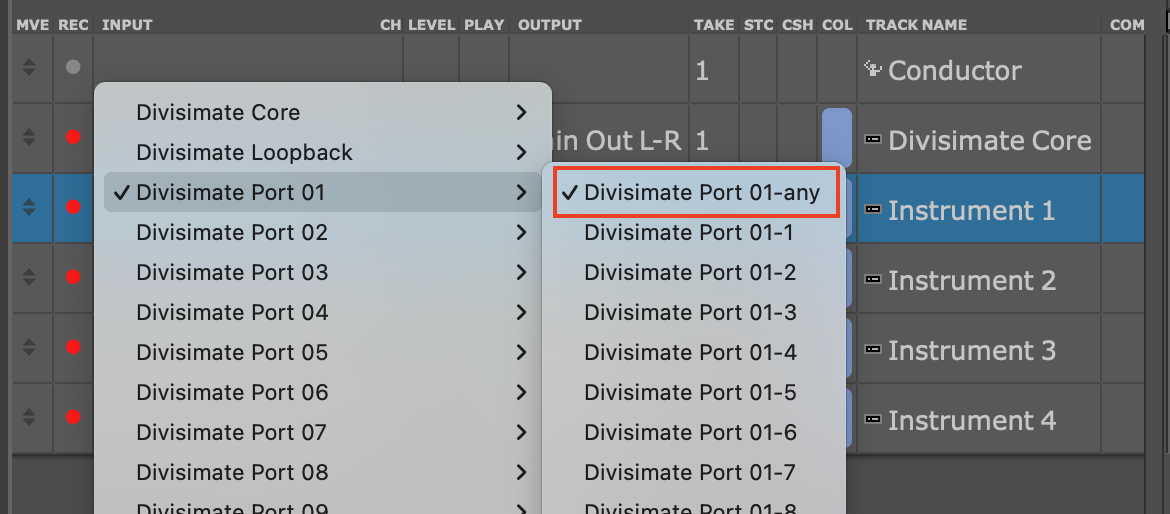
- Now, create four additional instrument tracks that you want to connect with Divisimate Core and load instruments of your choice. For the input of those tracks select Divisimate Port 01 for track 1, Divisimate Port 02 for track 2 and so on. Note: On Windows, the ports can appear out of order. Digital Performer sorts the ports by an arbitrary ID given to the devices by Windows, so there is nothing we can do about this, unfortunately.
- And that should already be all - record enable all five tracks and you should be able to play!
Divisimate Core Plugin Out Setup
- Open a new session in Digital Performer and make sure Multi Record is enabled in the Studio menu.
- Create a new Instrument Track and choose Divisimate Core as the instrument.
- Divisimate Core should open. Set the output configuration in the upper right corner to Plugin Out.
- Make sure 4 voices are activated in the lower part of the GUI above the keyboard (if not, you can activate the voices by clicking on ‘4’) and connect the 4 voices to the first 4 rows on the right by clicking in the matrix.
- Choose your MIDI controller as input.
If you want to use multiple input devices on your Divisimate Core track, you can use the Nextmidi Merger Port, which was installed automatically with Divisimate Core. Learn how to use it in the following video.
- Create four additional instrument tracks. On the input selection of your instrument tracks you should see the option to select "Divisimate Core" as an input. The sub-menu on the side will immediately let you choose a MIDI channel as well.
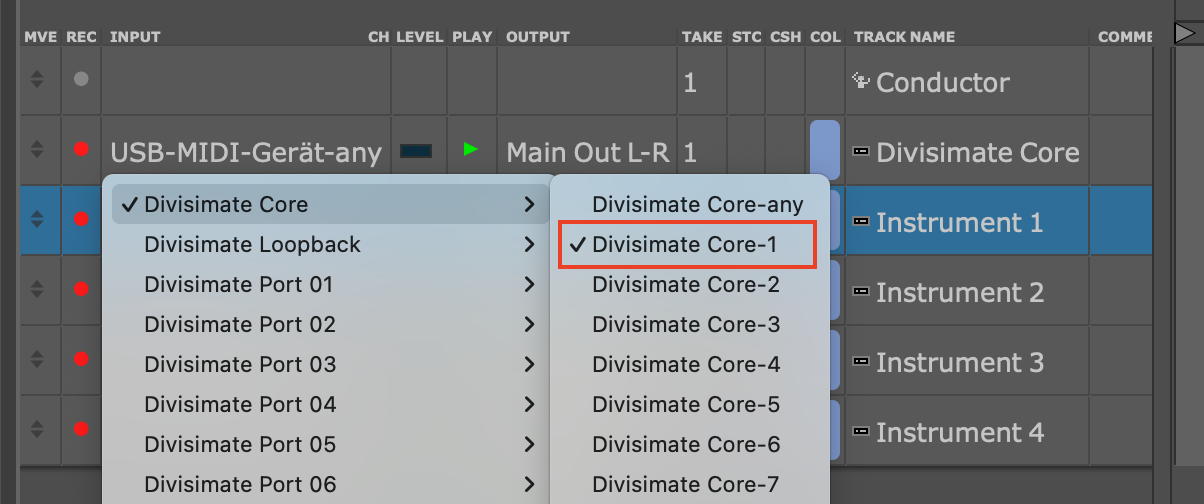
Select Divisimate Core-1 for your first instrument, Divisimate Core-2 for your second one and so on. And that should already be all, record enable all five tracks and you should be able to play!
Important Settings
If you want to go back to working the traditional way track-by-track, simply press ‘Bypass’ or the shortcut b in Divisimate. Divisimate will then send all midi events and CCs directly through to all ports without any delay or latency. This way you can just record enable any track alone and play them as if Divisimate was not there.
In this quickstart we will go through the steps to send the individual notes from 4-note chords to four different instruments in Logic Pro.
Divisimate Core installs as a plugin that can be found in the Instruments category in Logic Pro. It can be used either with up to 2x16 dedicated Divisimate Ports or with the Plugin Out function. If you want to use Divisimate Core with the plugin out, keep reading. If you want to use the dedicated Divisimate ports, scroll down to Divisimate Core Port Setup. Keep in mind that while using Divisimate Ports you can have only two instances of Divisimate Core at a time.
Divisimate Core Plugin Out Setup
Compatibility Note
The shown method using the plugin out is only supported by Logic Pro 11 and above.
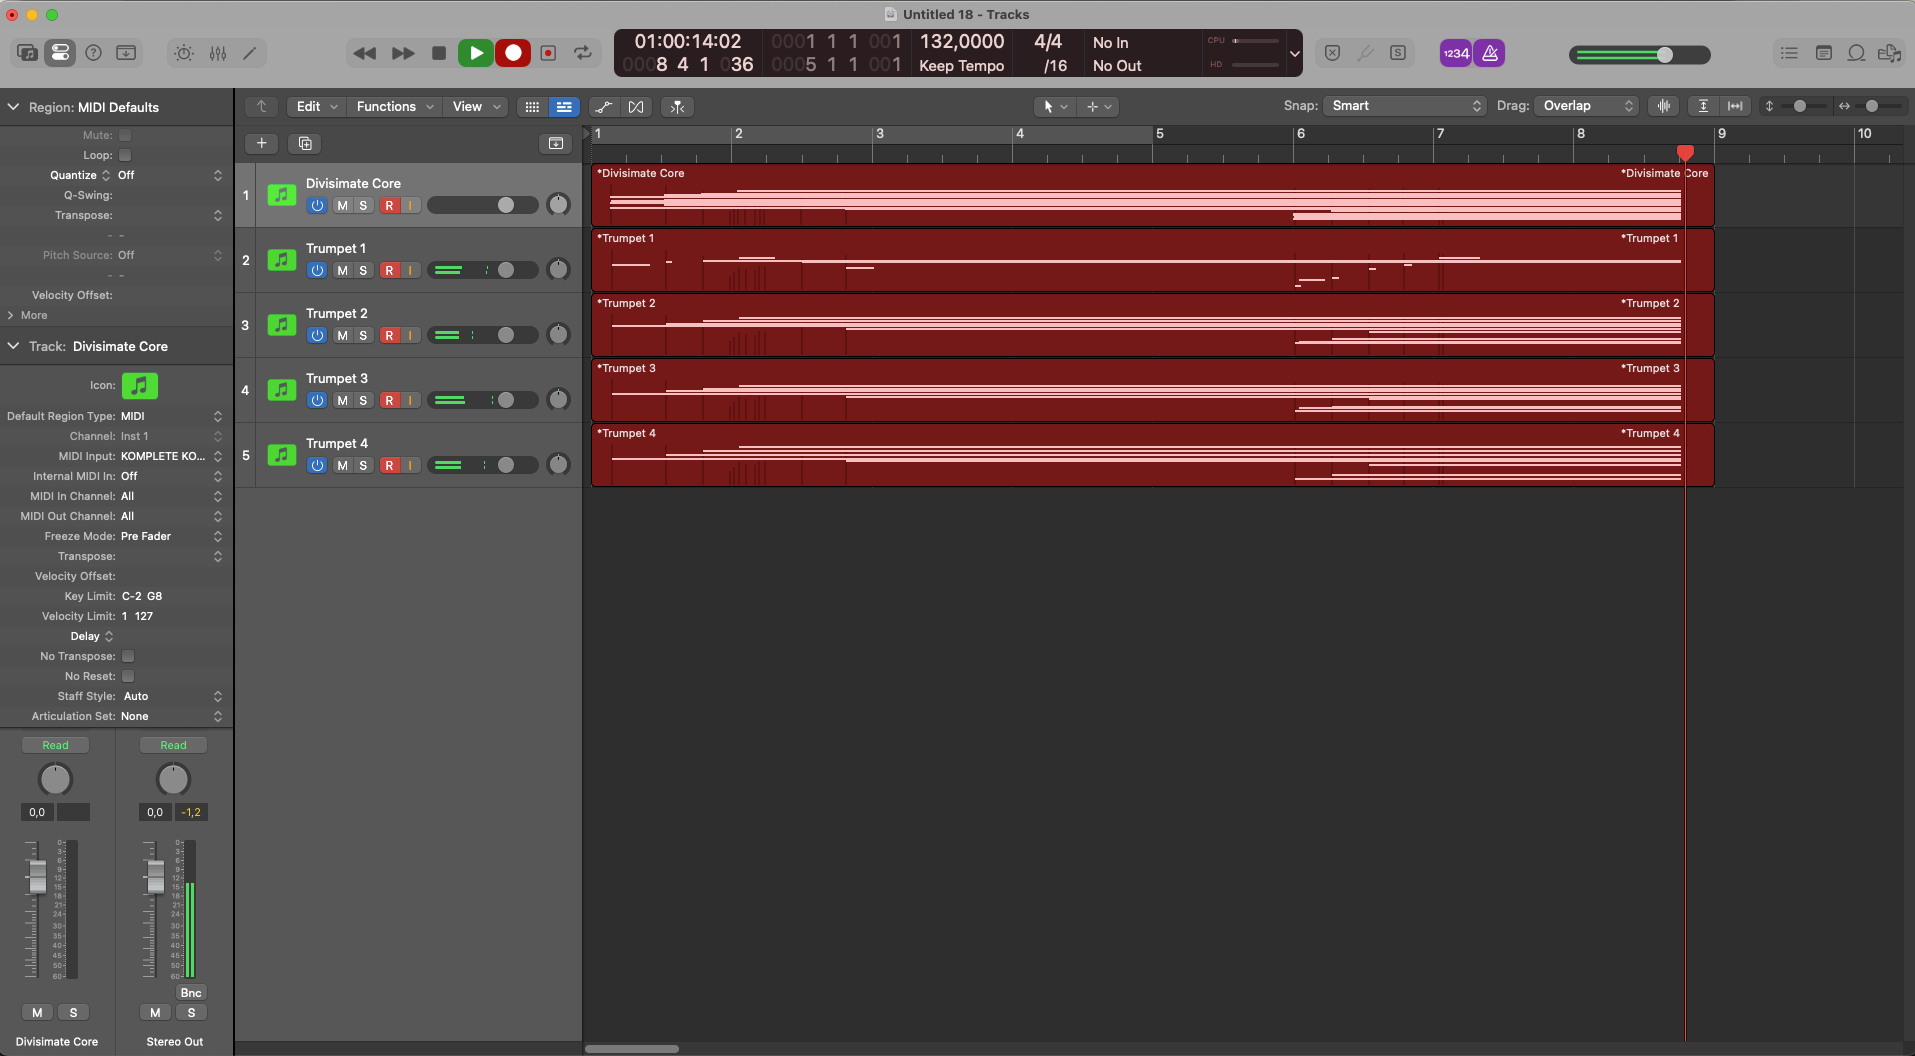
- Open a session in Logic and add a new instrument track.

- Divisimate Core should open. Set the output configuration in the upper right corner to Plugin Out.
- Go to the inspector of the Divisimate Core track and select your Keyboard Controller as MIDI input for the track.
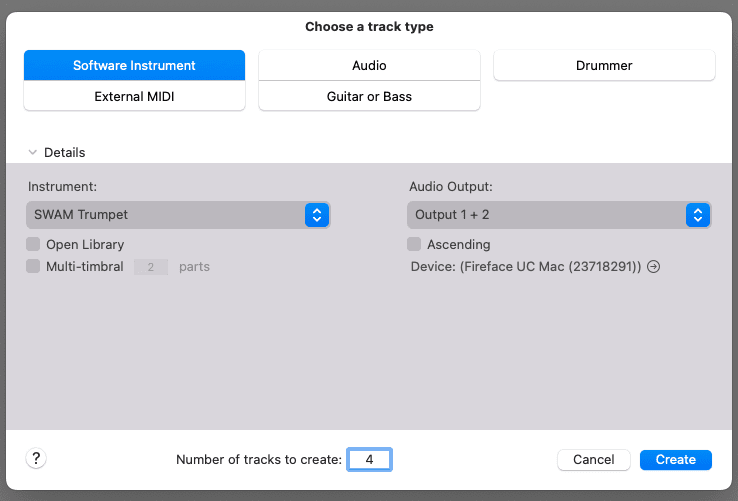
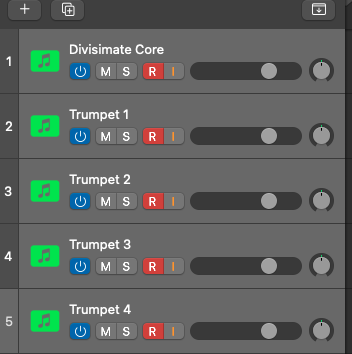
- Next create four new instrument-tracks with any virtual instruments of your choice
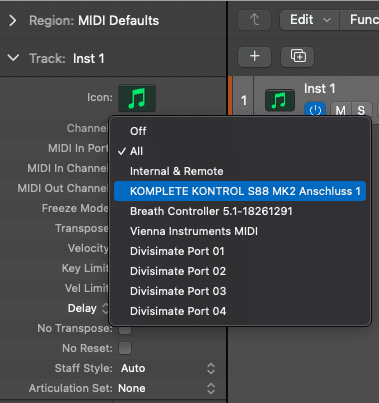
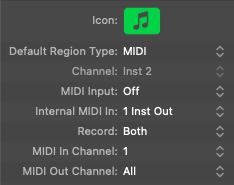
- In the inspector set the "MIDI Input" to "Off", and under "Internal MIDI In" select the Divisimate Core instance from the menu. Repeat this step for the other four instrument tracks.
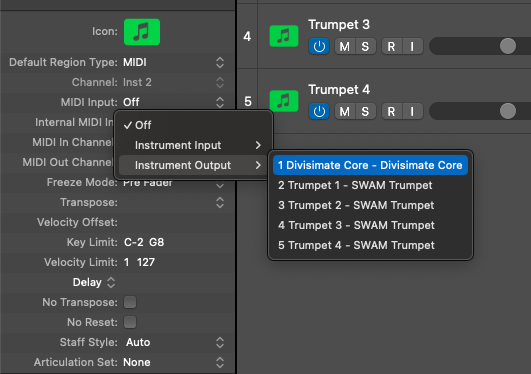
Important!
Make sure that you are choosing Divisimate Core from the column "Instrument Output", not from "Instrument Input".
- Next a bit below that option in the inspector under MIDI In Channel choose Channel 1 for your first instrument track, Channel 2 for your second one and so on. Again, make sure that you are not accidentally using the MIDI Out Channel. This is crucial.
- Now record-enable all five instrument tracks. Per default you can do this by simply selecting the tracks. Click on the first one and shift-click on the last one or ctrl/cmd-click on the ones you like to play. Now Logic should automatically record-enable the selected tracks.
- Now you can play the four instruments in Divisimate Core!
Divisimate Core Port Setup
- Open a session in Logic and add a new instrument track.
- Divisimate Core should open. Set the output configuration in the upper right corner to Port 1-16. If it was not already running, this action should start the Nextmidi Hub and create the dedicated 16 Divisimate Ports.
- Go to the inspector of the Divisimate Core track and select your Keyboard Controller as MIDI input for the track.
- Next create four new instrument-tracks with any virtual instruments of your choice
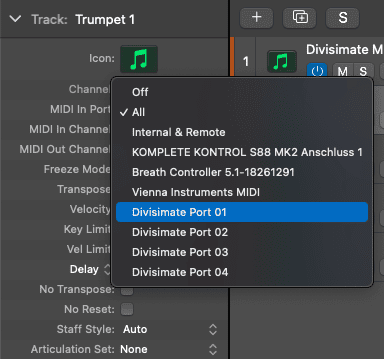
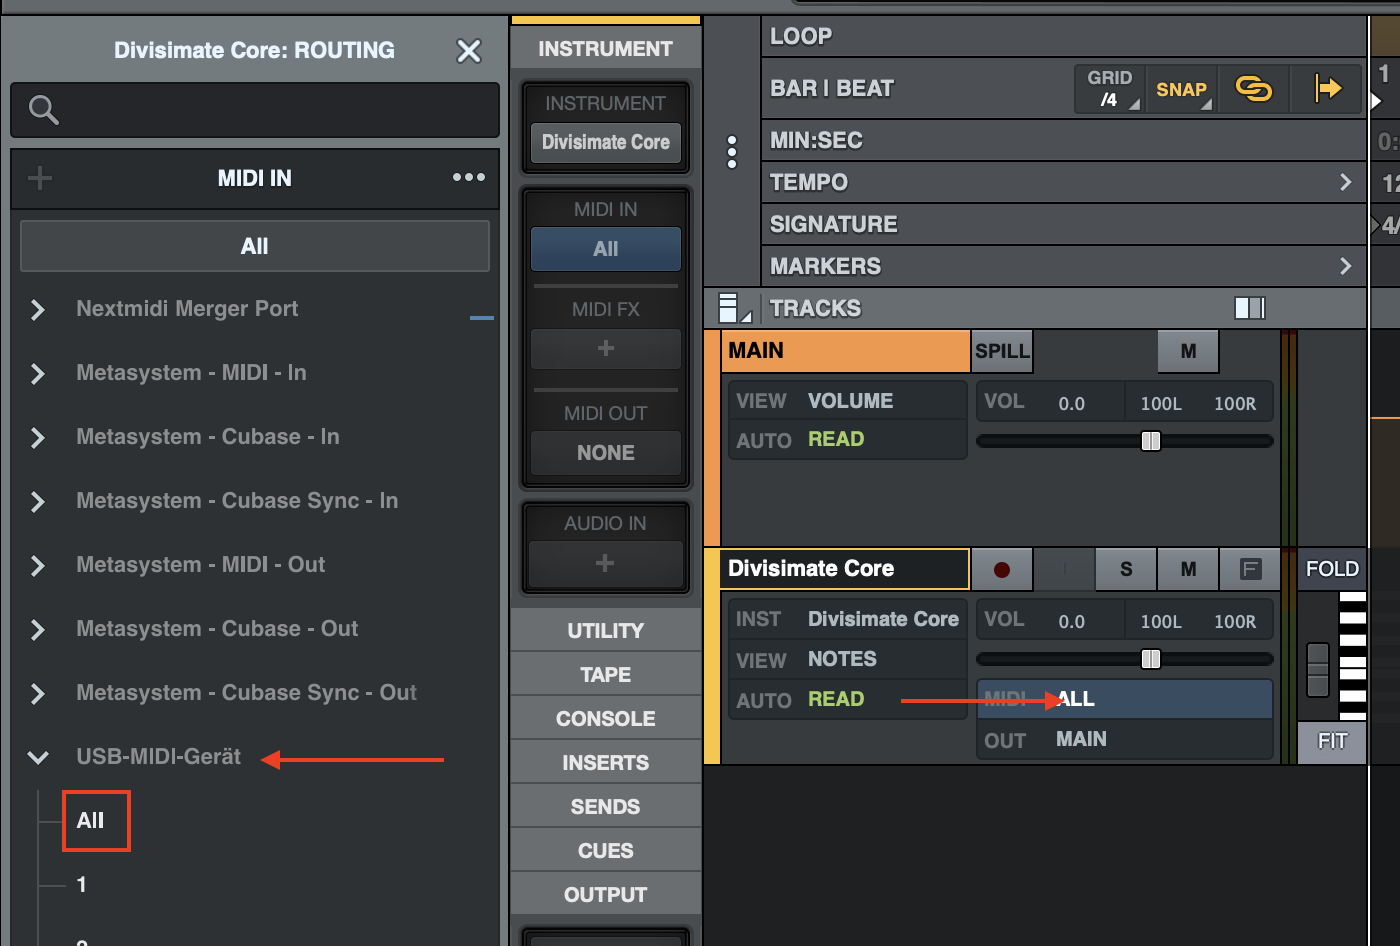
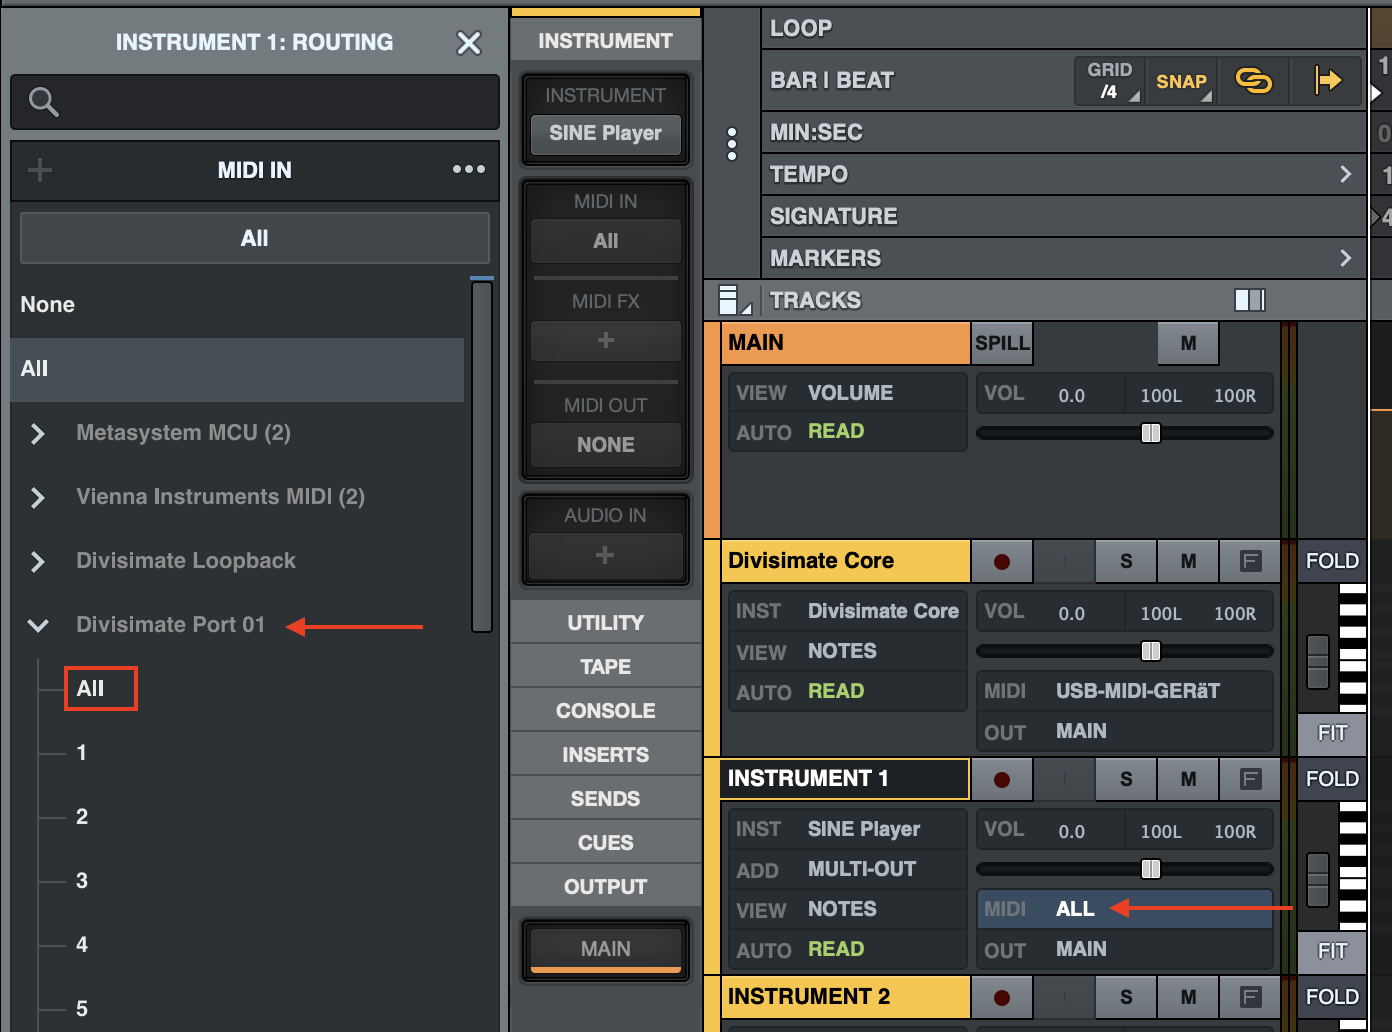
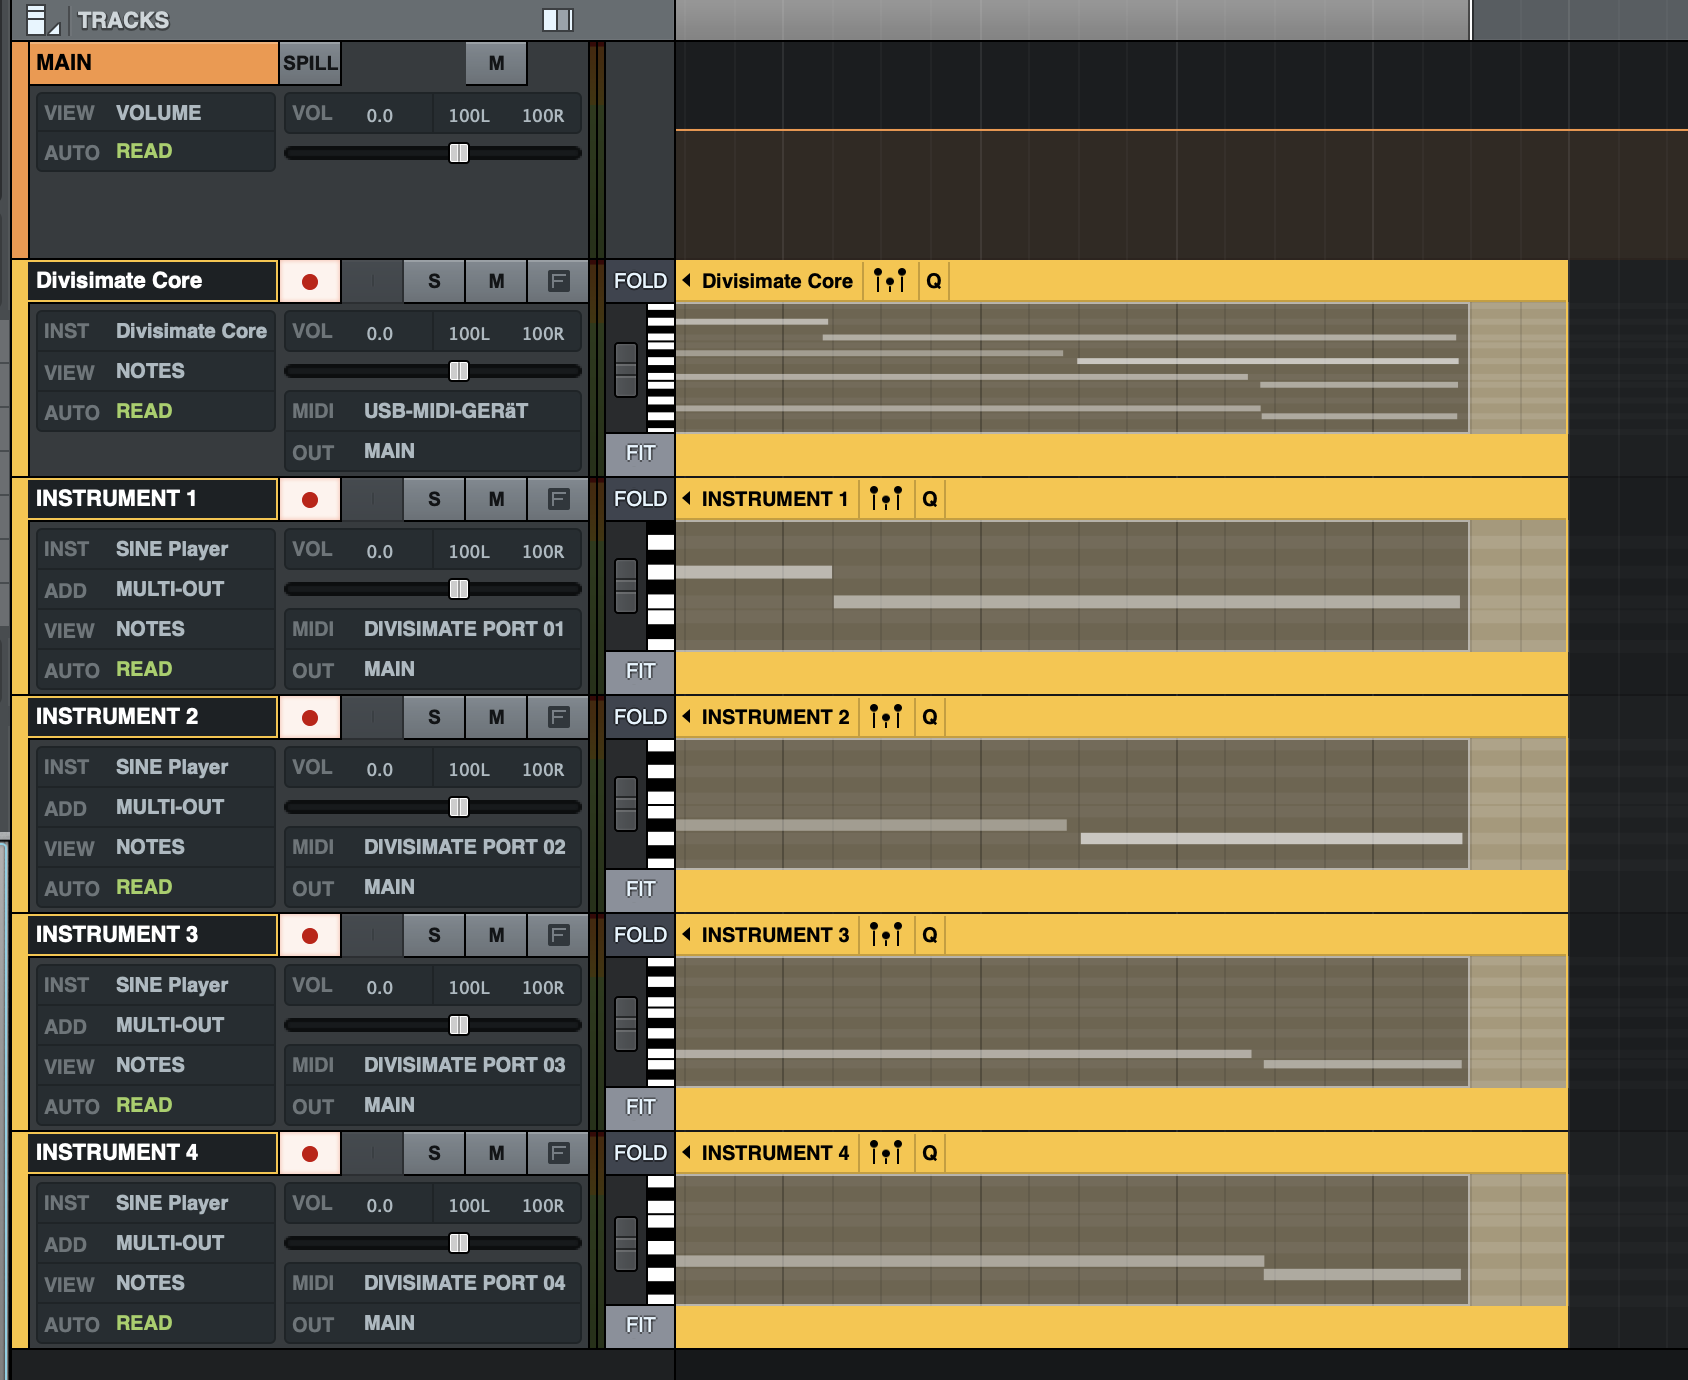
- Set the first track’s midi-input to Divismate Port 01, the following track’s midi input to Divisimate Port 02 and so on.
- Now record-enable all five instrument tracks. Per default you can do this by simply selecting the tracks. Click on the first one and shift-click on the last one or ctrl/cmd-click on the ones you like to play. Now Logic should automatically record-enable the selected tracks.
- Now you can play the four instruments in Divisimate Core!
Important Settings
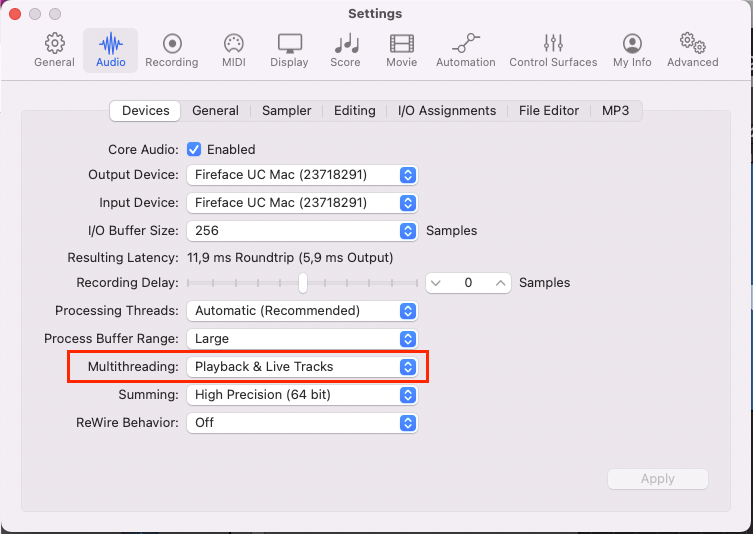
When you build larger orchestrations with Divisimate Core, you are playing a larger number of instruments live than you usually would. This can put additional strain on your system and be demanding on your CPU. To ensure ideal performance, make sure that your multithreading settings are set to include live tracks.
In this quickstart we will go through the steps to send the individual notes from 4-note chords to four different instruments in LUNA.
Divisimate Core installs as a plugin that can be found in the Instruments category in LUNA.
In LUNA, Divisimate can only be used with up to 2x16 dedicated Divisimate Ports. Unfortunately the Plugin Out functionality can not be used in LUNA at this time, as plugin MIDI output can not be split up by channel in this DAW. We hope for this limitation to be removed in the future, but for now, users of LUNA have to stay with the Divisimate Port workflow.
- Open a new, empty session in LUNA.
- Create a new instrument track and load Divisimate Core.
- Divisimate Core should open. Set the output configuration in the upper right corner to Port 01 - 16.
- Make sure 4 voices are activated in the lower part of the GUI above the keyboard (if not, you can activate the voices by clicking on ‘4’) and connect the 4 voices to the first 4 rows on the right by clicking in the matrix.
- Choose your MIDI controller as input. Don’t leave it to All, otherwise you can create a feedback loop!
If you want to use multiple input devices on your Divisimate Core track, you can use the Nextmidi Merger Port, which was installed automatically with Divisimate Core. Learn how to use it in the following video.
- Now, create four additional midi tracks that you want to connect with Divisimate Core and load instruments of your choice. Set the track inputs ("MIDI From") to Divisimate Port 01 for the first instrument track, Divisimate Port 02 for the second instrument track and so on.
- Record enable all 5 tracks and you can play your instruments by playing 4-note-chords.
Important Settings
If you want to go back to working the traditional way track-by-track, simply press ‘Bypass’ or the shortcut b in Divisimate. Divisimate will then send all midi events and CCs directly through to all ports without any delay or latency.
Careful: If you have instruments using the option “All MIDI In”, you should use the power button (or the ESC key) to turn Divisimate off when you record those instruments to avoid note duplicates.
In this quickstart we will go through the steps to send the individual notes from 4-note chords to four different instruments in Pro Tools.
Divisimate Core installs as a plugin that can be found in the instrument section in Pro Tools. It can be used either with up to 2x16 dedicated Divisimate Ports or with the Plugin Out function. If you want to use Divisimate Core with the plugin out, keep reading. If you want to use the dedicated Divisimate ports, scroll down to Divisimate Core Port Setup.
Divisimate Core Plugin Out Setup
- Open a new session in Pro Tools.
- Create a new instrument track and insert Divisimate Core as instrument.
- Divisimate Core should open. Set the output configuration in the upper right corner to Plugin Out.
- Make sure 4 voices are activated in the lower part of the GUI above the keyboard (if not, you can activate the voices by clicking on ‘4’) and connect the 4 voices to the first 4 rows on the right by clicking in the matrix.
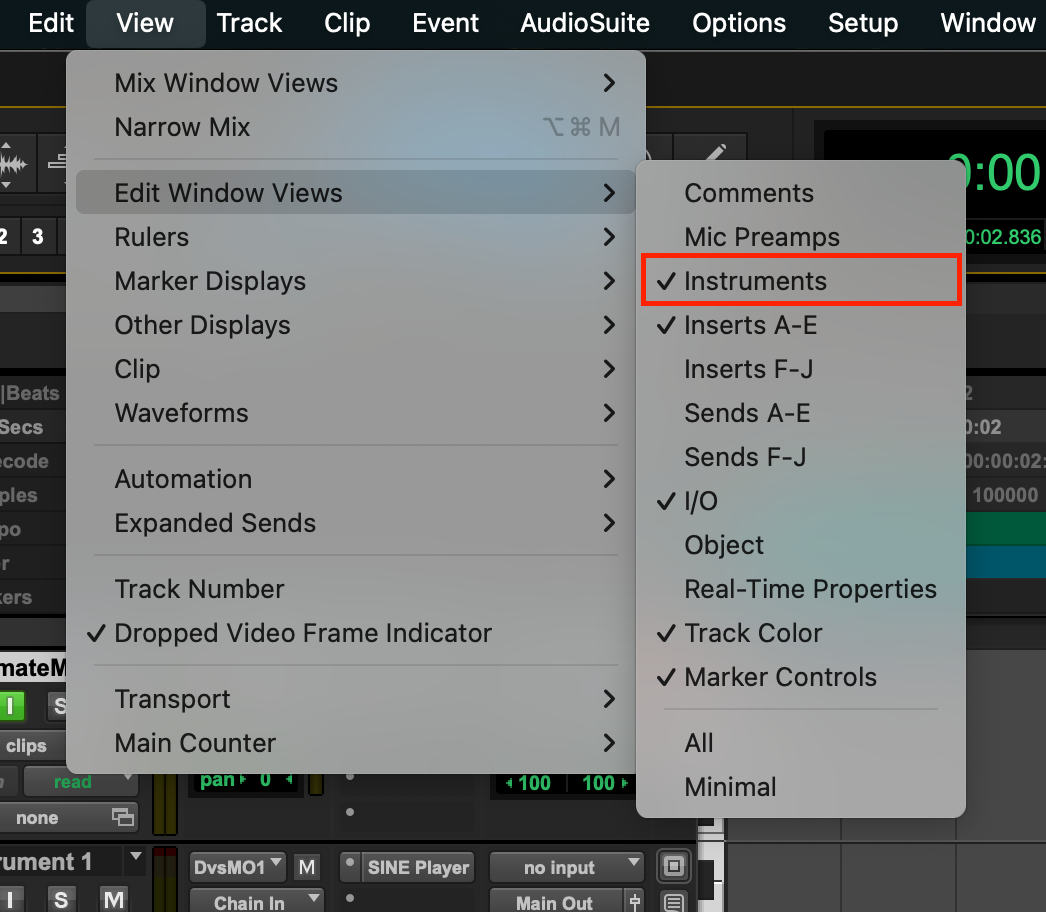
- Make sure the Instrument pane is visible by going to View > Edit Window Views and check the Instruments option.
- Choose your MIDI controller as input. Don’t leave it to All, otherwise you can create a feedback loop!

If you want to use multiple input devices on your Divisimate Core track, you can use the Nextmidi Merger Port, which was installed automatically with Divisimate Core. Learn how to use it in the following video.
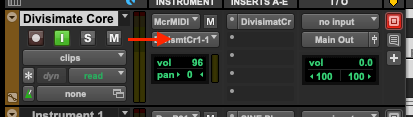
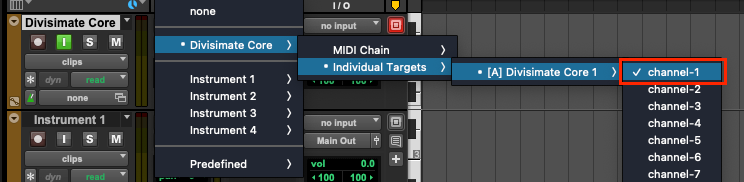
- Set the instrument output (not the track output!) for the Divisimate Core track to Divisimate Core > Individual Targets > Divisimate Core 1 > Channel 1
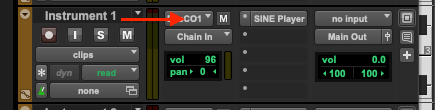
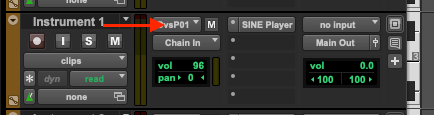
- Create 4 instrument tracks and load an instrument of your choice on each. For the individual instrument tracks, make sure the instrument output is set to Chain In and the track input is set to no input.
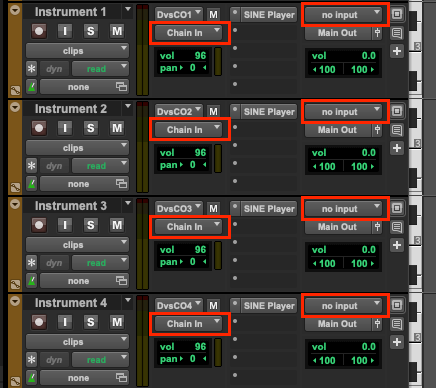
- Set the instrument input for the individual instruments to Divisimate Core > Individual Targets > Divisimate Core 1 > Channel 1 through Channel 4 respectively.

- Enable monitoring on the Divisimate Core track by clicking the "I" button below the track name and record enable the 4 instrument tracks. Now you are ready to play the four tracks by playing chords with 4 notes.
Divisimate Core Port Setup
- Open a new session in Pro Tools.
- Create a new track and choose Divisimate Core as instrument.
- Divisimate Core should open. Set the output configuration in the upper right corner to Port 01 - 16.
- Make sure 4 voices are activated in the lower part of the GUI above the keyboard (if not, you can activate the voices by clicking on ‘4’) and connect the 4 voices to the first 4 rows on the right by clicking in the matrix.
- Make sure the Instrument pane is visible by going to View > Edit Window Views and check the Instruments option.
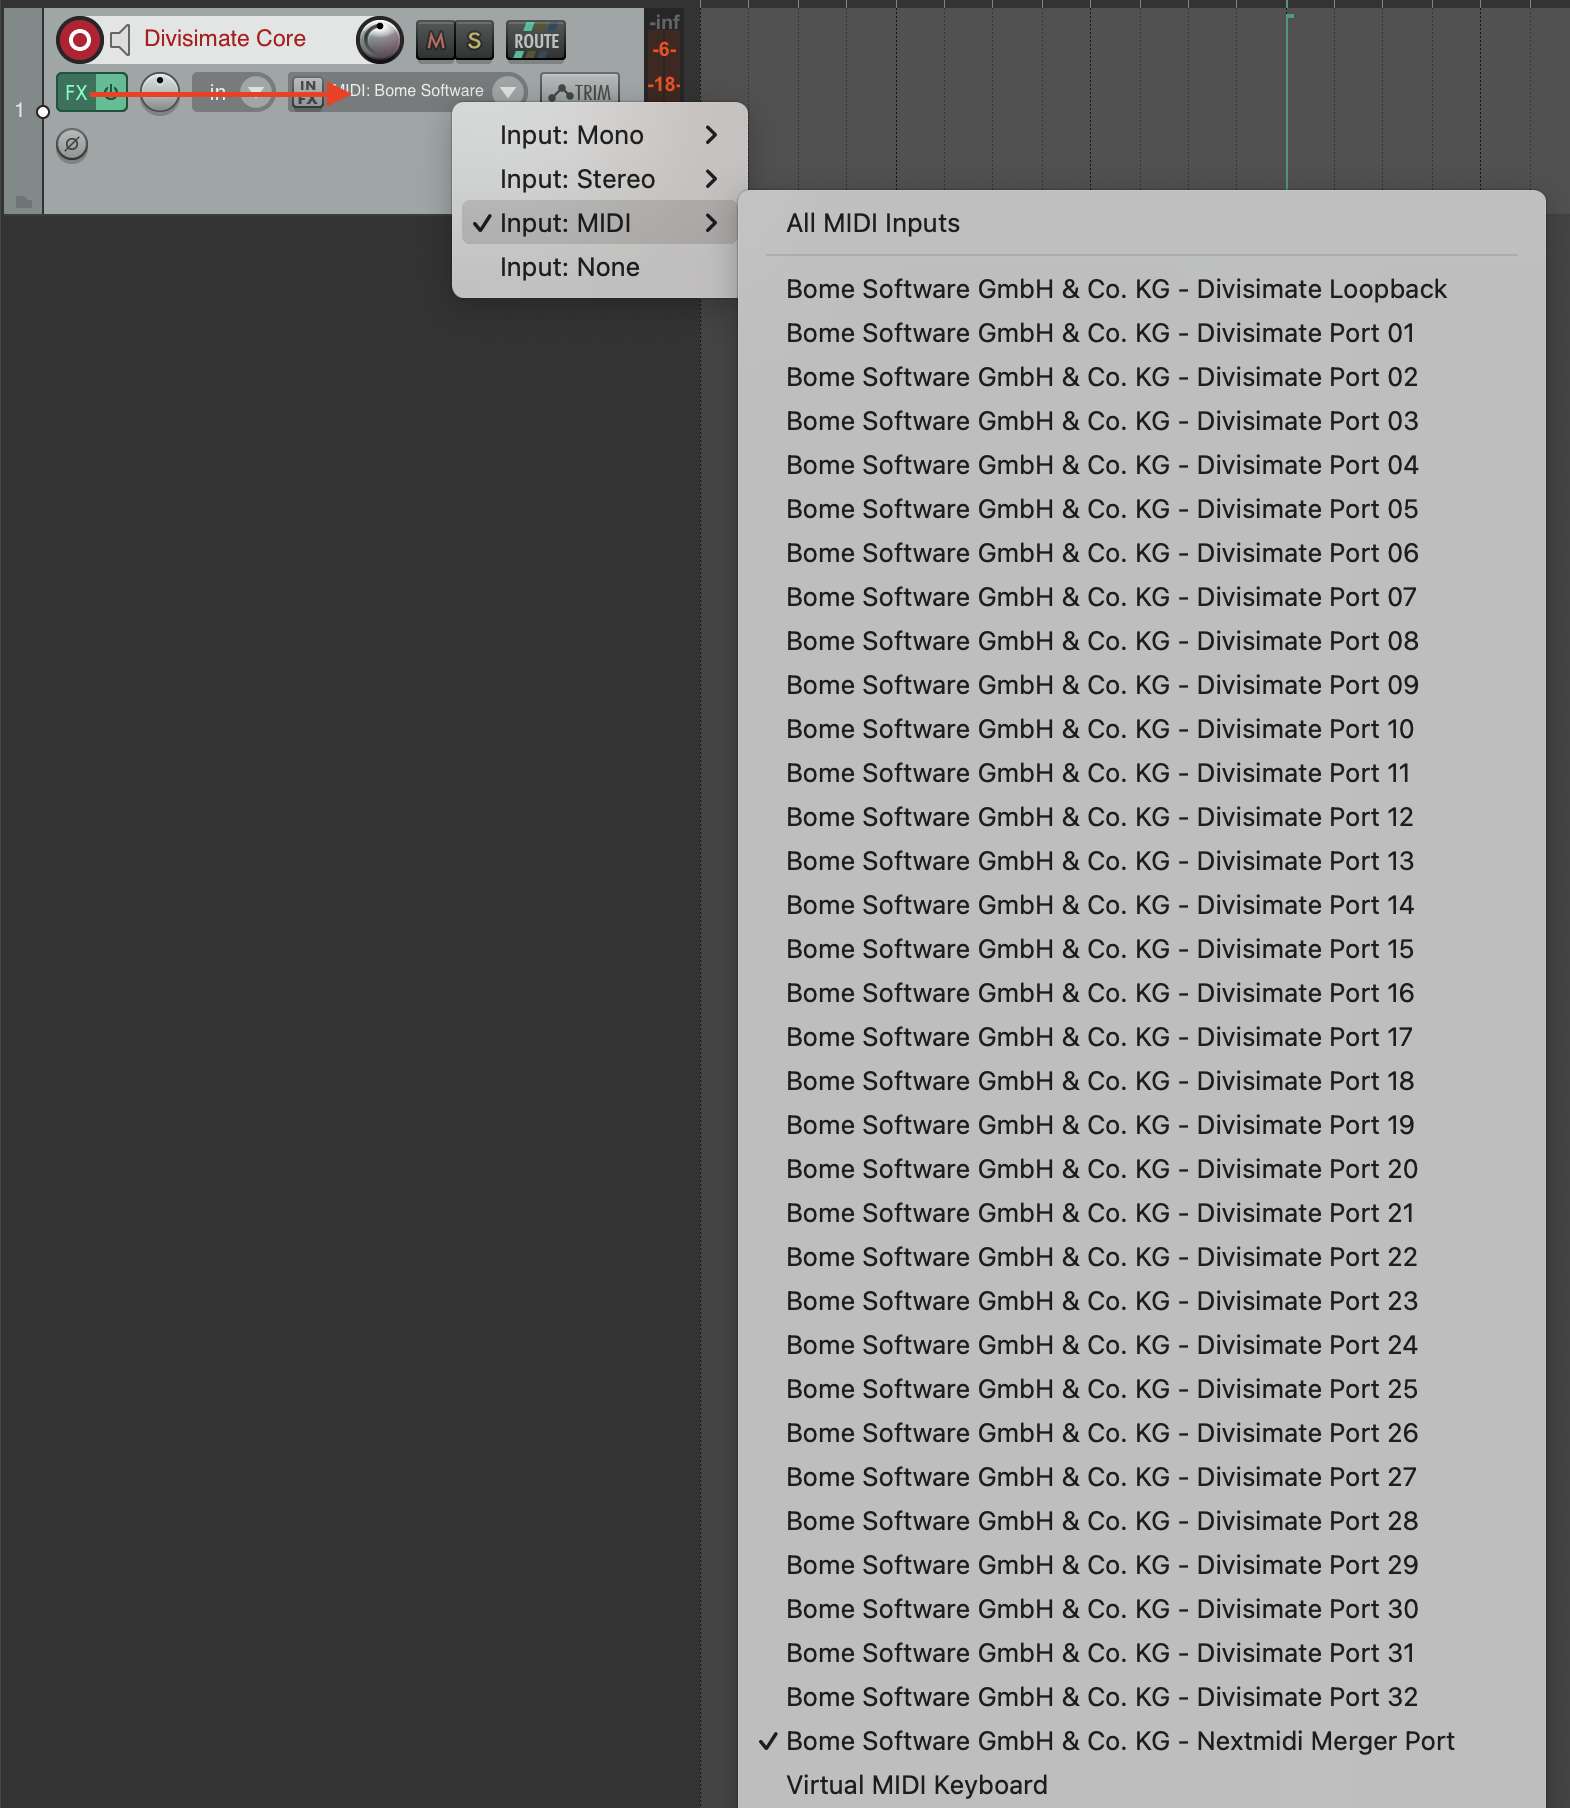
- Choose your MIDI controller as input. Don’t leave it to All, otherwise you can create a feedback loop! Also, make sure the instrument output (not the track output!) for the Divisimate Core track is set to Divisimate Core > MIDI Chain > Chain In. It should be this way per default, but it could be set differently, if you used the plugin out feature earlier.

If you want to use multiple input devices on your Divisimate Core track, you can use the Nextmidi Merger Port, which was installed automatically with Divisimate Core. Learn how to use it in the following video.
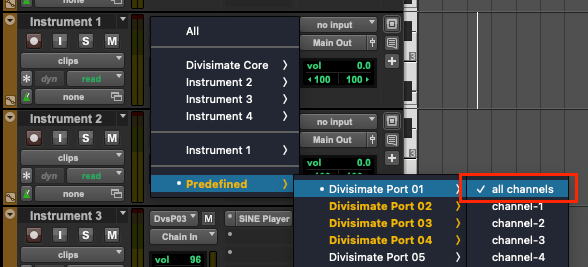
- Now, create four additional instrument tracks that you want to connect with Divisimate Core and load instruments of your choice. As input for the instrument tracks select Divisimate Port 01 for track 1, Divisimate Port 02 for track 2 and so on. Note: On Windows, the ports can appear out of order. Pro Tools sorts the ports by an arbitrary ID given to the devices by Windows, so there is nothing we can do about this, unfortunately.
- Enable monitoring on the Divisimate Core track by clicking on the small loudspeaker symbol and record enable the 4 instrument tracks. Now you are ready to play the four tracks by playing chords with 4 notes.
Important Settings
Bypass
If you want to go back to working the traditional way track-by-track, simply ‘Bypass’ Divisimate. Divisimate will then send all midi events and CCs directly through to all outputs or ports without any delay or latency. This way you can just record enable any track alone and play them as if Divisimate was not there.
In this quickstart we will go through the steps to send the individual notes from 4-note chords to four different instruments in Reaper.
Divisimate Core installs as a plugin that can be found in the VST3i section in Reaper. It can be used either with up to 2x16 dedicated Divisimate Ports or with the Plugin Out function. If you want to use Divisimate Core with the plugin out, keep reading. If you want to use the dedicated Divisimate ports, scroll down to Divisimate Core Port Setup.
Divisimate Core Plugin Out Setup
- Open a new session in Reaper.
- Create a new track and choose Divisimate Core as instrument.
- Divisimate Core should open. Set the output configuration in the upper right corner to Plugin Out.
- Make sure 4 voices are activated in the lower part of the GUI above the keyboard (if not, you can activate the voices by clicking on ‘4’) and connect the 4 voices to the first 4 rows on the right by clicking in the matrix.
- Choose your MIDI controller as input. Don’t set it to All MIDI Inputs, otherwise you can create a feedback loop!
If you want to use multiple input devices on your Divisimate Core track, you can use the Nextmidi Merger Port, which was installed automatically with Divisimate Core. Learn how to use it in the following video.
- Create four additional instrument tracks that you want to connect with Divisimate Core. In the track settings, set the main input of your instrument tracks to Input: Virtual MIDI Keyboard, or any other input that you don't plan to use. Reaper needs some input assigned here, otherwise we can't record anything on this track, but we don't want to use this input (not even accidentally).

- On every instrument track click the ROUTE button and add Divisimate Micro as a "new receive".
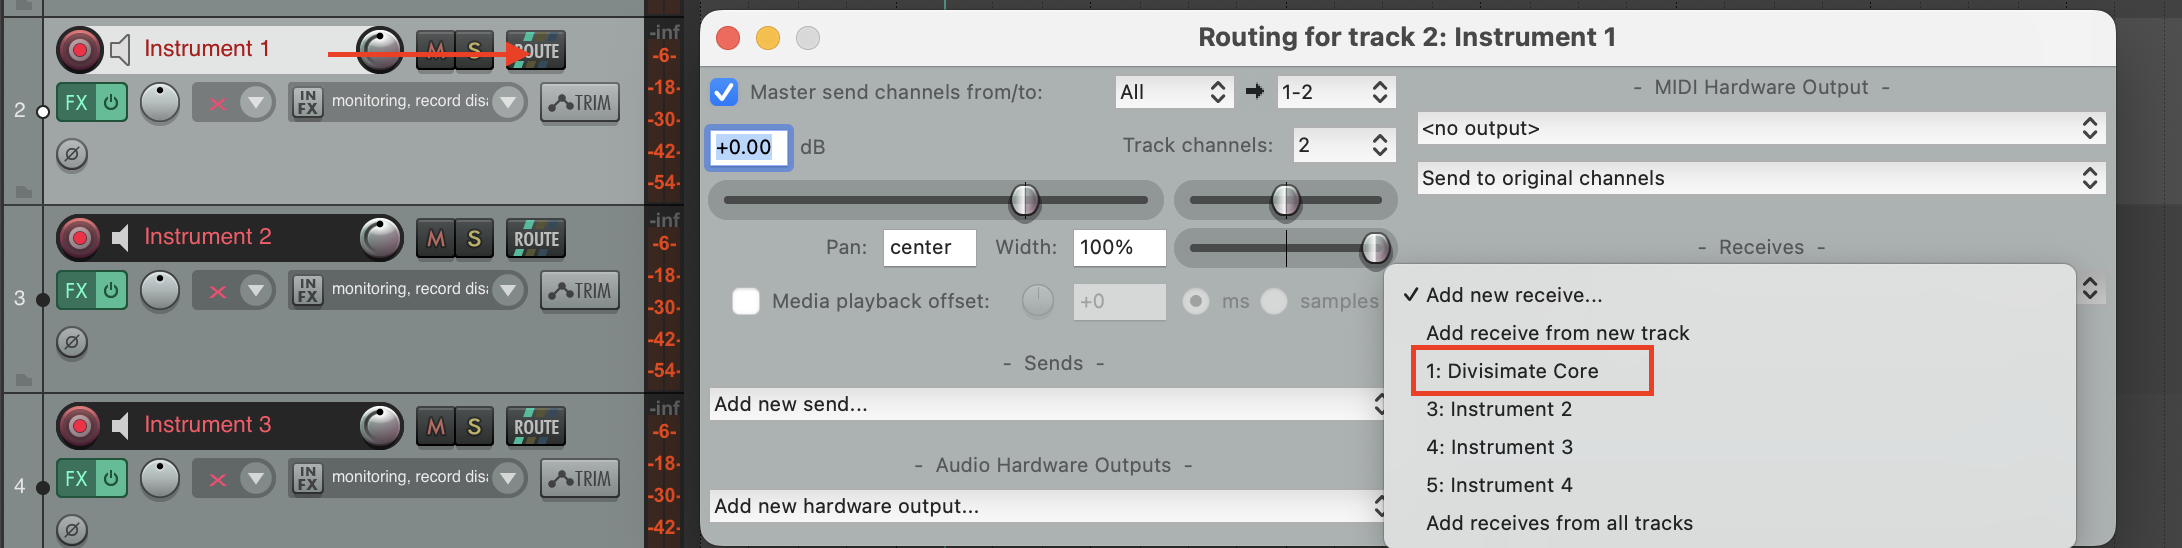
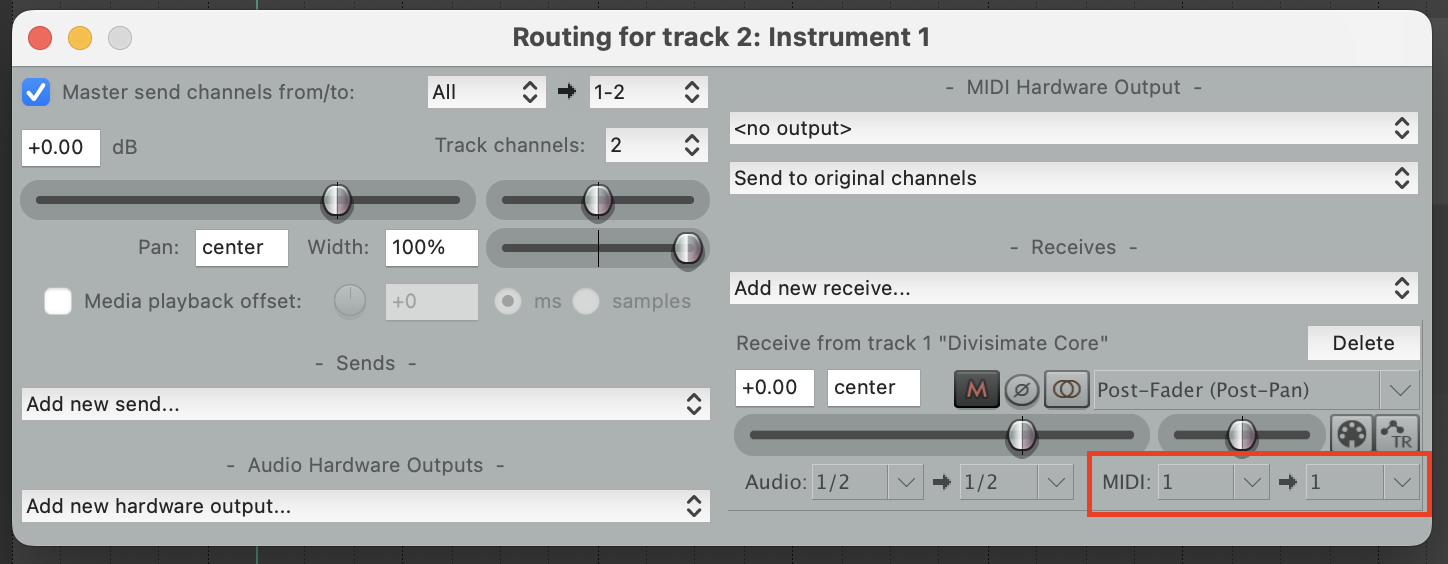
- In the lower right corner of the Routing window, select the appropriate MIDI channel and send it to channel 1. 1 → 1 for the first instrument track, 2 → 1 for the second track, 3 → 1 for the third and so on. This sets each track to listen to a specific MIDI channel only, but pass it on to the instrument as channel 1 (which most virtual instruments default to).
- Enable monitoring on the Divisimate Core track by clicking on the small loudspeaker symbol and record enable the 4 instrument tracks. Now you are ready to play the four tracks by playing chords with 4 notes.
Divisimate Core Port Setup
- Open a new session in Reaper.
- Create a new track and choose Divisimate Core as instrument.
- Divisimate Core should open. Set the output configuration in the upper right corner to Port 01 - 16.
- Make sure 4 voices are activated in the lower part of the GUI above the keyboard (if not, you can activate the voices by clicking on ‘4’) and connect the 4 voices to the first 4 rows on the right by clicking in the matrix.
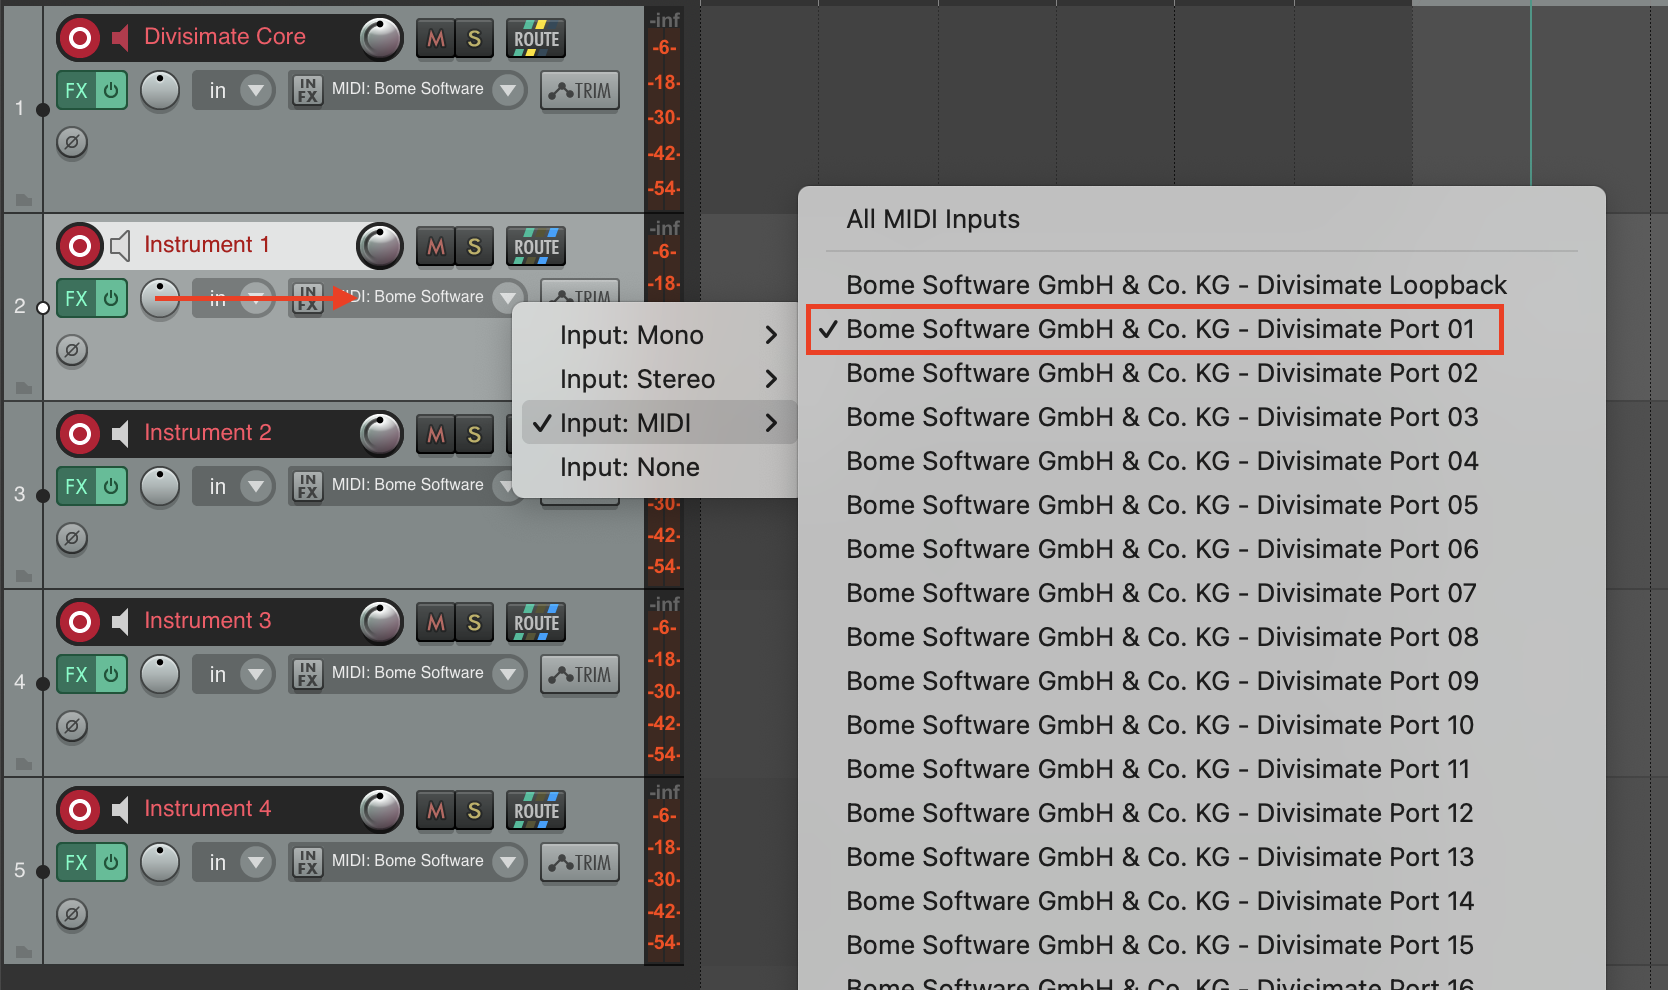
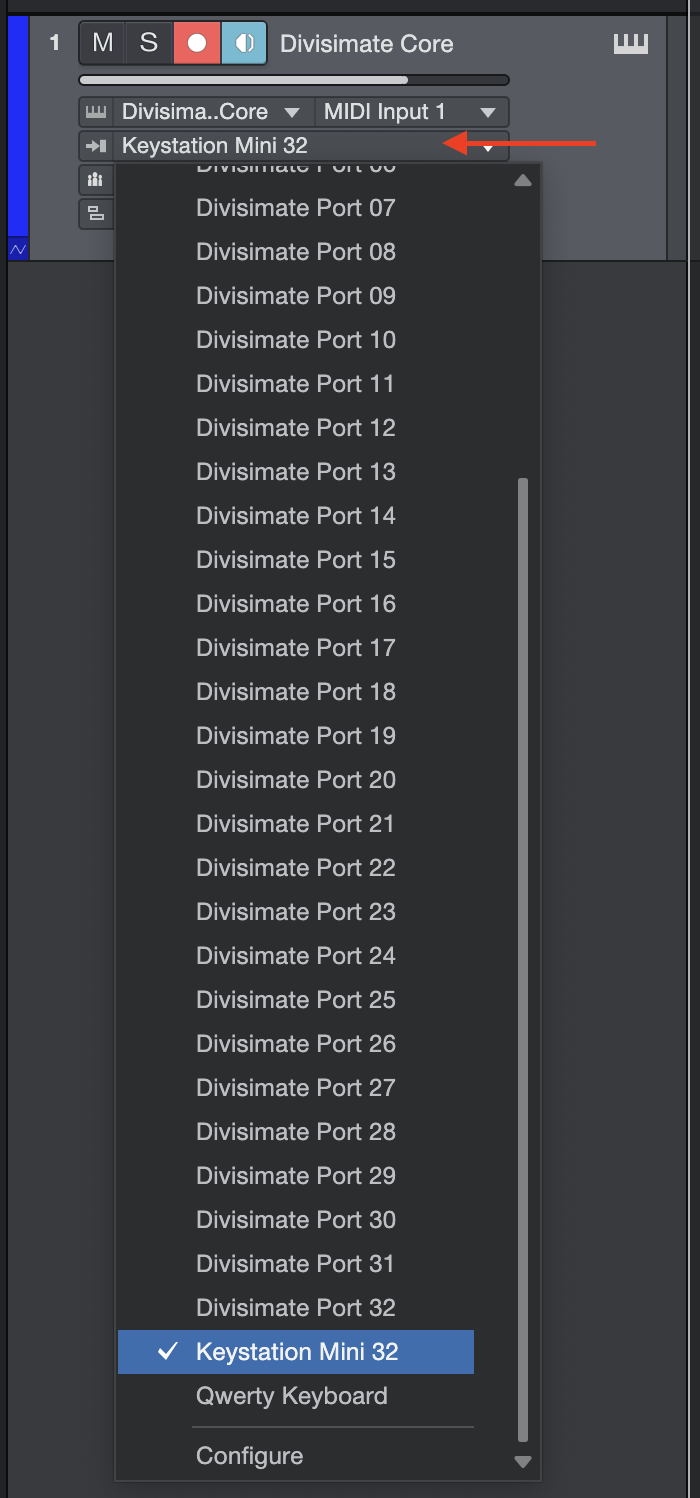
- Choose your MIDI controller as input. Don’t set it to All MIDI Inputs, otherwise you can create a feedback loop!
If you want to use multiple input devices on your Divisimate Core track, you can use the Nextmidi Merger Port, which was installed automatically with Divisimate Core. Learn how to use it in the following video.
- Now, create four additional instrument tracks that you want to connect with Divisimate Core and load instruments of your choice. As input for the instrument tracks select Divisimate Port 01 for track 1, Divisimate Port 02 for track 2 and so on. Note: On Windows, the ports can appear out of order. Reaper sorts the ports by an arbitrary ID given to the devices by Windows, so there is nothing we can do about this, unfortunately.
- Enable monitoring on the Divisimate Core track by clicking on the small loudspeaker symbol and record enable the 4 instrument tracks. Now you are ready to play the four tracks by playing chords with 4 notes.
Important Settings
Bypass
If you want to go back to working the traditional way track-by-track, simply ‘Bypass’ Divisimate. Divisimate will then send all midi events and CCs directly through to all outputs or ports without any delay or latency. This way you can just record enable any track alone and play them as if Divisimate was not there.
In this quickstart we will go through the steps to send the individual notes from 4-note chords to four different instruments in Studio One.
Divisimate Core installs as a plugin that can be found in the Instruments folder in Studio One. It can be used either with up to 2x16 dedicated Divisimate Ports or with the Plugin Out function. If you want to use Divisimate Core with the plugin out, keep reading. If you want to use the dedicated Divisimate ports, scroll down to Divisimate Core Port Setup.
Divisimate Core Plugin Out Setup
- Open a new session in Studio One.
- Create a new Instrument Track and choose the VST3 version of Divisimate Core as the instrument. The plugin out setup doesn't work with AU, so make sure to stick to VST3.
- Divisimate Core should open. Set the output configuration in the upper right corner to Plugin Out.
- Make sure 4 voices are activated in the lower part of the GUI above the keyboard (if not, you can activate the voices by clicking on ‘4’) and connect the 4 voices to the first 4 rows on the right by clicking in the matrix.
- Choose your MIDI controller as input. Don’t leave it to All Inputs, otherwise you can create a feedback loop!
If you want to use multiple input devices on your Divisimate Core track, you can use the Nextmidi Merger Port, which was installed automatically with Divisimate Core. Learn how to use it in the following video.
- Create four additional instrument tracks with instruments of your choice that you want to connect with Divisimate Core. On the controls of these instrument tracks you should see the input selection. You may need to extend the track height a little. Here you should select "Divisimate Core". Then right next to that menu select "MIDI Output 1" for your first instrument (that would be MIDI Channel 1), "MIDI Output 2" for your second instrument and so on.
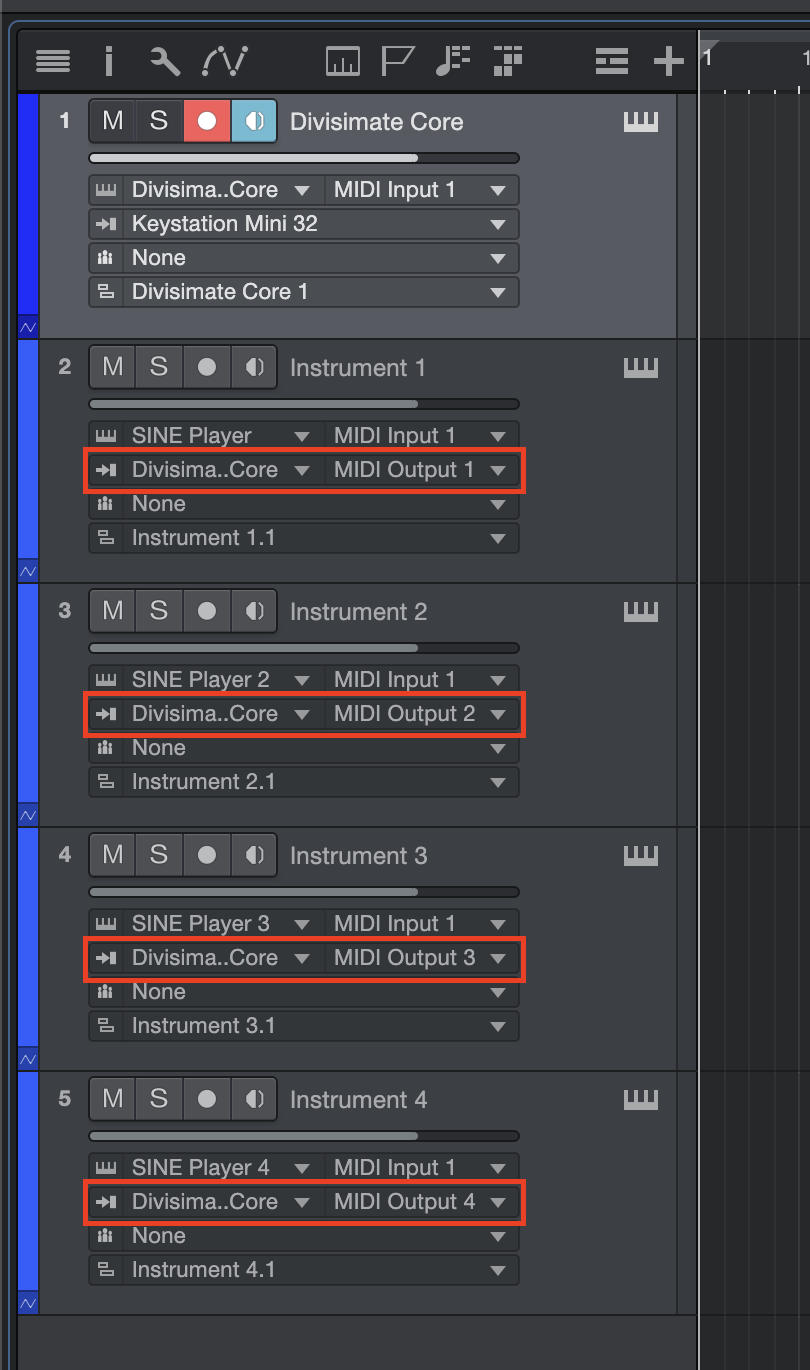
- Enable monitoring on the Divisimate Core track by clicking on the small loudspeaker symbol and record enable the 4 instrument tracks. Now you are ready to play the four tracks by playing chords with 4 notes.
Divisimate Core Port Setup
- Open a new session in Studio One.
- Create a new Instrument Track and choose Divisimate Core as the instrument.
- Divisimate Core should open. Set the output configuration in the upper right corner to Plugin Out.
- Make sure 4 voices are activated in the lower part of the GUI above the keyboard (if not, you can activate the voices by clicking on ‘4’) and connect the 4 voices to the first 4 rows on the right by clicking in the matrix.
- Choose your MIDI controller as input. Don’t leave it to All Inputs, otherwise you can create a feedback loop!
If you want to use multiple input devices on your Divisimate Core track, you can use the Nextmidi Merger Port, which was installed automatically with Divisimate Core. Learn how to use it in the following video.
- If this is the first time you use any of the Divisimate versions, you have to set up the Divisimate Ports. If you have done that already, skip to 7.
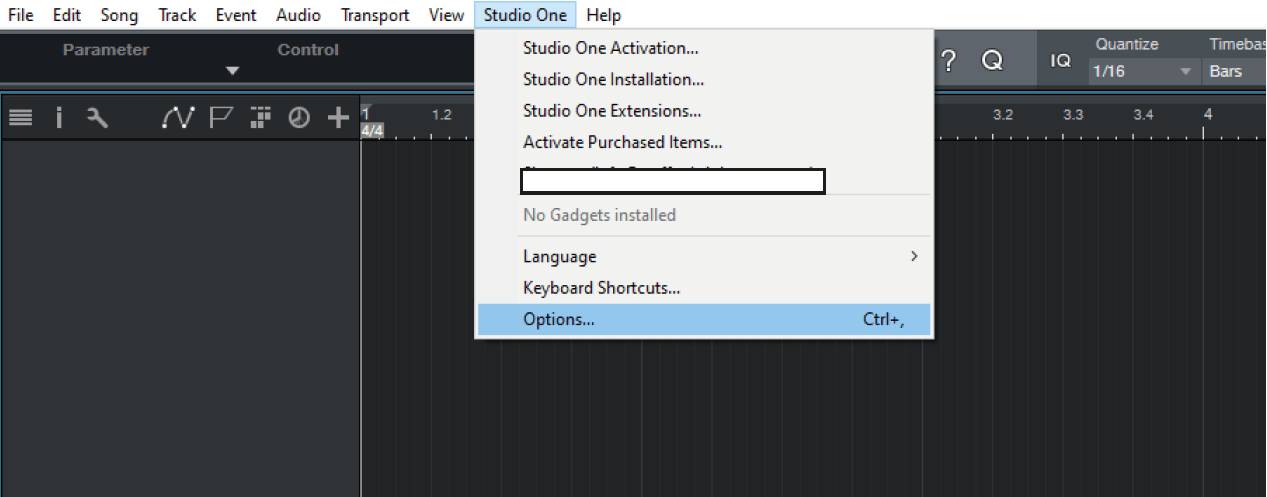
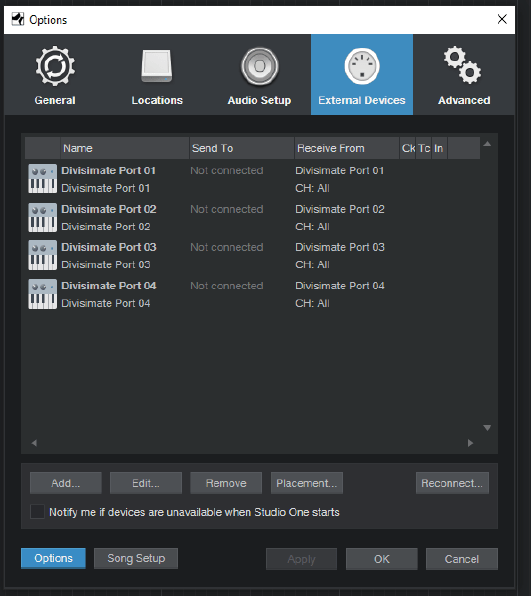
a) Open the “Options…”-Panel in Studio One.
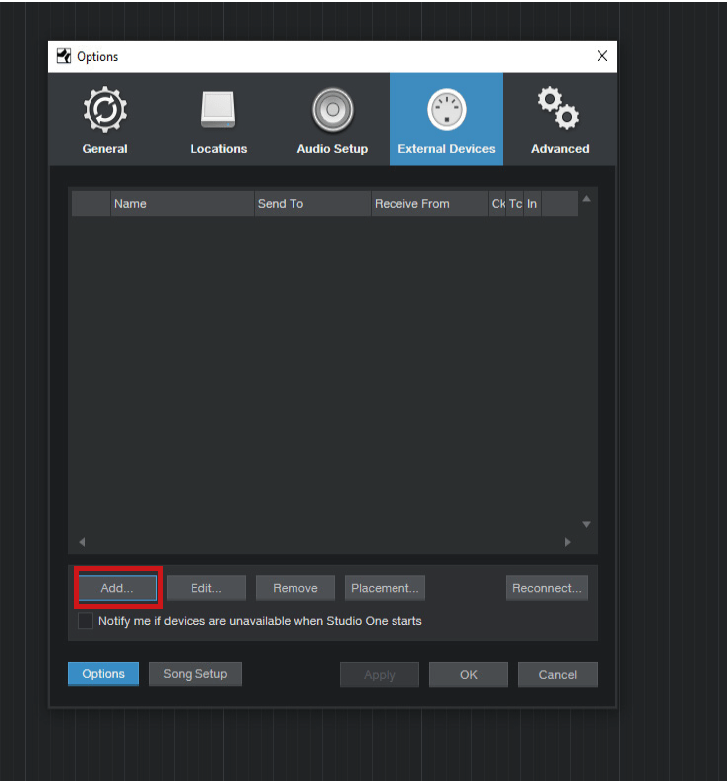
b) Navigate to the “External Devices” and click on “Add…”
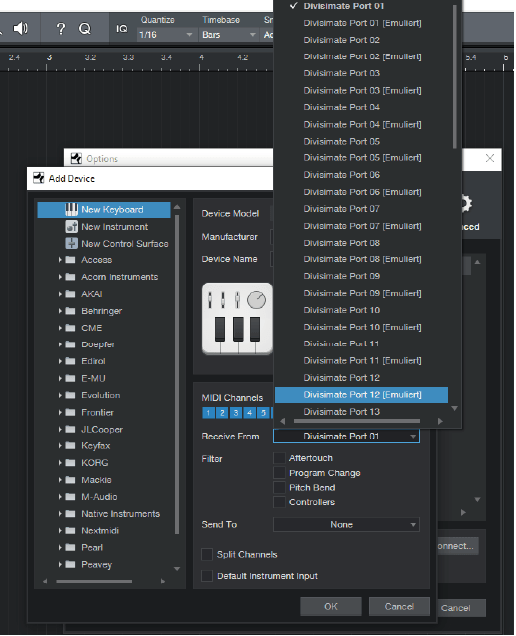
c) Select “New Keyboard” and type in the Port Name under “Device Name”
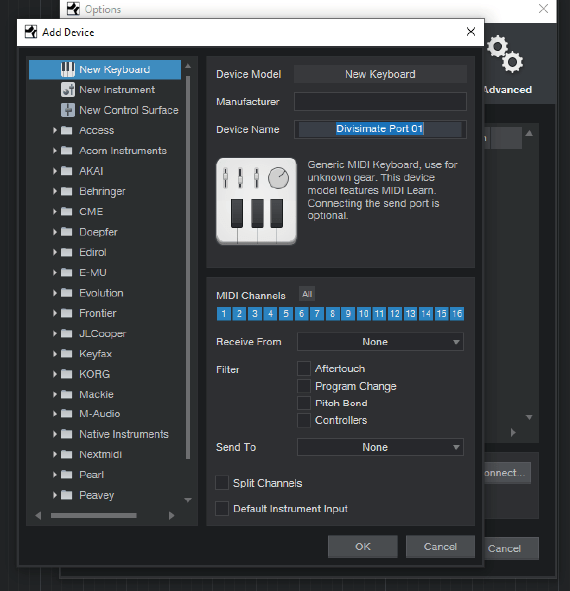
d) Under “Receive from” select the Divisimate Port you are setting up, in this case Divisimate Port 01
e) Repeat this process for every Divisimate Port you want to use, we’re adding 4 ports here. The bad news is to use all 16, you will need to add them all manually. The good news is that you only have to do that once, and then the connections will be saved.
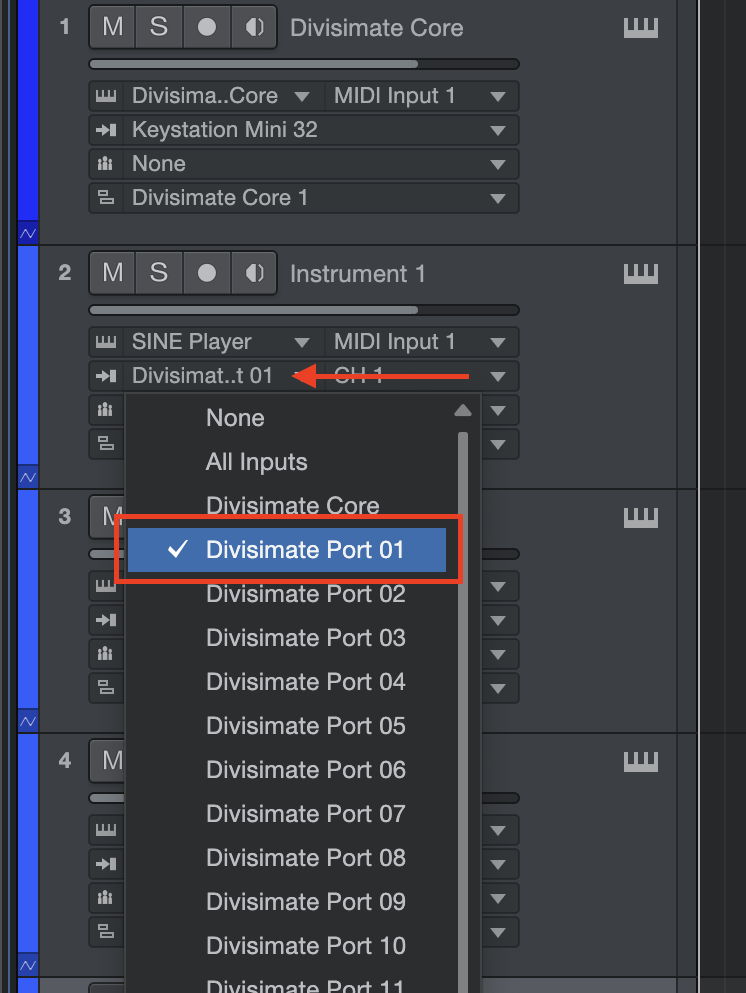
- Now, create four additional instrument tracks that you want to connect with Divisimate Core and load instruments of your choice. Go to the inspector on the left hand side and in the "Routing" section select Divisimate Port 01 for track 1, Divisimate Port 02 for track 2 and so on. Note: On Windows, the ports can appear out of order. Studio One sorts the ports by an arbitrary ID given to the devices by Windows, so there is nothing we can do about this, unfortunately.
- Enable monitoring on the Divisimate Core track by clicking on the small loudspeaker symbol and record enable the 4 instrument tracks. Now you are ready to play the four tracks by playing chords with 4 notes.
Important Settings
Bypass
If you want to go back to working the traditional way track-by-track, simply press ‘Bypass’ or the shortcut b in Divisimate. Divisimate will then send all midi events and CCs directly through to all ports without any delay or latency. This way you can just record enable any track alone and play them as if Divisimate was not there.
Careful: If you have instruments using the option “All Inputs”, you should use the power button (or the ESC key) to turn Divisimate off when you record those instruments to avoid note duplicates.