Controlling Divisimate and Cubase with Metagrid Pro
How can you build a workflow using Metagrid and Divisimate? Composer Jonas Vogler from our team takes you through his setup.
Metagrid Pro by Metasystem is a small but quite popular app for iPad to control software on a Mac or PC via buttons and faders. Divisimate comes with its own dedicated remote control app DivisiControl, but if you are a Metagrid user and you don’t have two tablets, switching back and forth between the two apps isn’t exactly convenient. It’s possible to control Divisimate with Metagrid though, even while controlling a DAW like Cubase simultaneously via a different virtual MIDI port.
In my case, I wanted to have my most used presets from the Universal Orchestral Template Core Performance available, together with a selection of controls to start and stop the recording.
The grid I built for this purpose features a couple of bread-and-butter presets for each section, as well as additional controls in the bottom row. The additional controls, from left to right, are:
- Bypass Divisimate
- Select/Record Enable all Divisimate tracks in my template
- Toggle metronome
- Nudge cursor back 1 bar
- Nudge cursor forward 1 bar
- Jump to left locator
- Undo
- Play/Stop
- Record
This guide explains the setup in Cubase. While some actions involve the unique project logical editor in Cubase, most of the elements—especially the preset switching—should be possible in other DAWs as well.
I assume you have Divisimate as well as Cubase and Metagrid Pro installed, and that you’ve properly configured each application.
The following applies to Windows systems only. *In MacOS, all necessary ports are created automatically.
In order for this setup to work, we need two separate Metagrid ports, one MIDI port and one dedicated DAW port. That’s what Metagrid advises in their setup guide so most probably you have it set up this way already. Just to double check: this is what your loopMIDI and MetaServer settings should look like:*
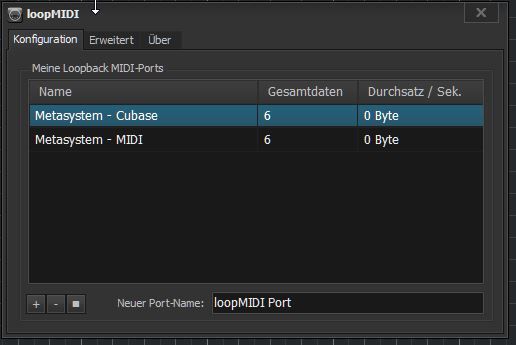
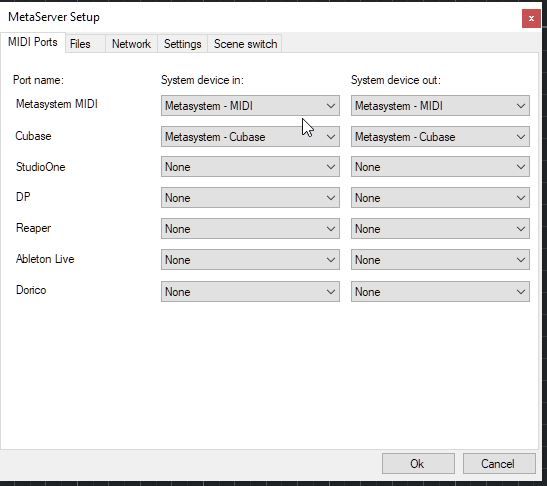
Additionally, make sure to enable the Metasystem – MIDI input in the Divisimate settings because we’ll send the commands to Divisimate via this port.
Divisimate can be controlled remotely by sending the values 1-127 on CC31 or by sending MIDI program changes. In this example, I’ll use CC31. Just make sure to tell Divisimate to listen to CC31 (Settings > Remote Setup > Listen to CC31: ON), or Program Changes if you prefer to use those.
Setup
First, create a new grid in Metagrid. Choose a sensible button size depending on how many buttons you need, what size your iPad is, and how good you are in hitting tiny buttons on a screen. I chose 6×8, but I changed the bottom row a bit to accommodate 9 buttons instead of 8.
If you are familiar with creating buttons in Metagrid, the next steps should be pretty self-explanatory. Basically, you need to create a new button, choose Continuous Controller as macro, and fill in CC31 and the value corresponding to the number of the Divisimate pad you want to link.
The first preset, 2 Fl. Unsison 8va (M), is on pad number 9 in the (UOT Core Performance)https://www.divisimate.com/templates/universal-orchestral in Divisimate, so I set the macro to CC: 31, VAL.: 9 CH.: 1.
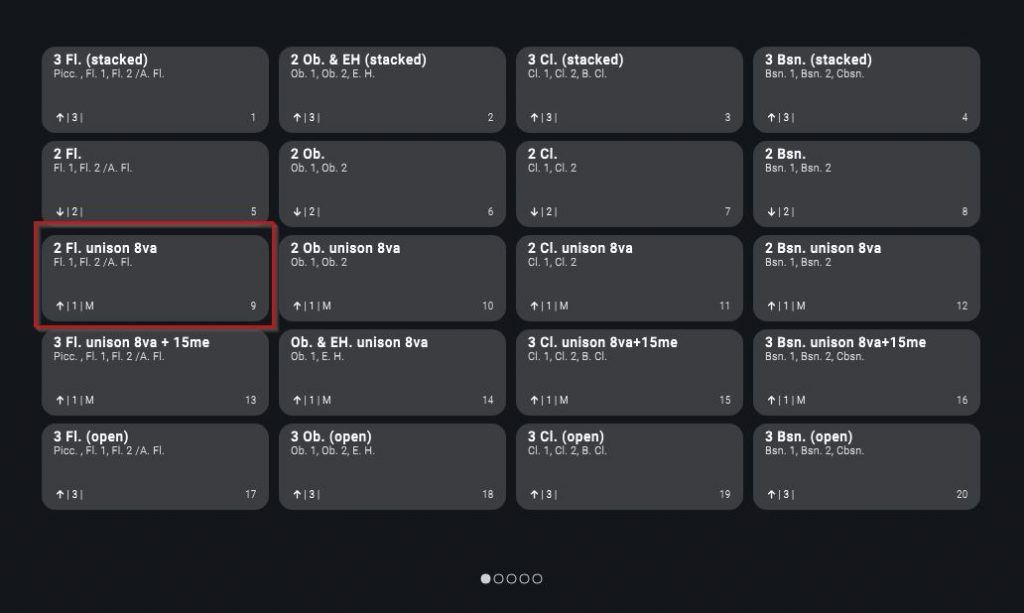
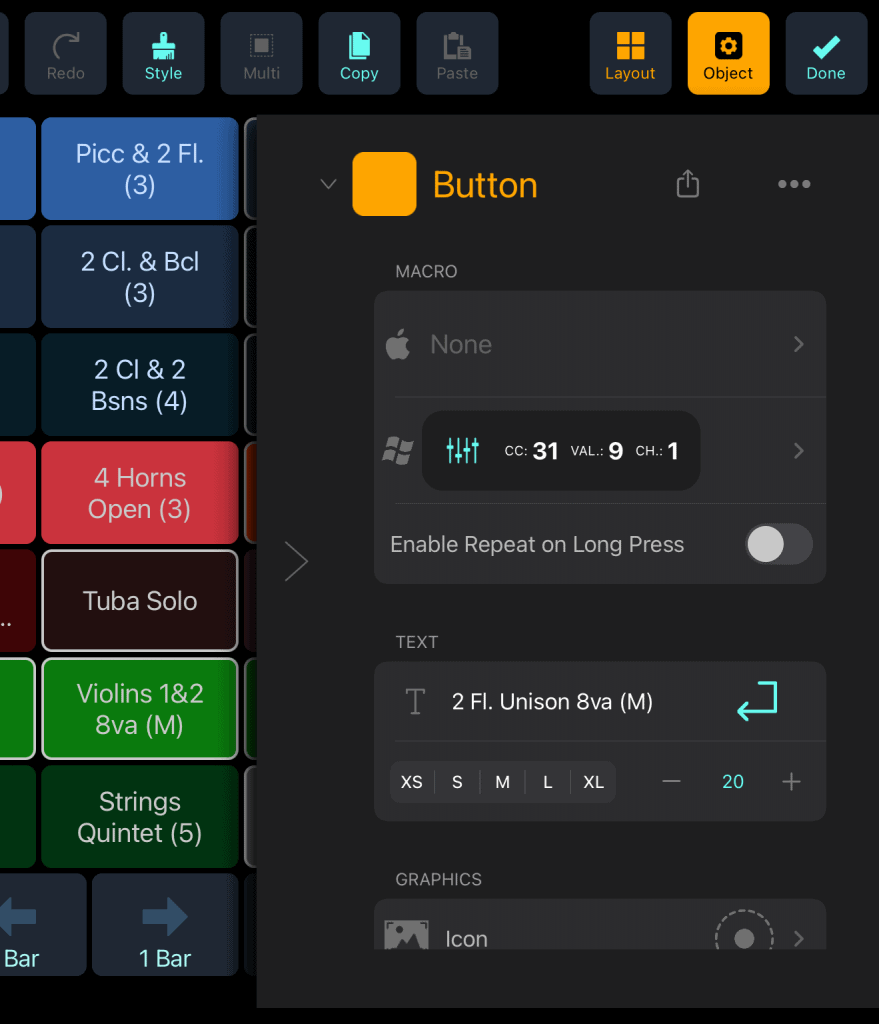
Do this with all the buttons you want to use and name and color them to your liking.
On the bottom row, some buttons are more sophisticated than others. The first button is there to bypass Divisimate. It’s not only possible to switch presets via MIDI commands, but also some of the other functions, including the Bypass function. When receiving CC31: 123, Divisimate will switch to bypass mode and when receiving CC31: 124, it will leave bypass.
In the following table, you can find all the possible remote control functions and their corresponding CC31 / Program Change values:
| Program Change / CC31 Value | Action |
|---|---|
| 101-110 | Performance Quickload Slot 1-10 |
| 121 | Power On |
| 122 | Power Off |
| 123 | Bypass On |
| 124 | Bypass Off |
| 125 | Set Divisi Mode: Top Down |
| 126 | Set Divisi Mode: Bottom Up |
| 127 | Set Divisi Mode: Fill Voices |
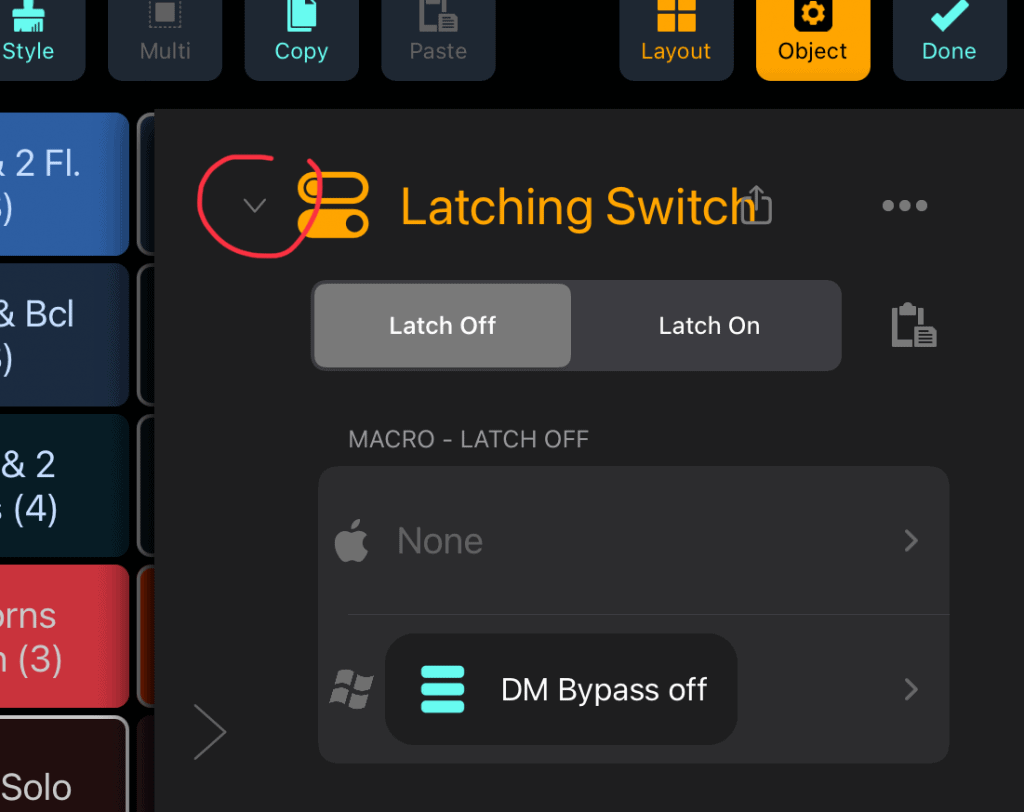 | |
| In order for this to work with just one button, I set up a latching switch in Metagrid. A latching switch is basically two buttons in one, meaning you can customize the entire button for two different states. To change the button type from a standard button to a latching switch, tap on the little down arrow next to the Button headline when editing it and then select Latching Switch. In the macro section, it’s the same thing as before: set each switch state to CC: 31, VAL.: 123 CH.: 1 and CC: 31, VAL.: 124 CH.: 1 accordingly. |
Note that the button won’t update itself if you change the bypass state of Divisimate manually via the GUI or by selecting any of the presets. In that case, you’ll need to tap the bypass button twice in order to catch up with Divisimate’s bypass state.
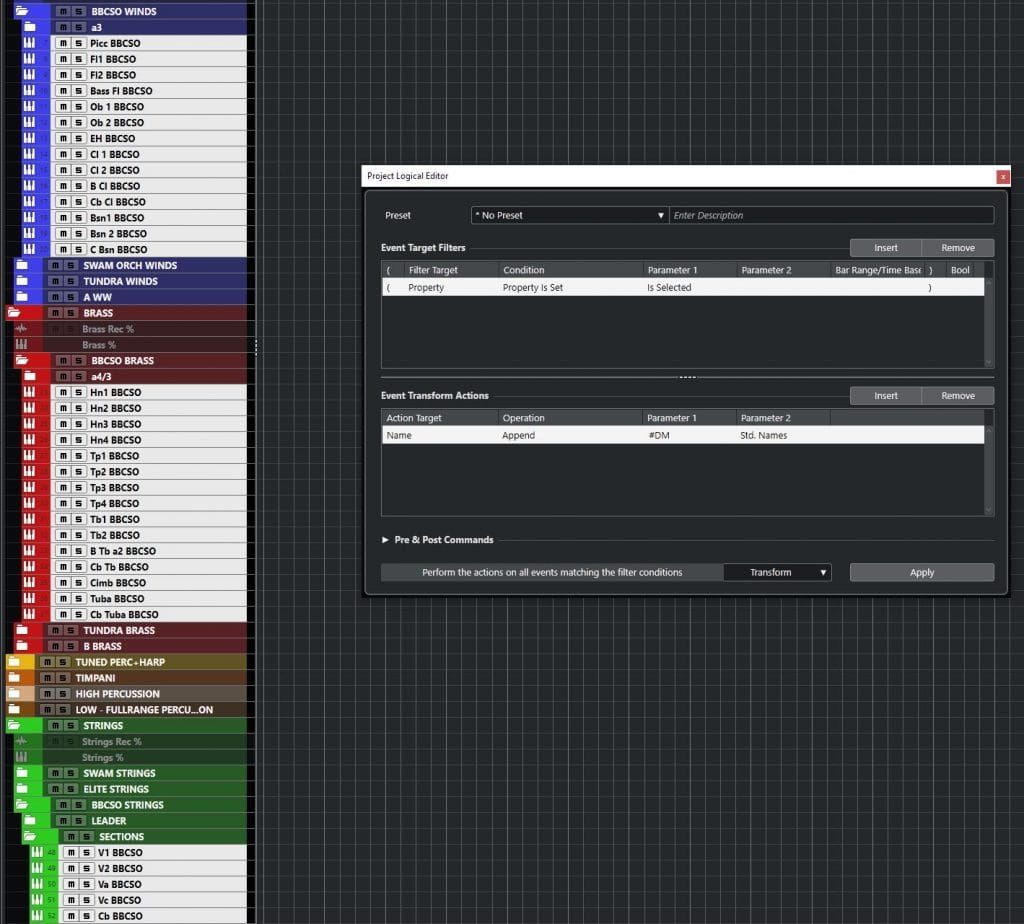
The next button involves a slightly advanced setup in Cubase: it automatically selects,and therefore record-enables, all the tracks that are part of my orchestra in my template. I have a pretty big template with hundreds of tracks, so I can’t just select all tracks. I added #DM as a unique identifier to all the tracks that I want to incorporate into the selection (it’s easily done by selecting all the tracks I want in this group and append the identifier to the names with the following Project Logical Editor (PLE) command).
Then I created a new PLE command that selects all the tracks with #DM in their name.
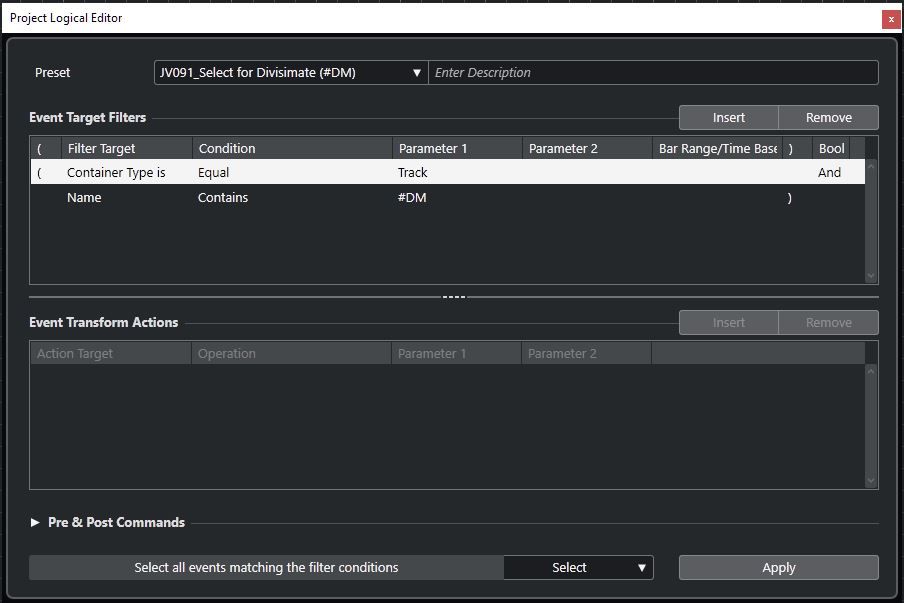 I saved this preset in order to assign it to a Metagrid macro in the Generic Remote Control settings in Cubase. I knew that the next free macro slot was 91 (I haven’t assigned my Macro 90 to this very Generic Remote, so you don’t see it in the screenshot), therefore I put 91 into the name of the preset so that I don’t lose track of what command is assigned to what macro.
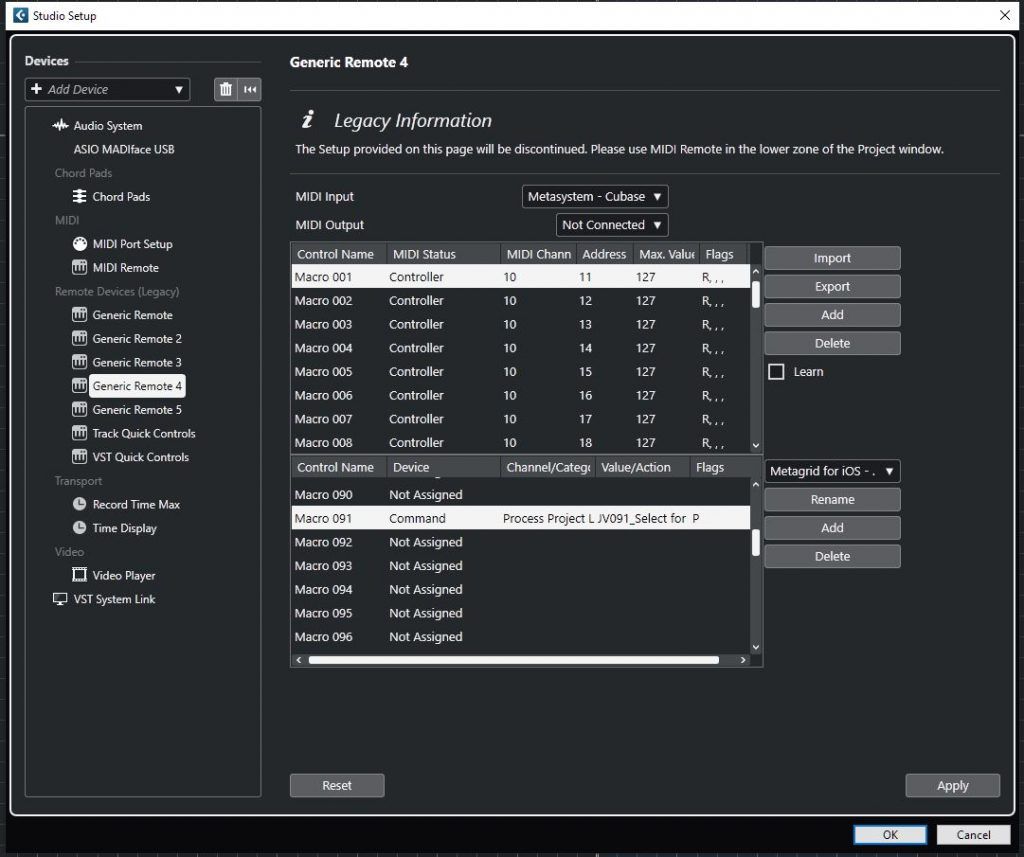 In the Studio Setup, I chose Generic Remote 4 which is my Generic Remote for Metagrid user macros, and assigned my newly created PLE command to Macro 091.
As a last step, I assigned User Macro 091 to my button in Metagrid, choose Integrations > Cubase, search for 091 in the user macro list, and that’s it. Now, as soon as I press this button, all the tracks with #DM in their names get selected and are ready for recording. The good thing is, should I want to use another set of instruments, I can now easily append #DM to the names of these instruments and the button keeps working.
The rest of the buttons are all functions already integrated into Metagrid, so it’s as easy as selecting the appropriate function and adding it to the button. From left to right, the names of the functions are: Activate Metronome, Nudge -1 Bar, Nudge +1 Bar, Go to Left Locator, Undo, StartStop, Record.
With this setup, I can select all orchestral tracks in my template, choose a preset, hit record and record a couple of bars, undo if it’s a bad take, do it again, go back to the left locator where I started the recording, select another instrument or section, record the next pass, and so on. Everything inside Metagrid Pro, without touching the mouse or the keyboard.
And if I want to go back to my standard Cubase grid, it’s just a tap of a button away.


